Lab: Use Postman to perform API requests on NSX
In this lab I am working with the following software and versions:
| Software | Version | Filename |
|---|---|---|
| VMware NSX | 4.0.0.1 | nsx-unified-appliance-4.0.0.1.0.20159694.ova |
| Postman | v9.29.0 | Postman-win64-Setup.exe |
Some tasks can only be performed with the use of API requests as there is no way to configure these tasks using the GUI. The API can also be useful when I programatically want to “automate tasks”. With the API I can perform Create, Read, Update and Delete (CRUD) operations on NSX objects.
- Prepare the environment so I can use the NSX API to perform management tasks
- Create a new NSX Group called “NSX Academy Web VMs”
- Get (Read) a list of the NSX Groups that are currently configured
- Rename (Update) the NSX Group from “NSX Academy Web VMs” to “NSX Academy App VMs”
- Delete the “NSX Academy App VMs” NSX Group
The Steps
- STEP 1: Download Postman
- STEP 2: Start Postman
- STEP 3: Turn SSL certificate verification off in settings
- STEP 4: Create a workspace
- STEP 5: Create an environment
- STEP 6: Create an collection
- STEP 7: Perform my first GET API request on NSX (read the groups)
- STEP 8: Perform my first PATCH API request on NSX (create and update the group)
- STEP 9: Perform my first DELETE API request on NSX (delete the group)
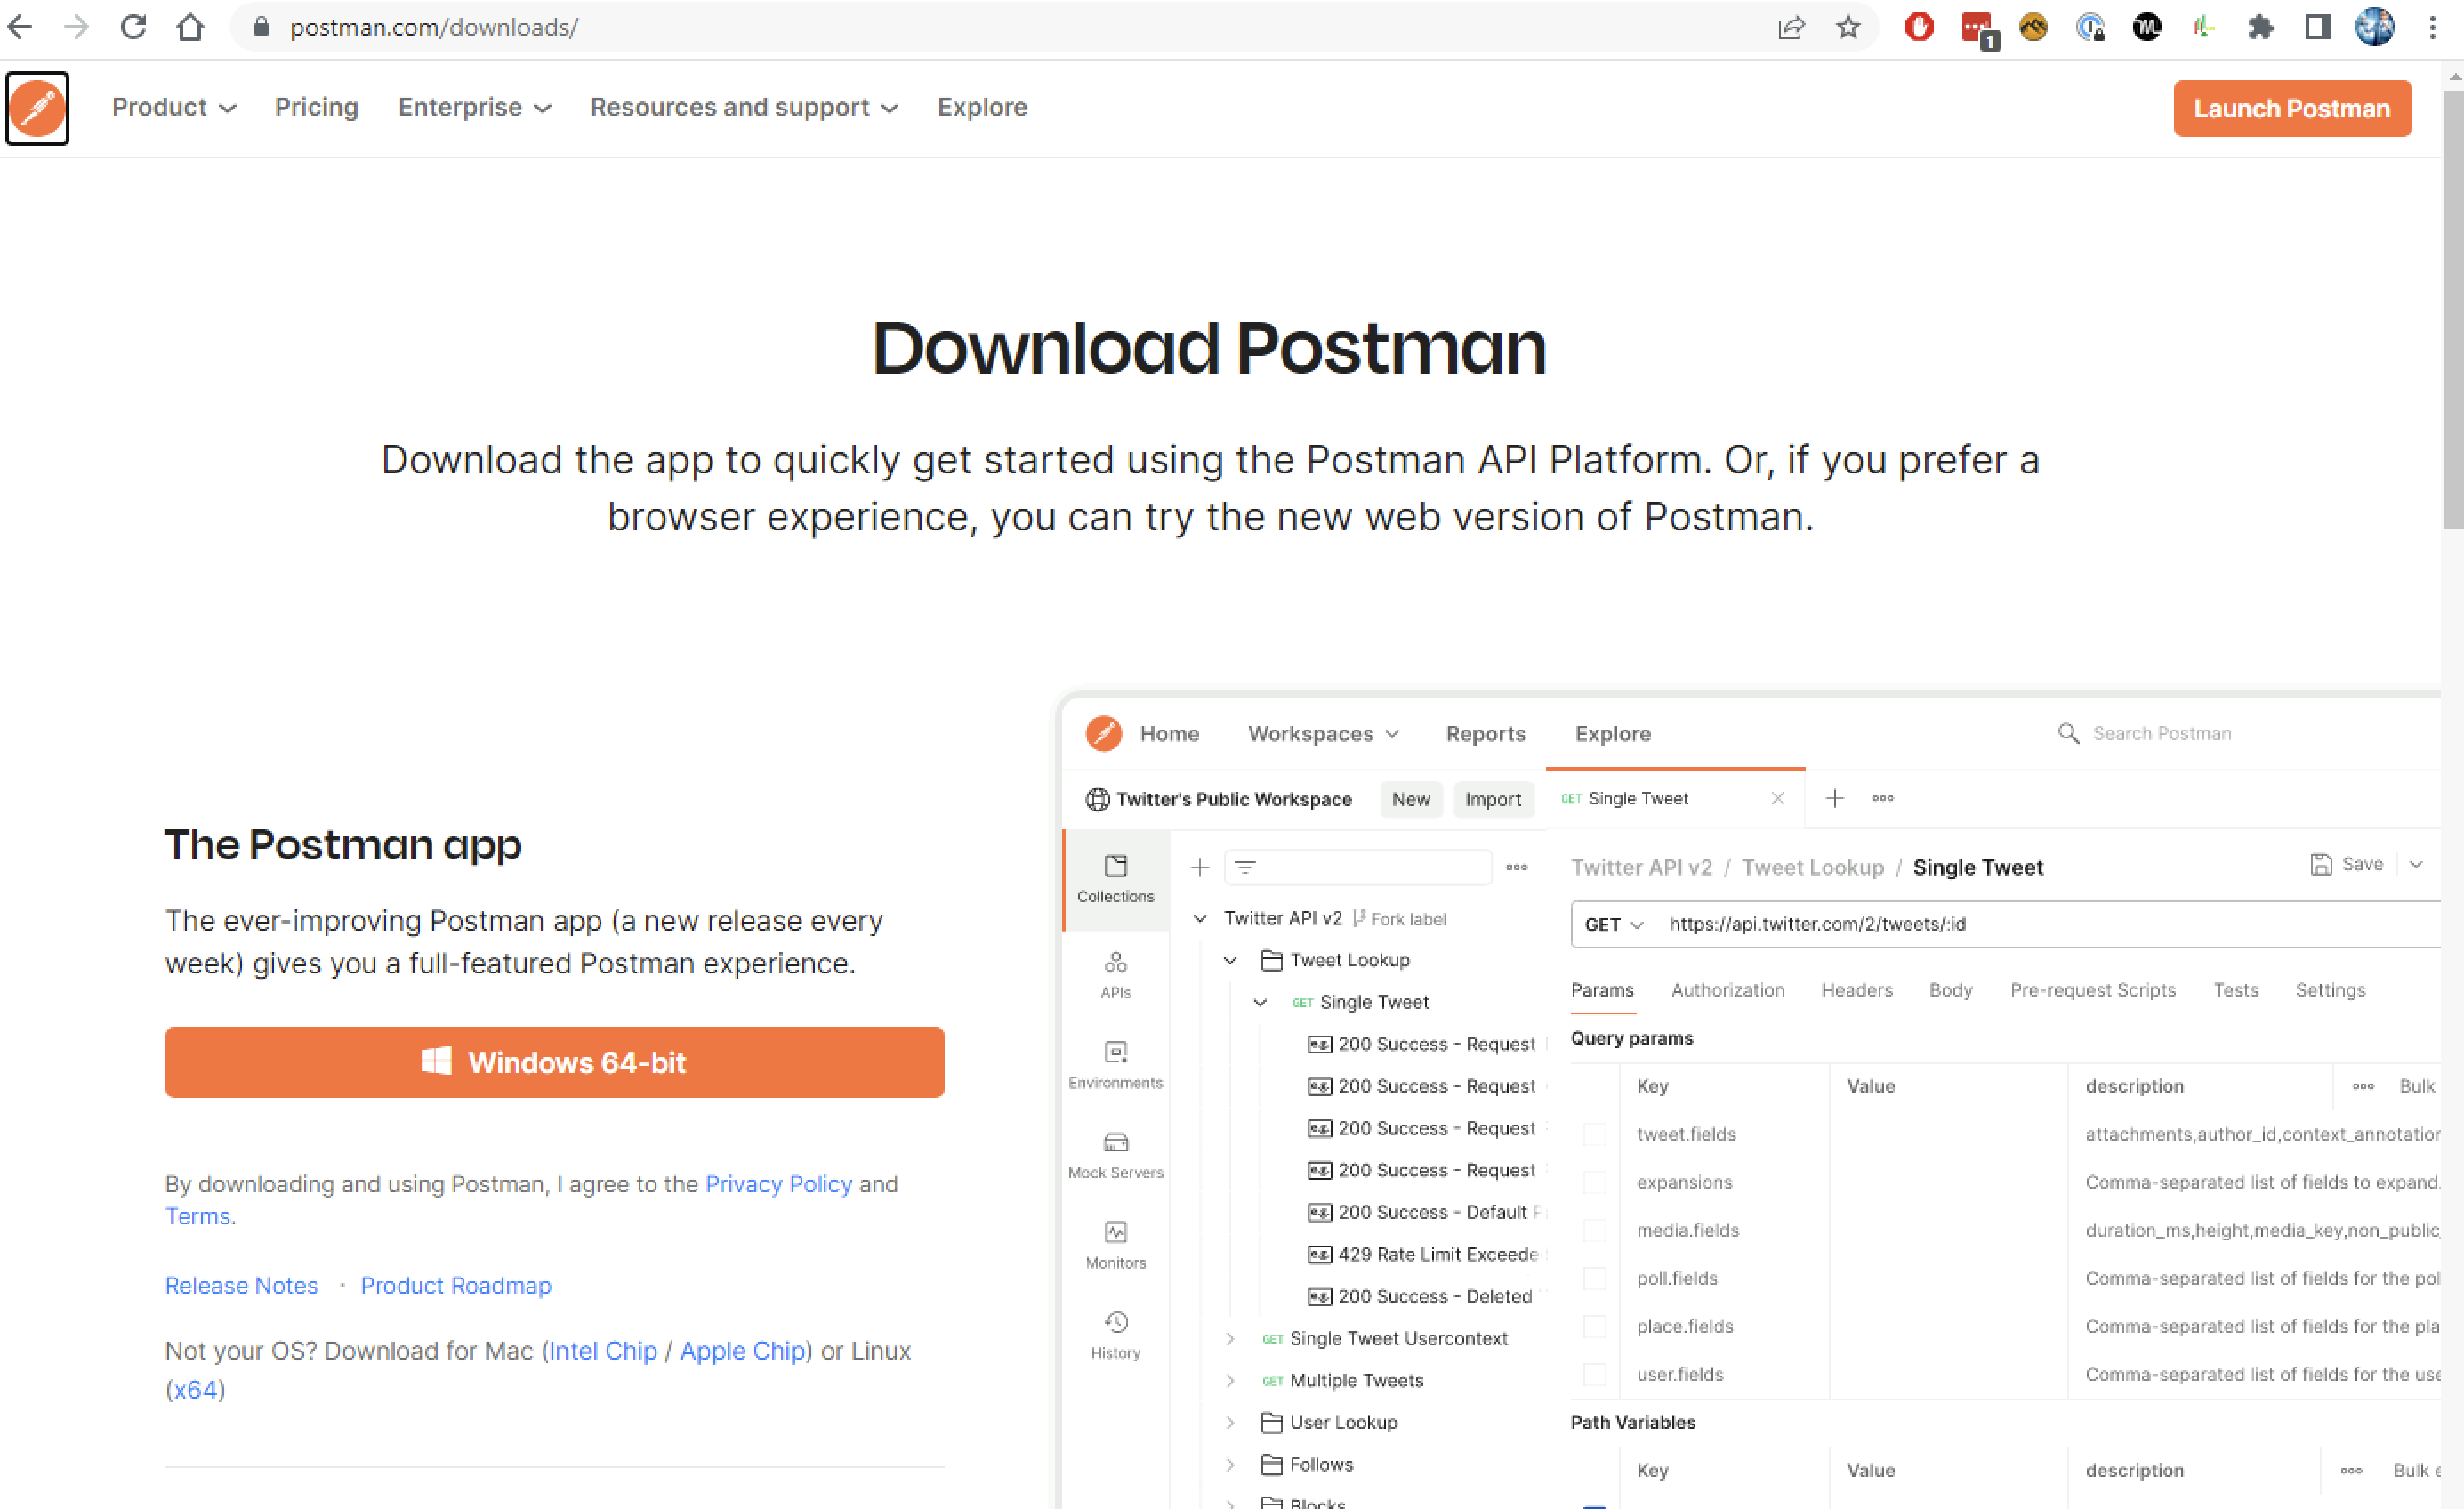
STEP 1: Download Postman
Download the Postman desktop application for my preferred platform from the Postman download page.
I will be using the Windows version in this article.
Once downloaded install the application with some fairly easy next, next, next and finish operations.
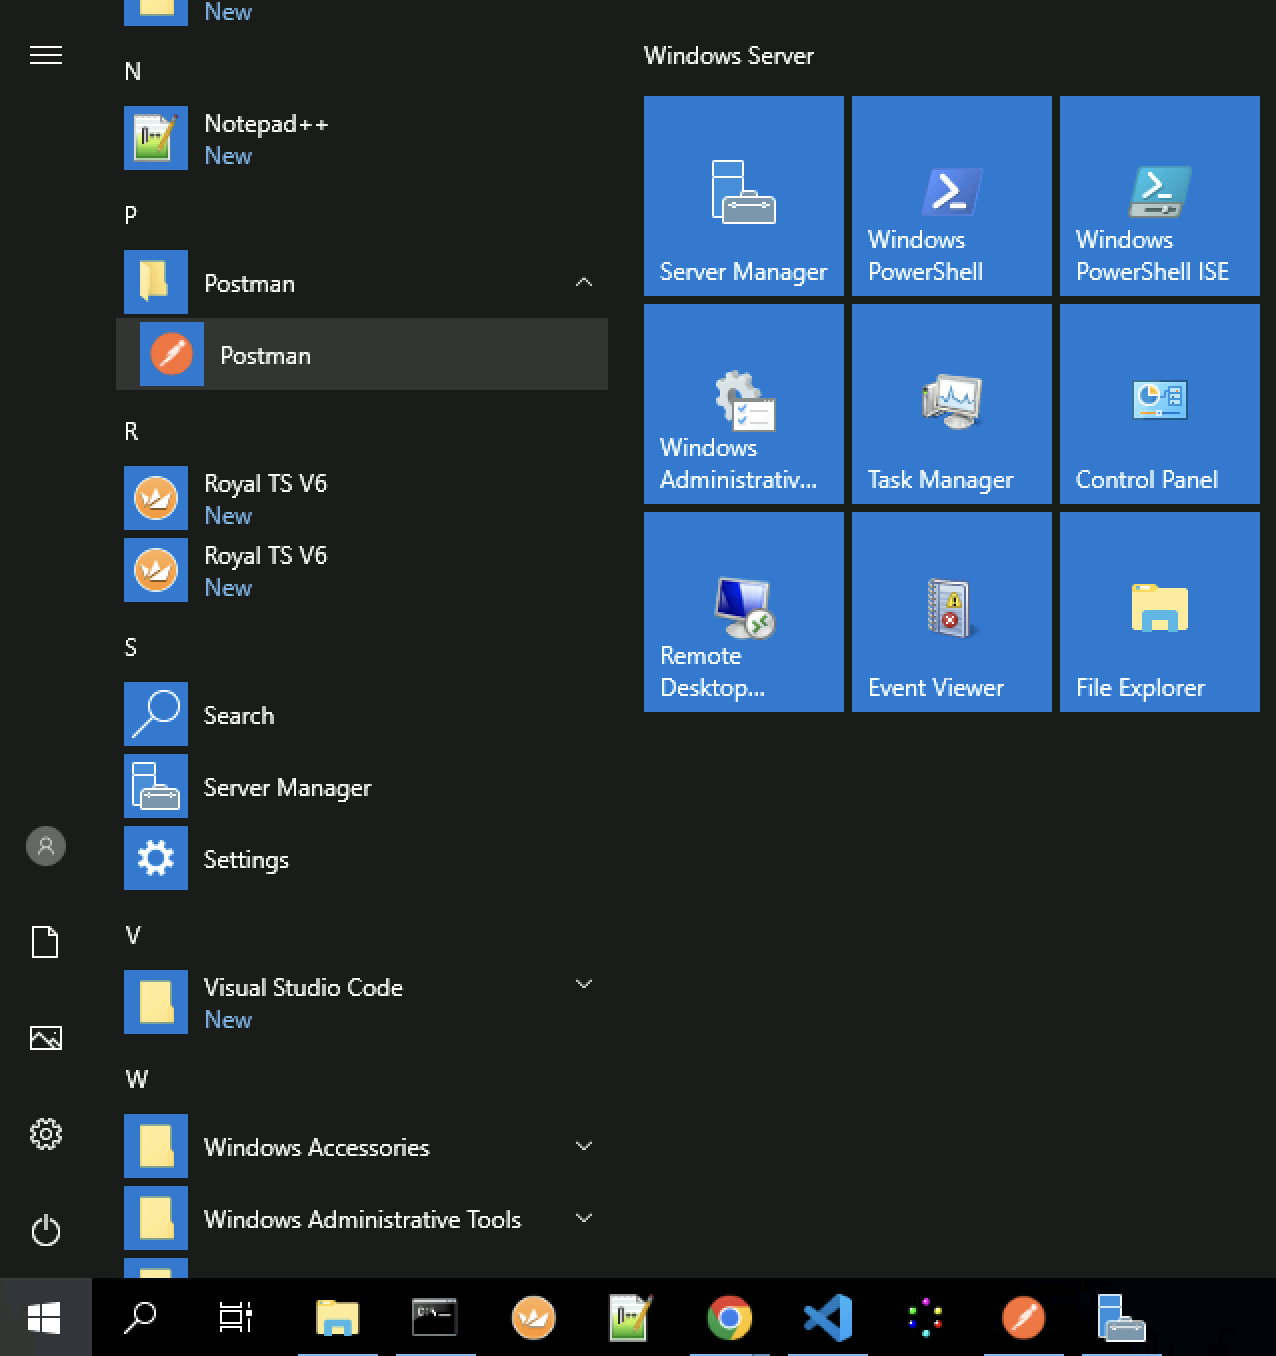
STEP 2: Start Postman
After the installation open the application trough the shortcut on the start menu or maybe I have a shortcut in the Desktop.
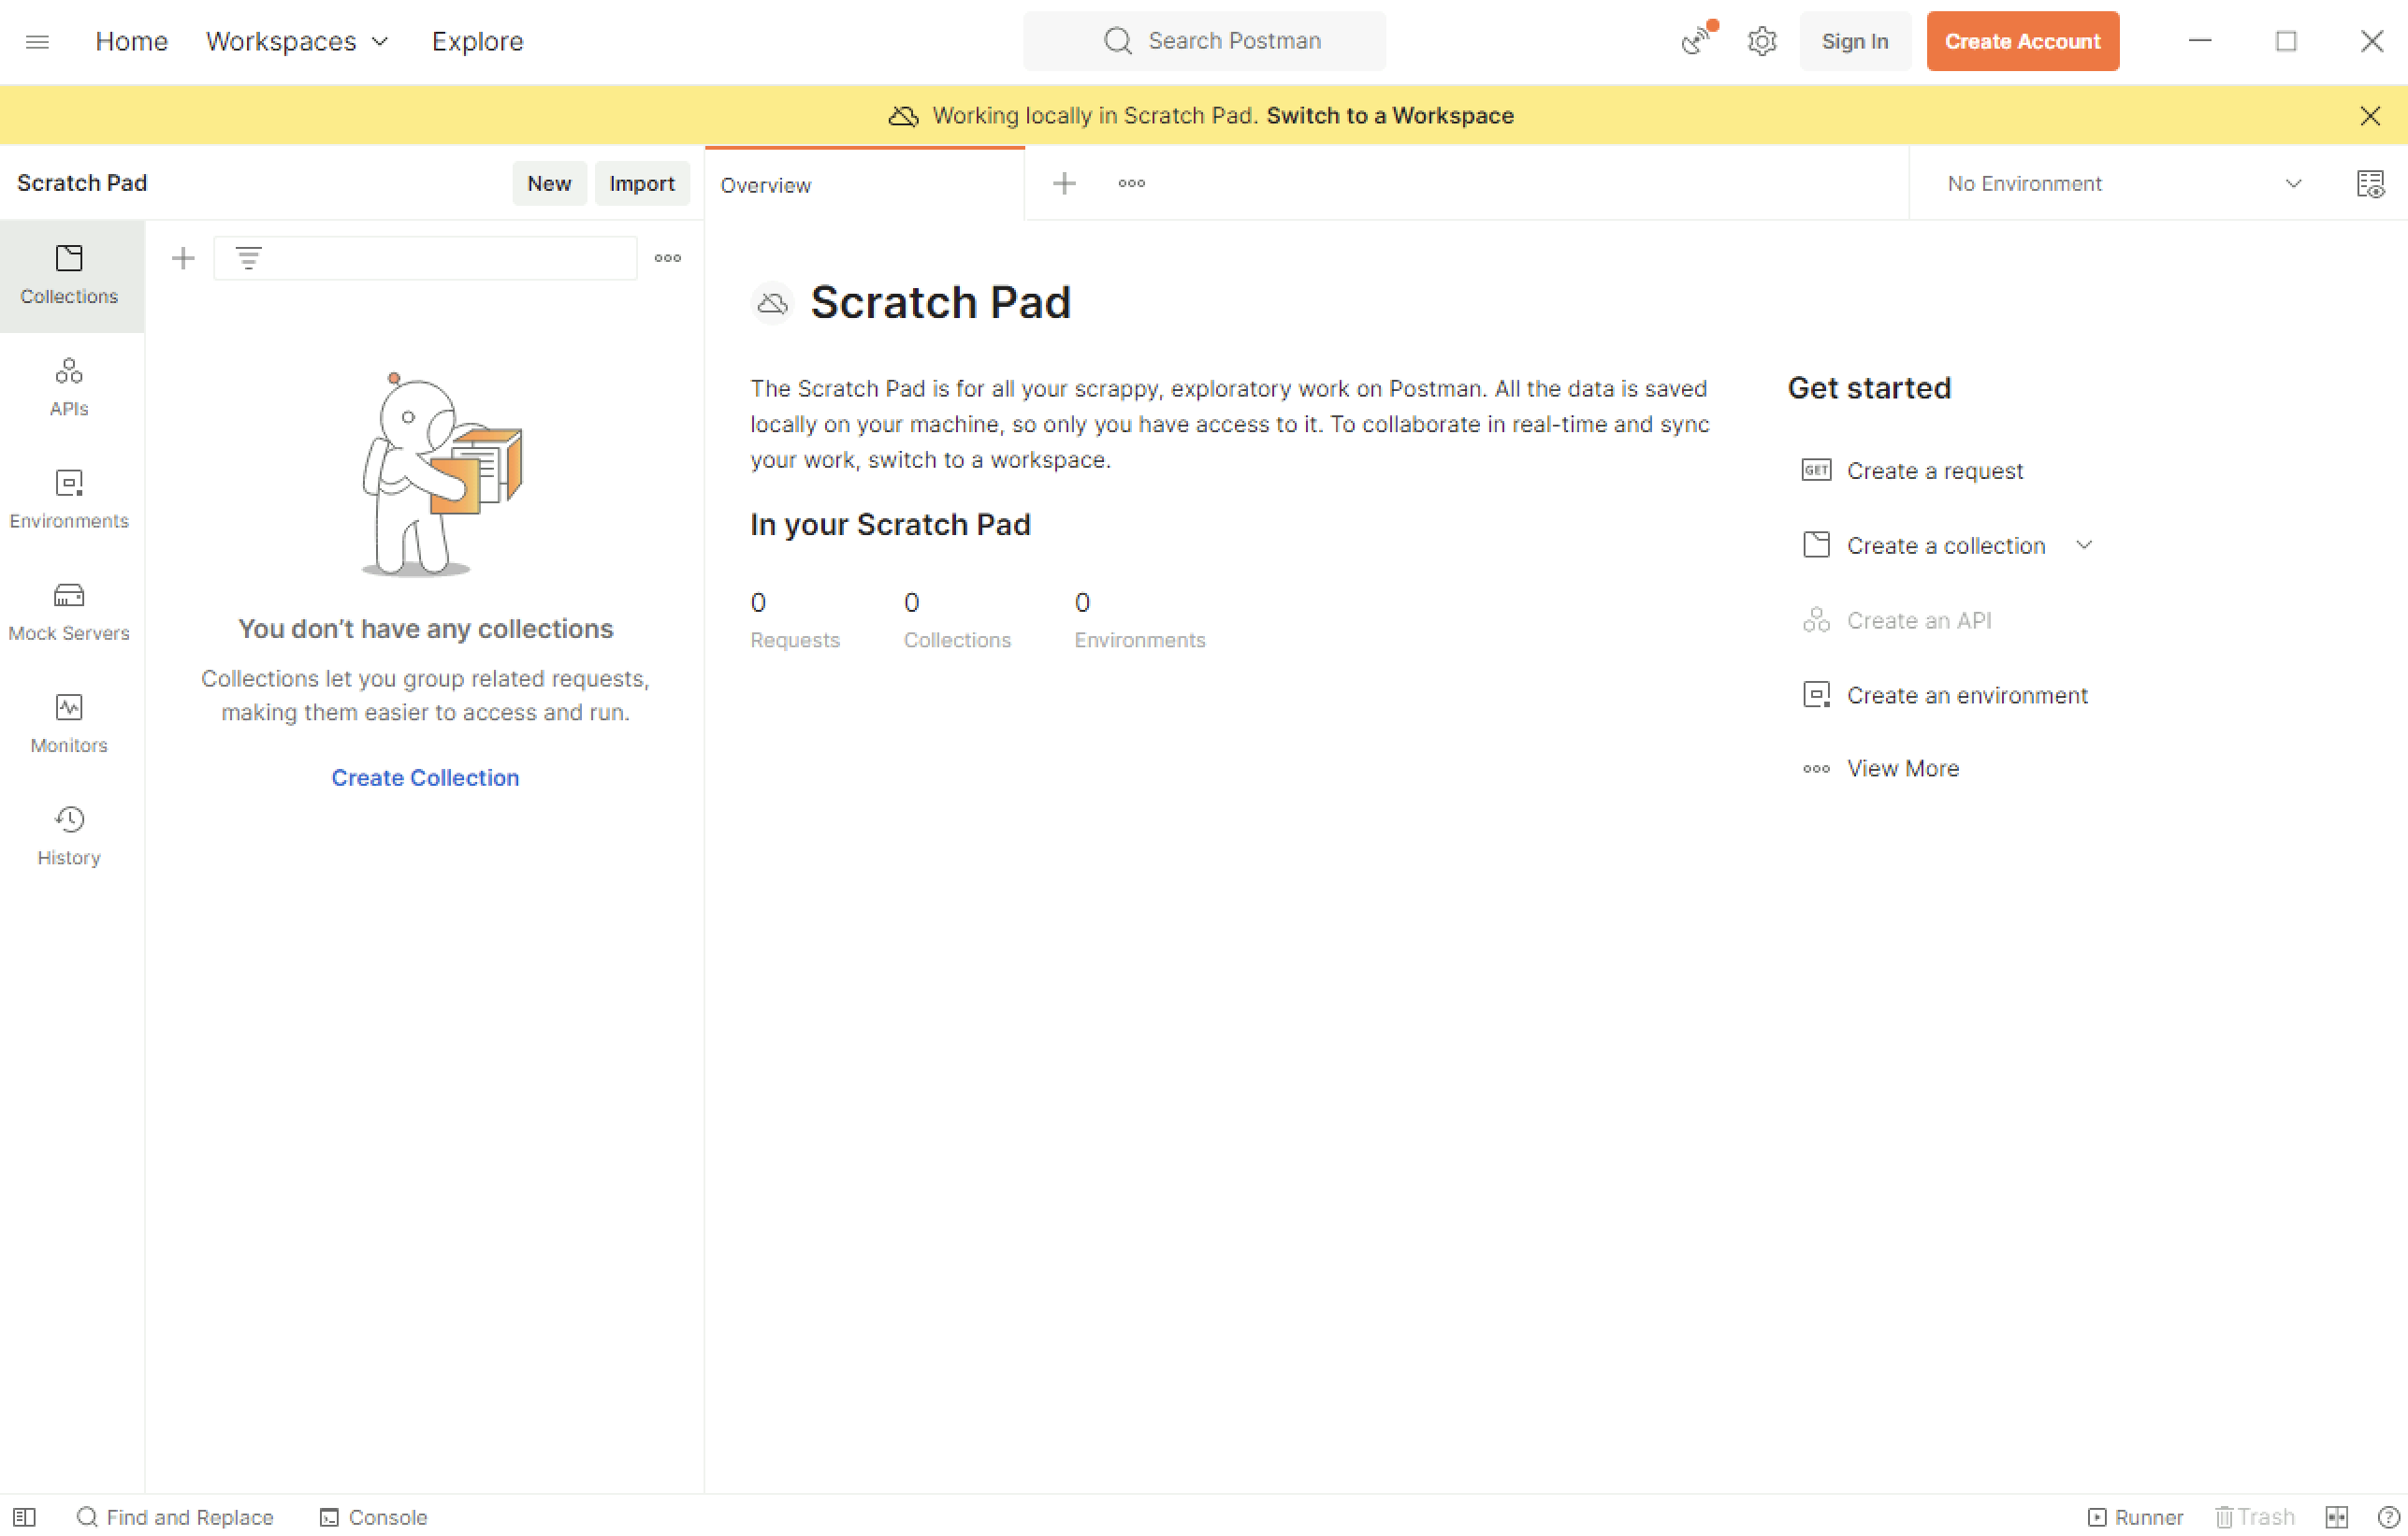
When I start the application for the first time I will have two options to use Postman.
- I can use Postman with local data (no account creation is required)
- I can use Postman with data stored in the cloud (account creation is required)
- I will be creating a new Workspace, Environments and Collections with API requests.
- When I create an account all these Postman “settings” will be saved in my account and I will be able to use them the next time on another computer where I log in.
I suggest that you create an account and log in before you get started so you can save all commands in case you need them later, or working from a new computer.
You will notice that looking up the API requests and the JSON inputs that belong to each request can be time consuming and its better to save them in the environment that you are actually working with them in.
This is how my screen looks like when I am not logged in.
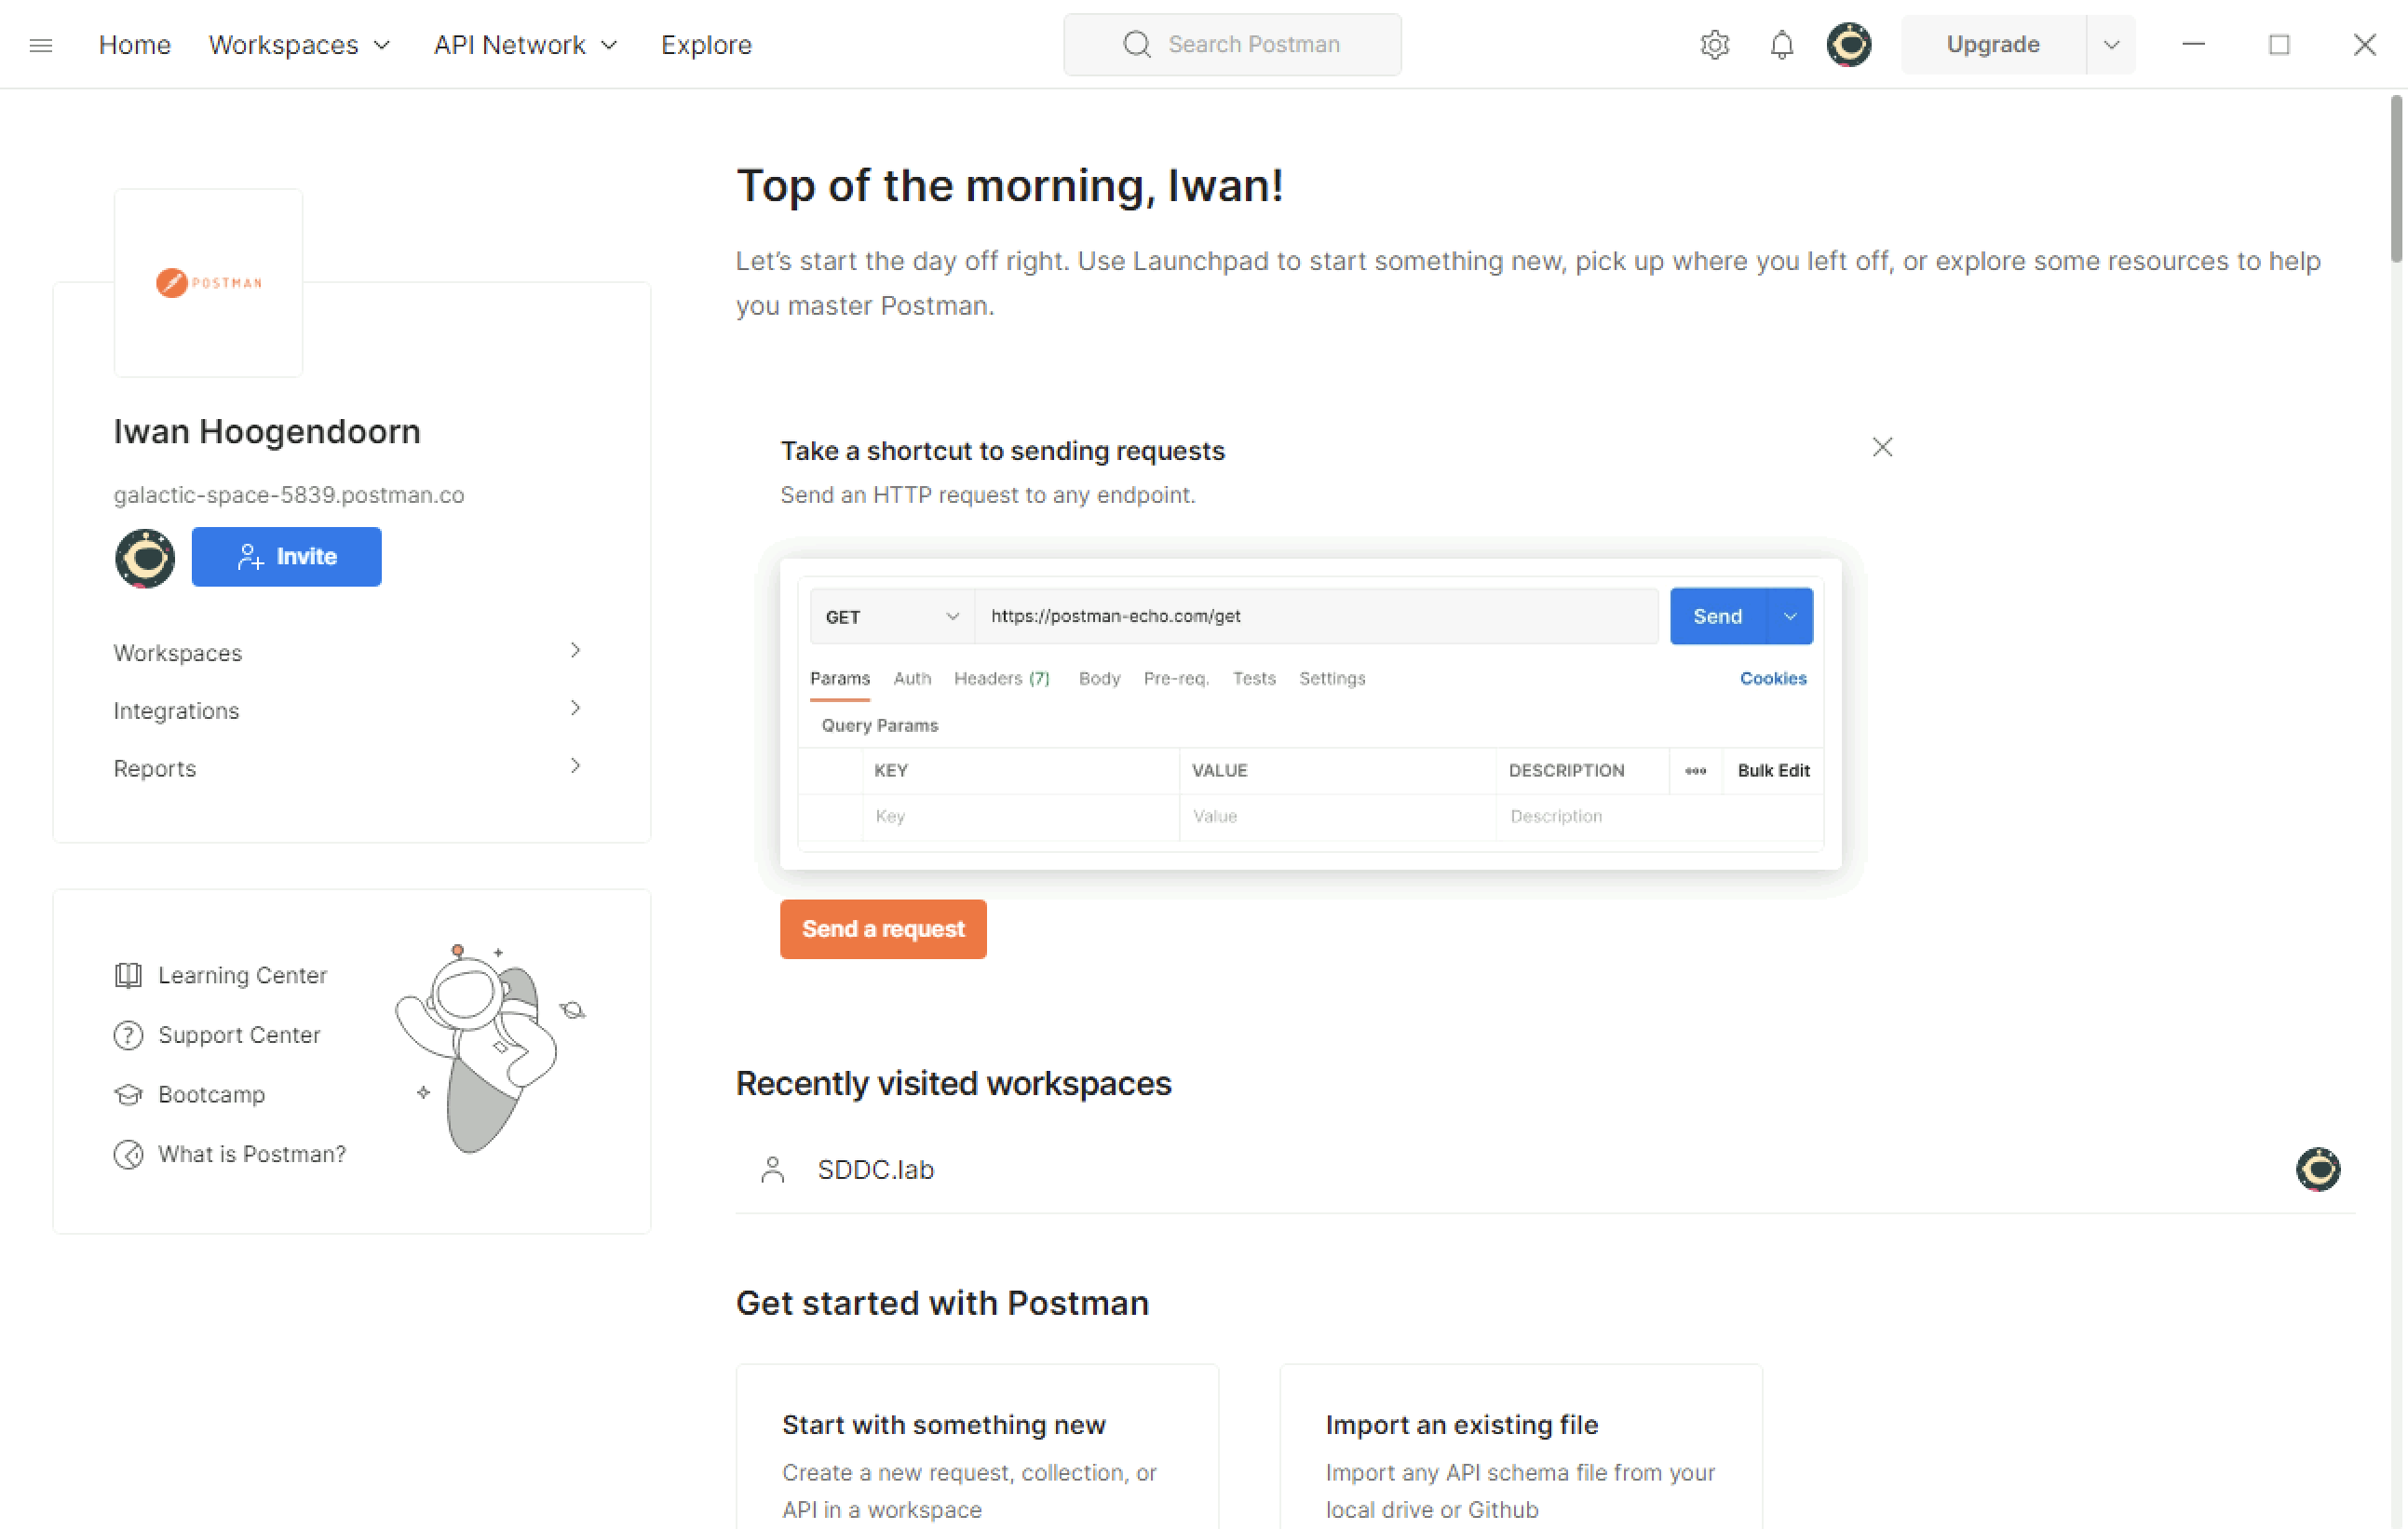
This is how my screen looks like when I am logged in.
Notice that I already have a workspace (SDDC.lab) created if I pay attention to the “Recently visited workspaces” section.
STEP 3: Turn SSL certificate verification off in settings
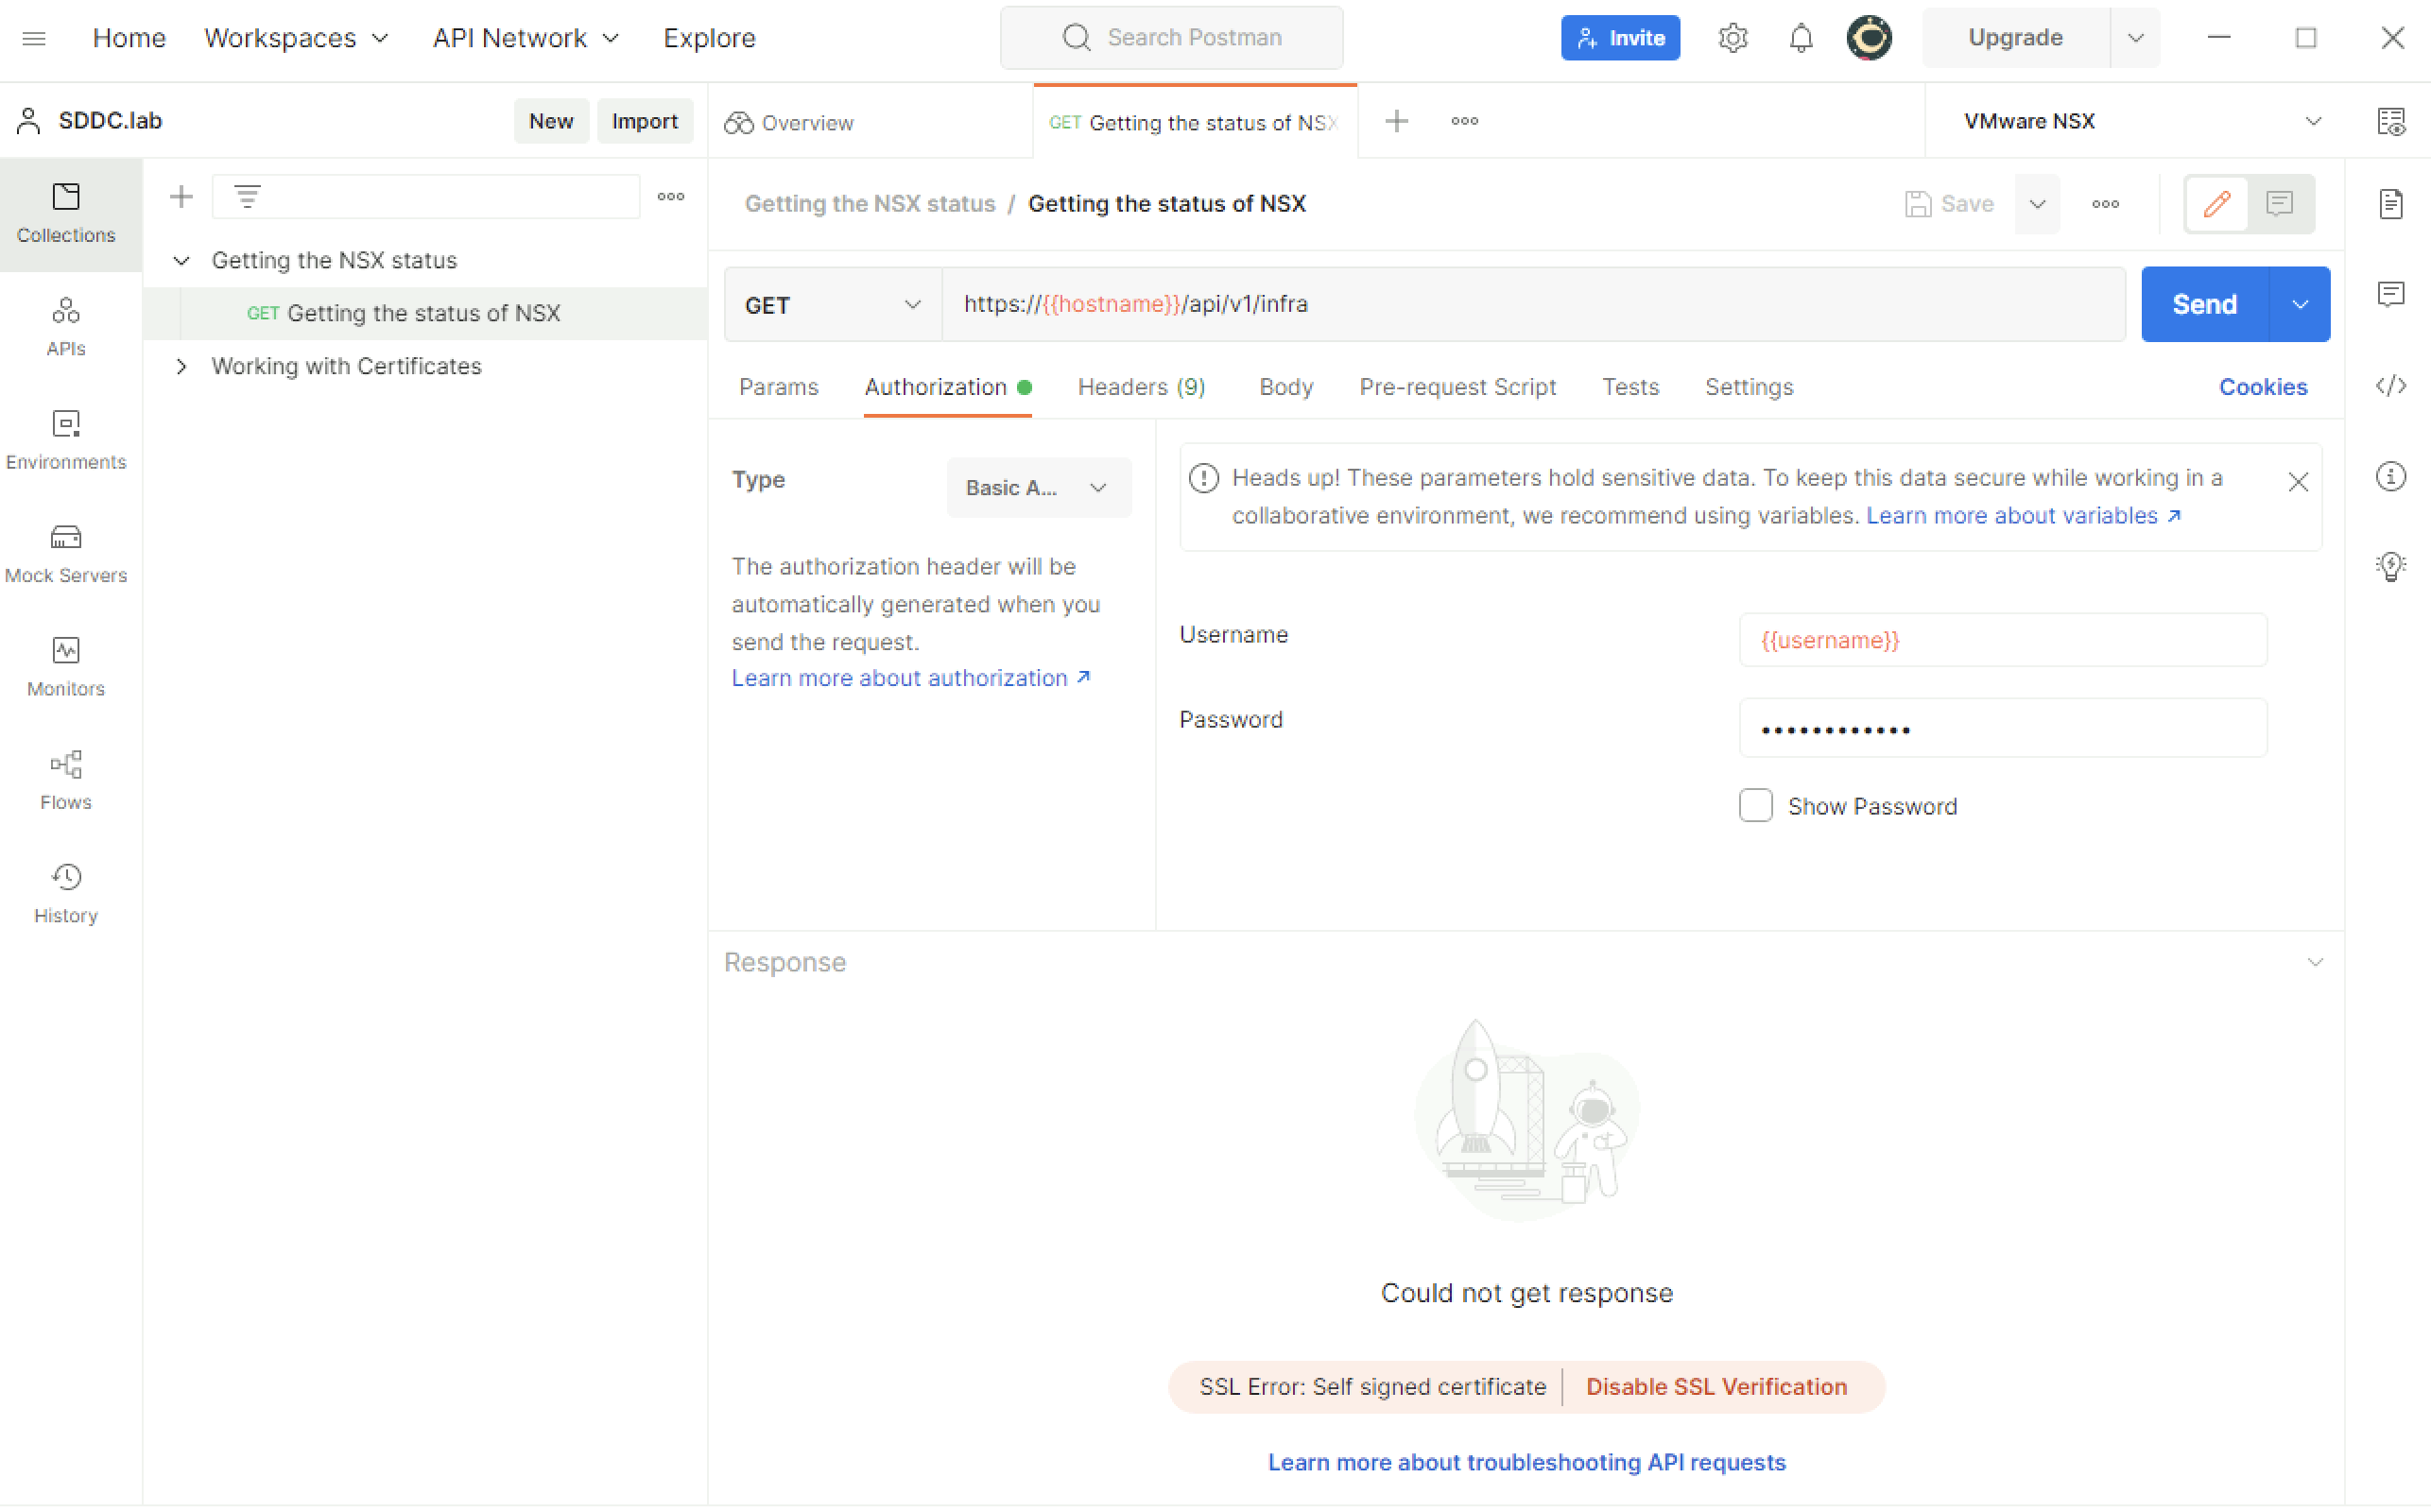
Before I can start with the execution of API request using Postman towards NSX I first need to turn off SSL certificate verification.
If I do not turn off SSL certificate verification I may get an SSL error like the screen below.
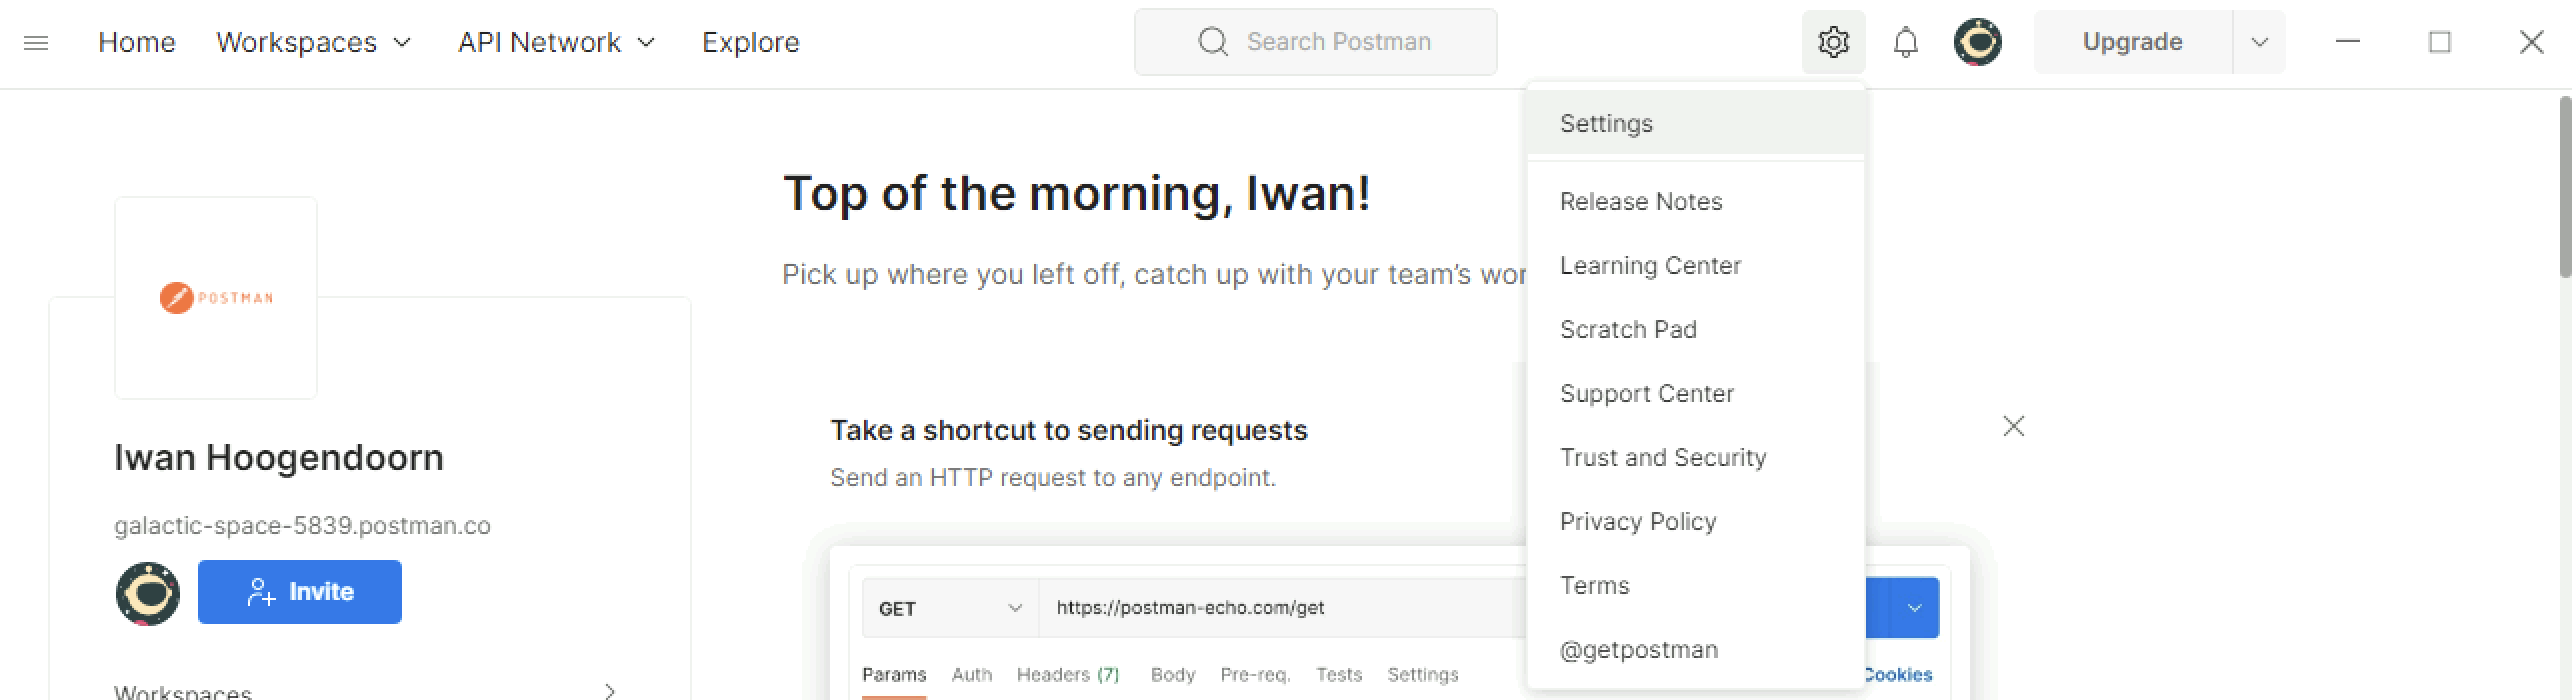
To turn off SSL certificate verification I need to go to settings by clicking on the settings wheel.
I see that the “SSL certificate verification” enabled.
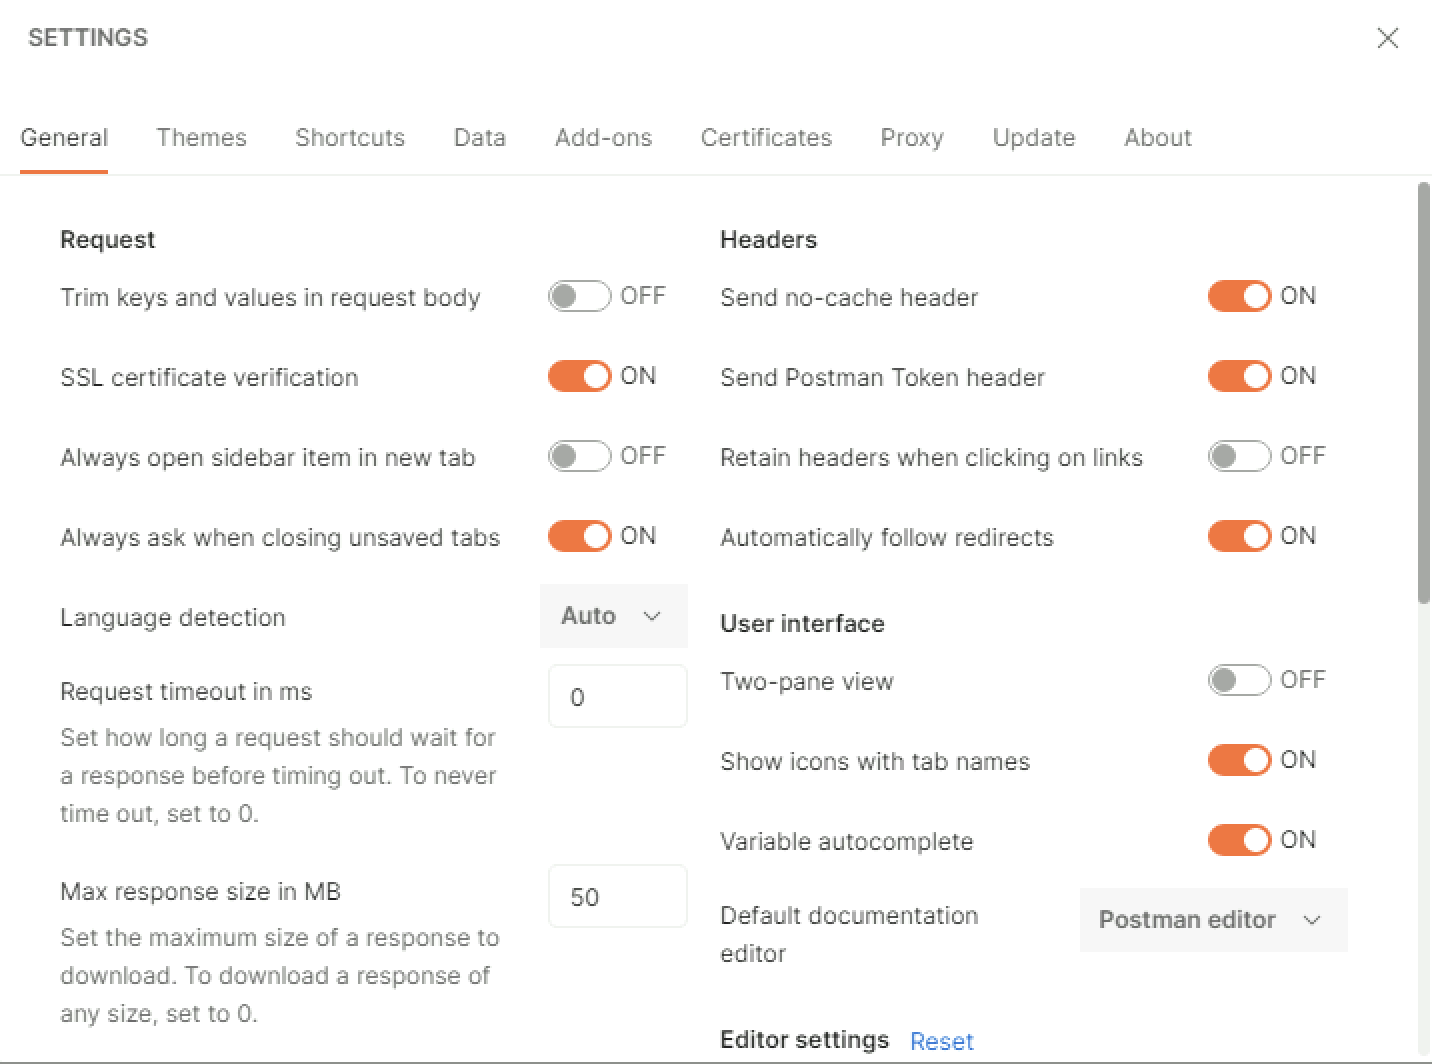
Make sure to disable the “SSL certificate verification”.
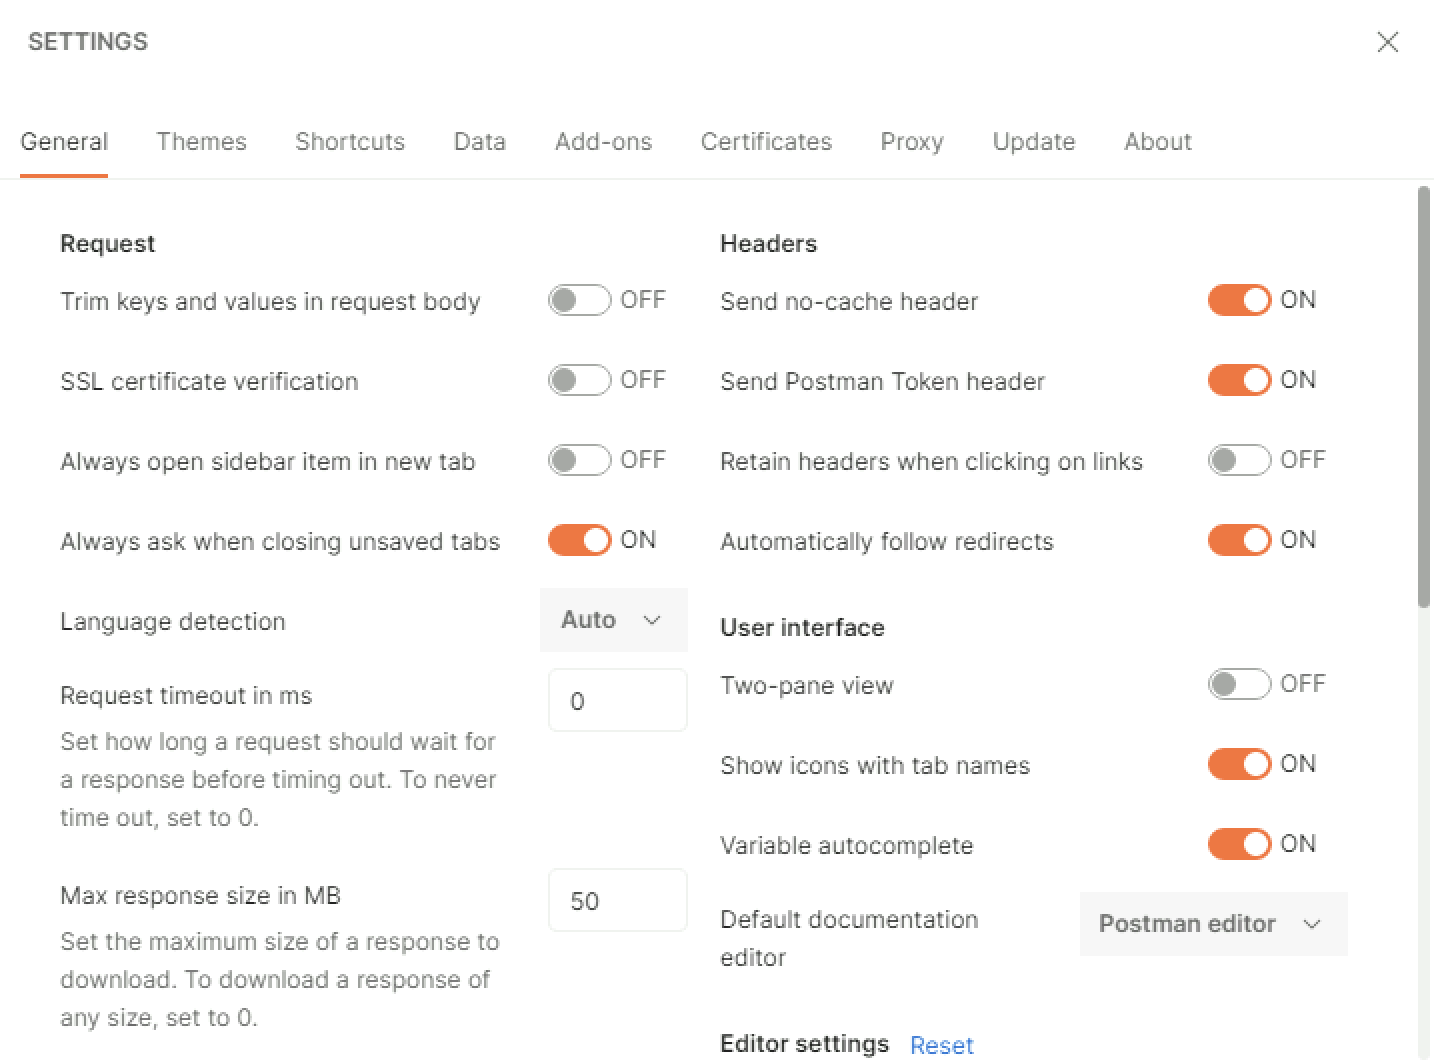
I do not have to click save because the change is saved immediately and I can just close the window.
STEP 4: Create a workspace
When I are working with multiple projects, products and environments it is good practice to create a workspace and inside this workspace I will create an environment and a collection in the next steps.

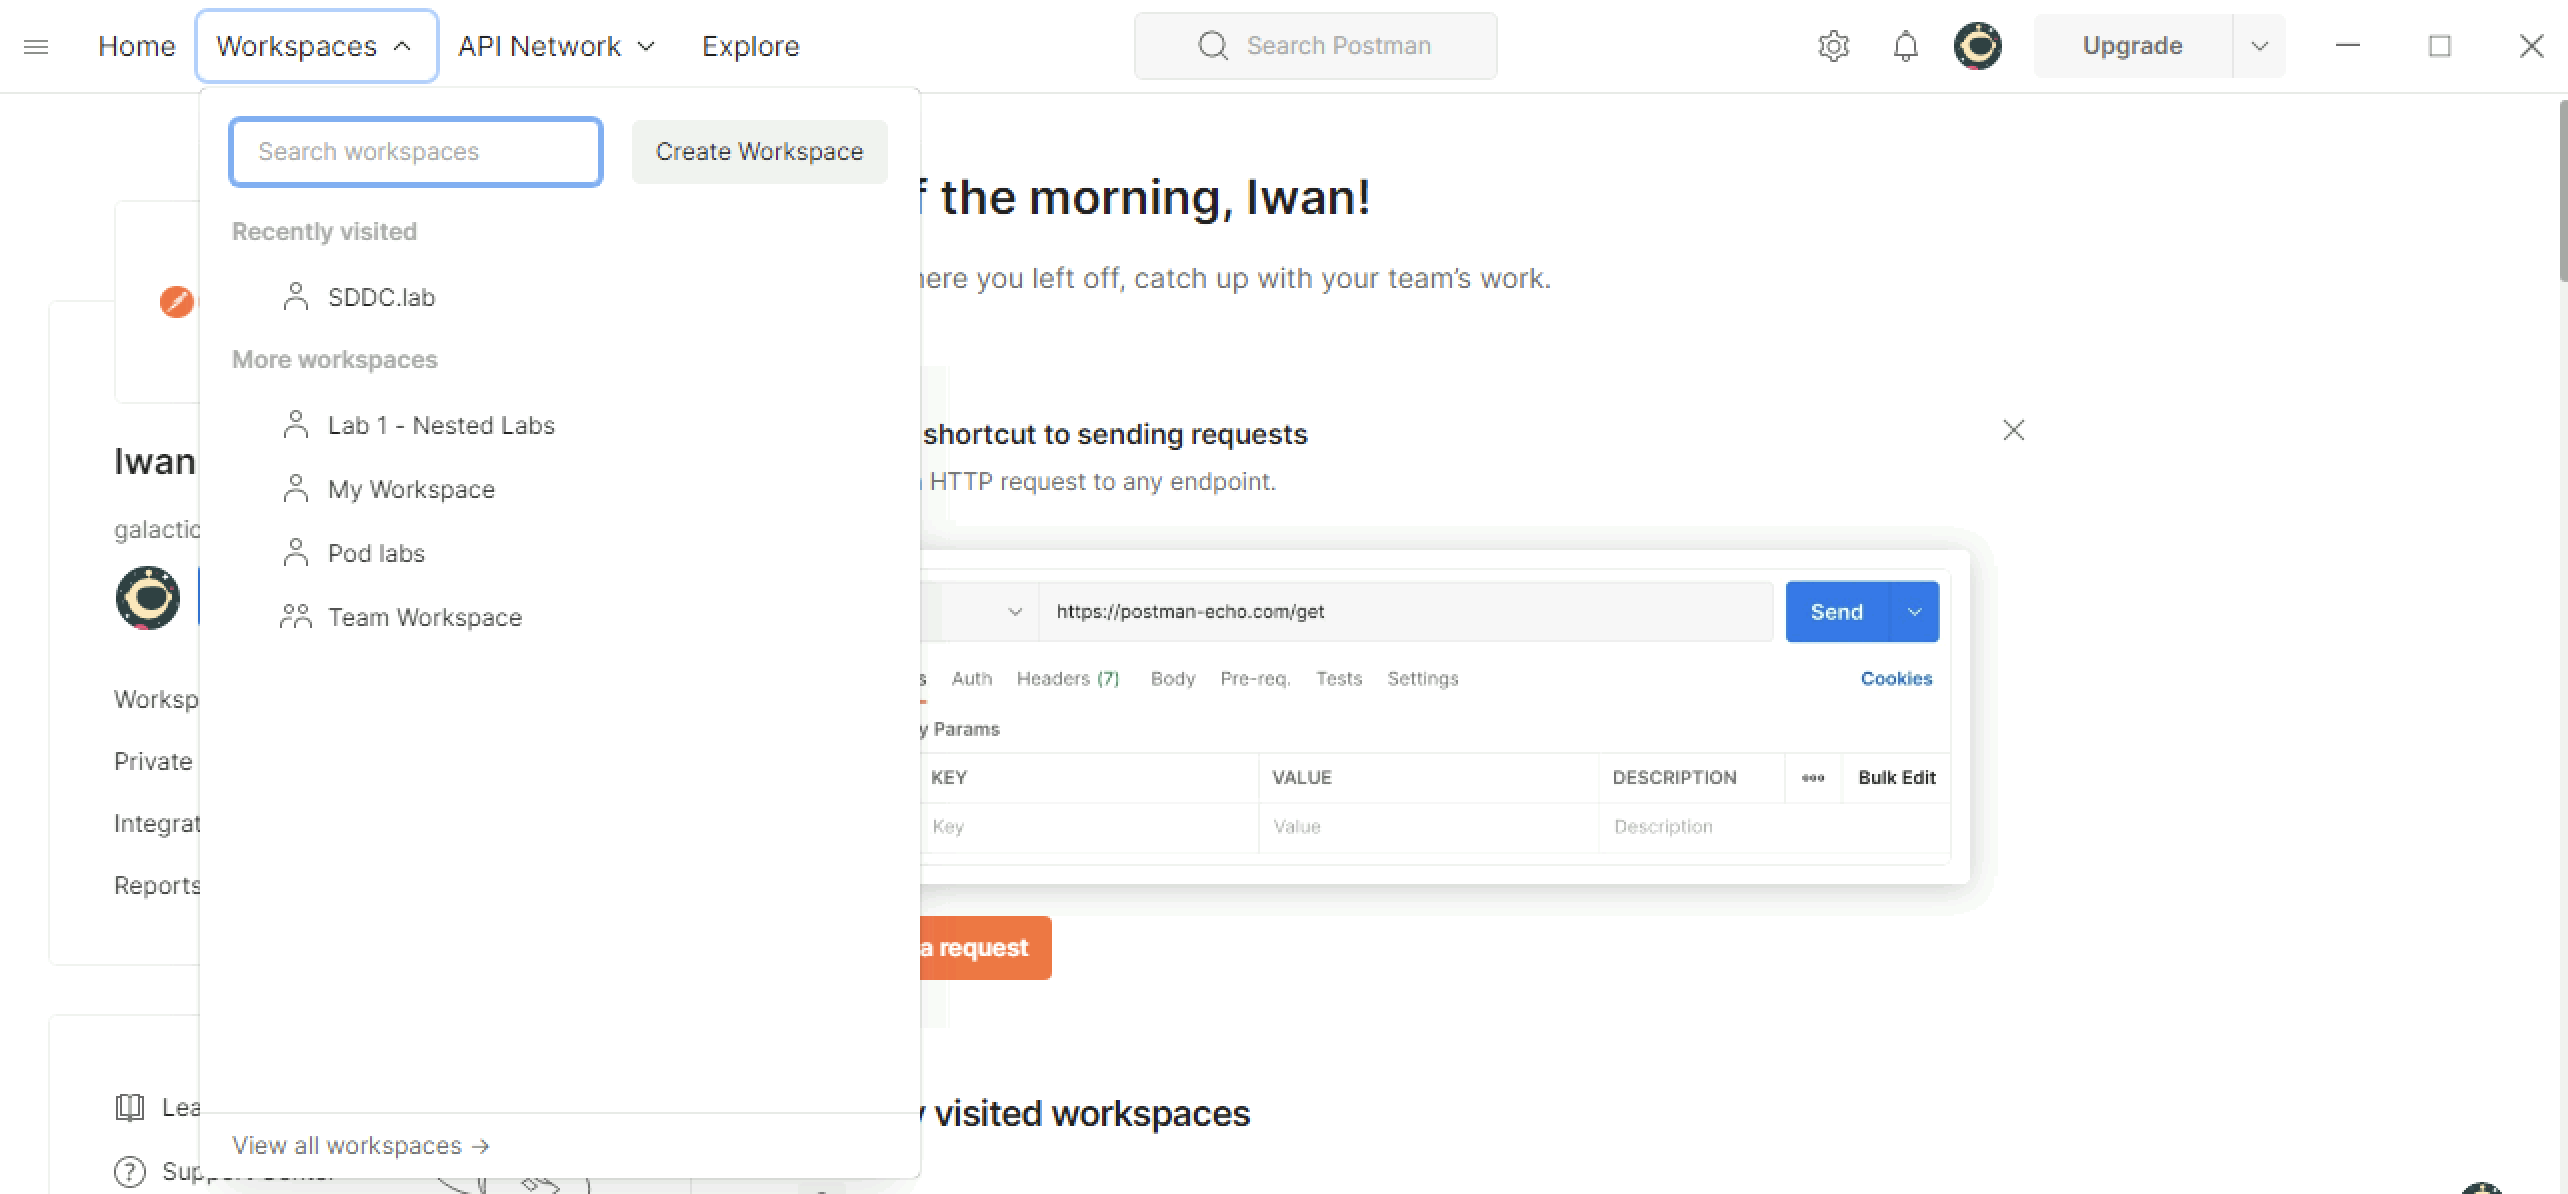
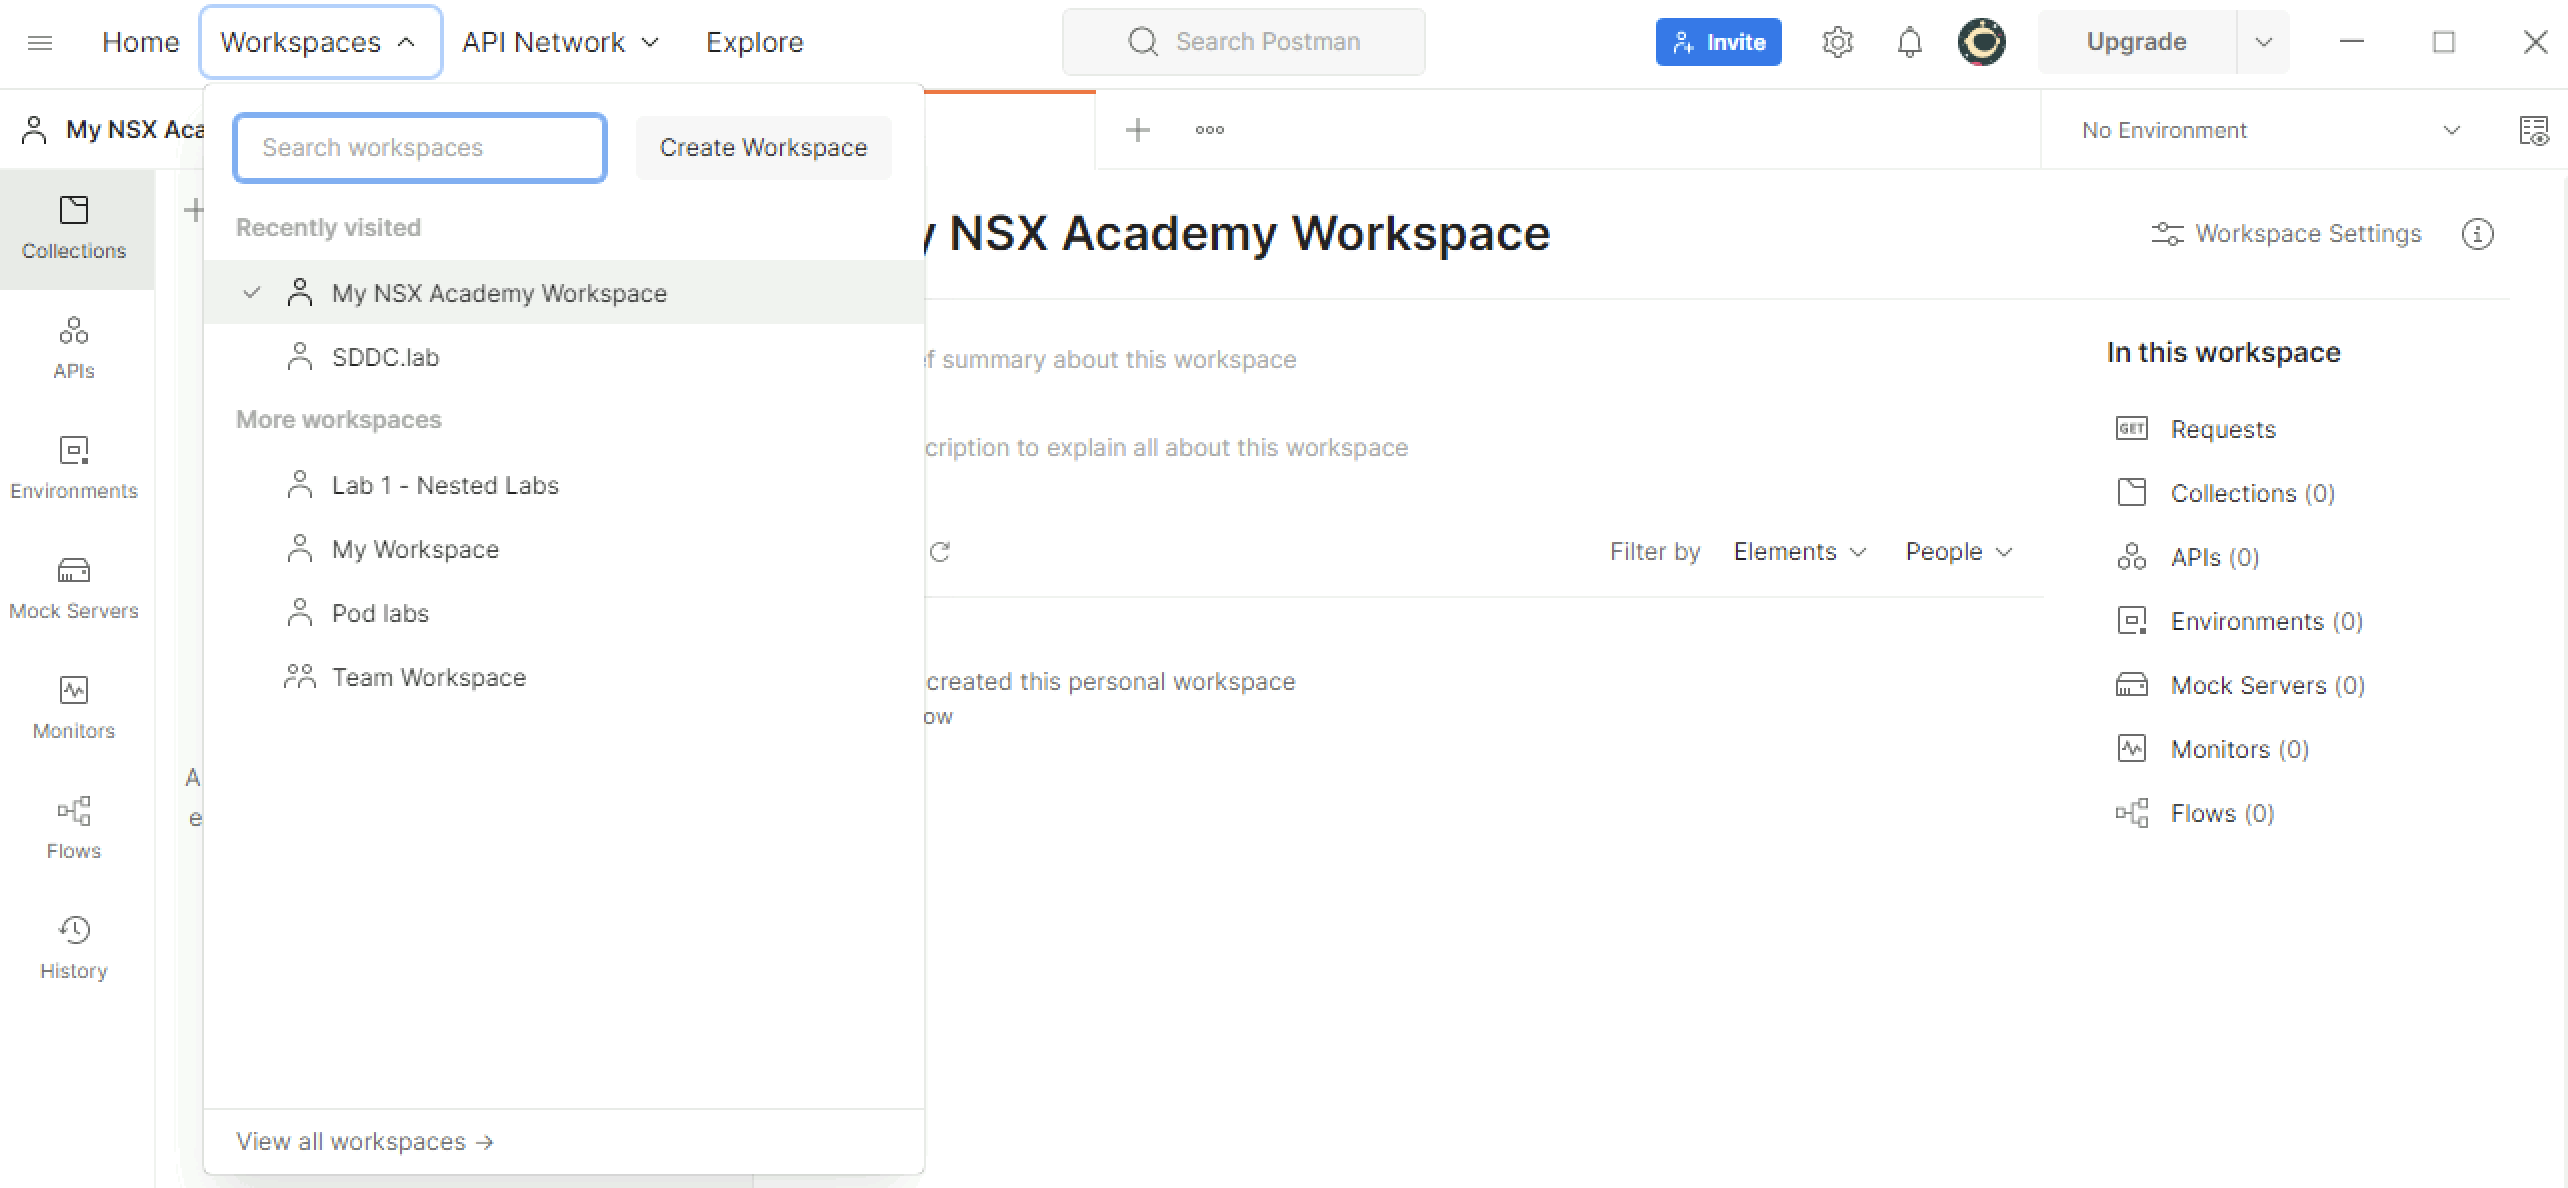
Click on workspaces to create a new Workspace.
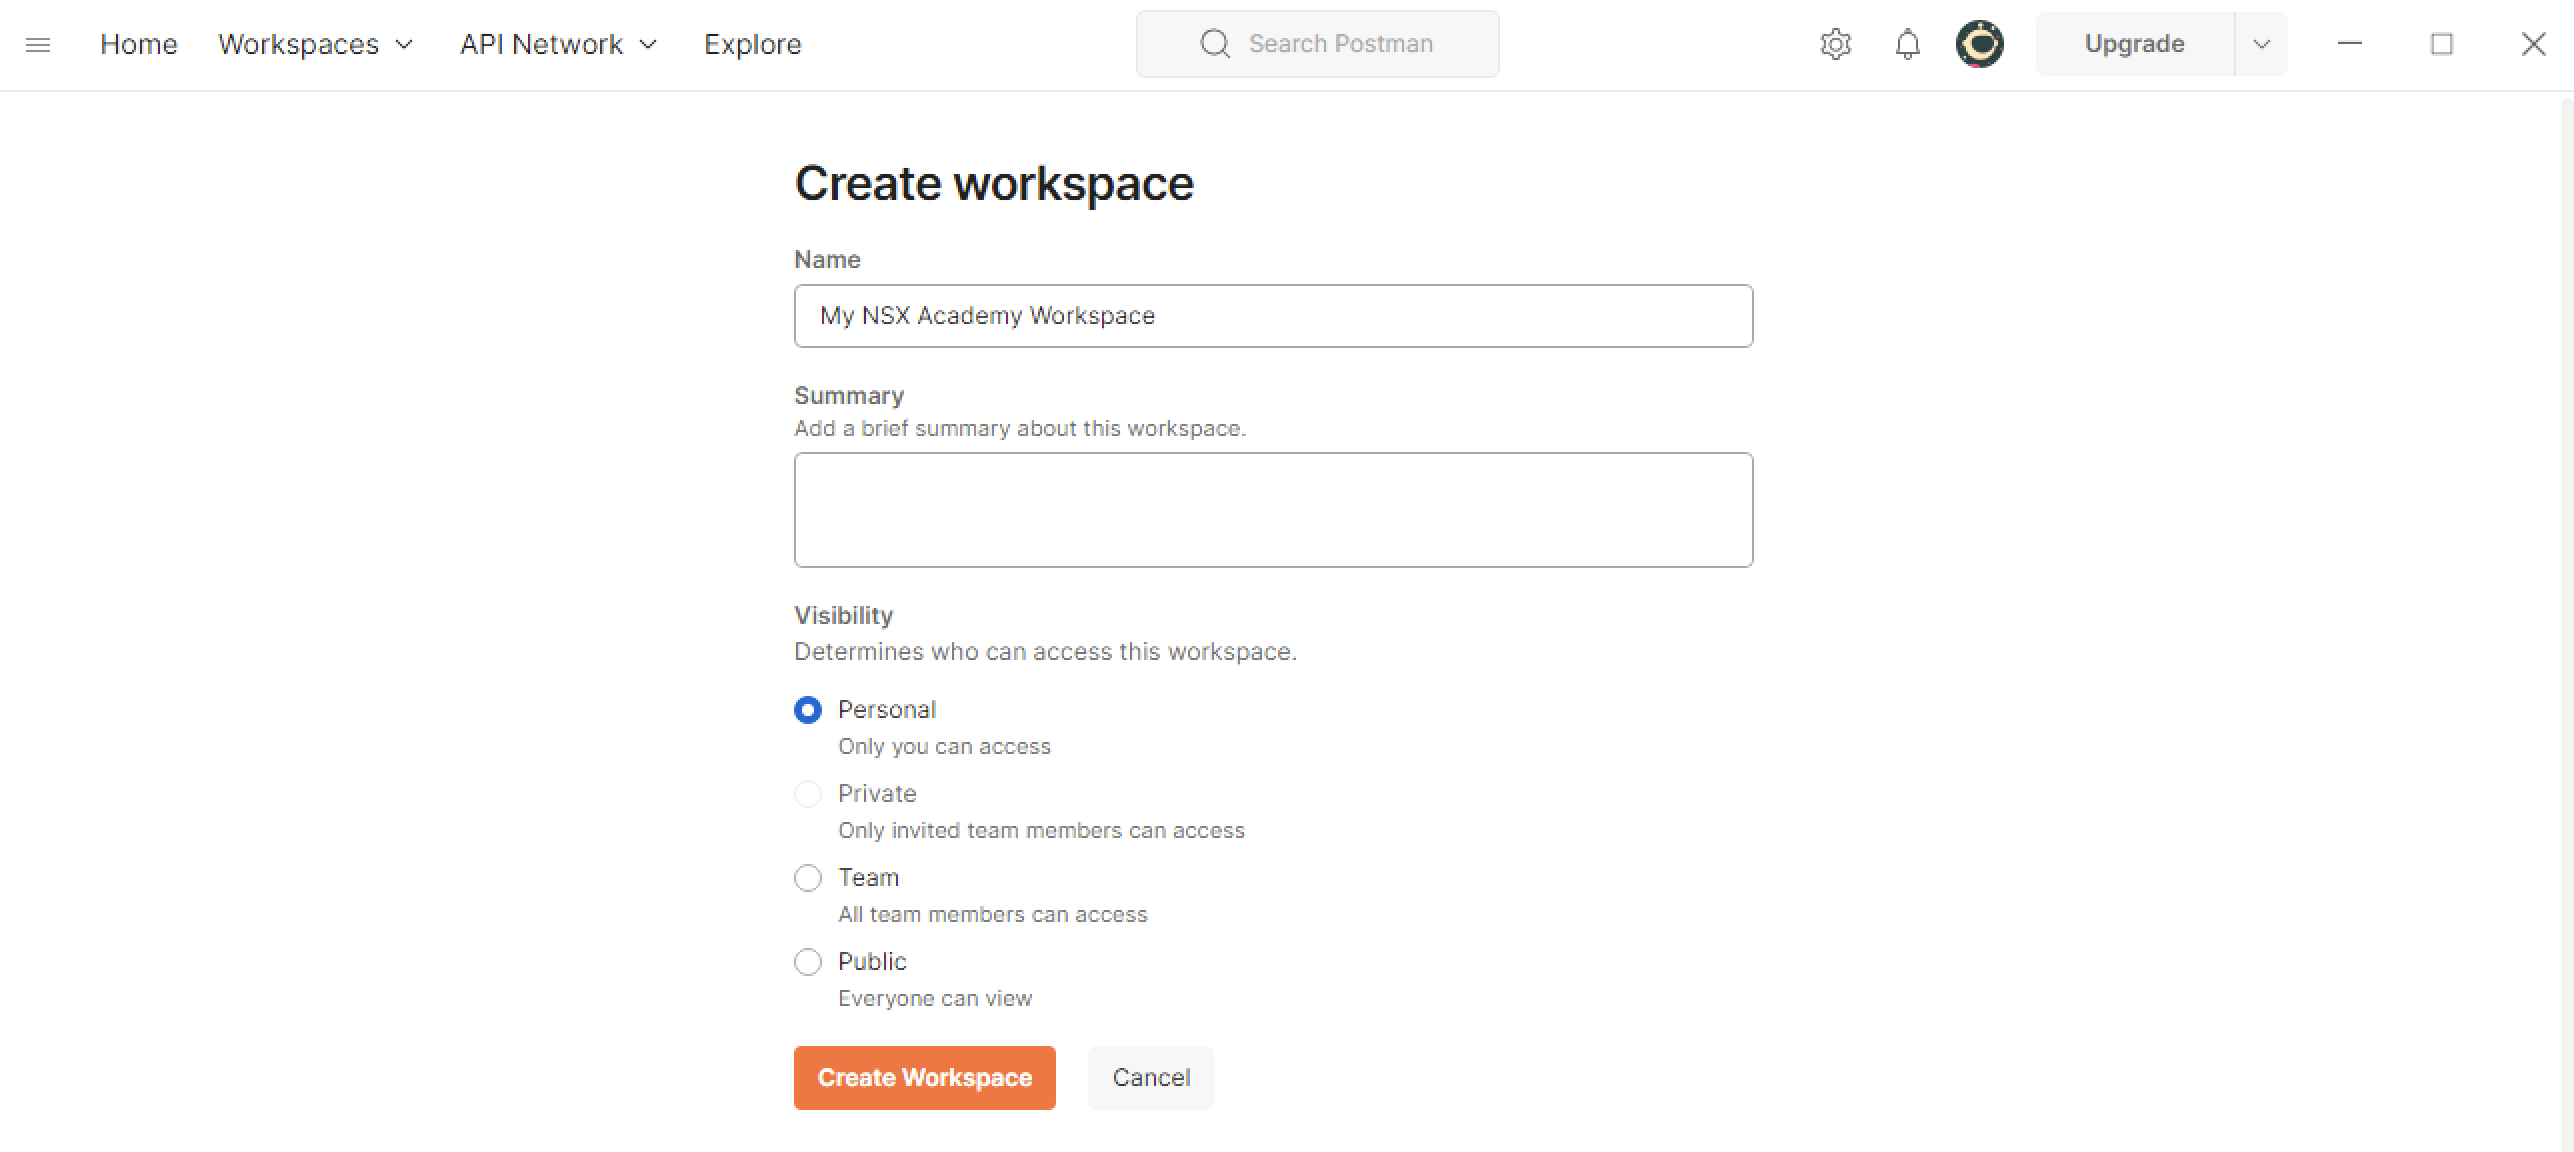
Give the workspace a name and select Personal in the visibility section.
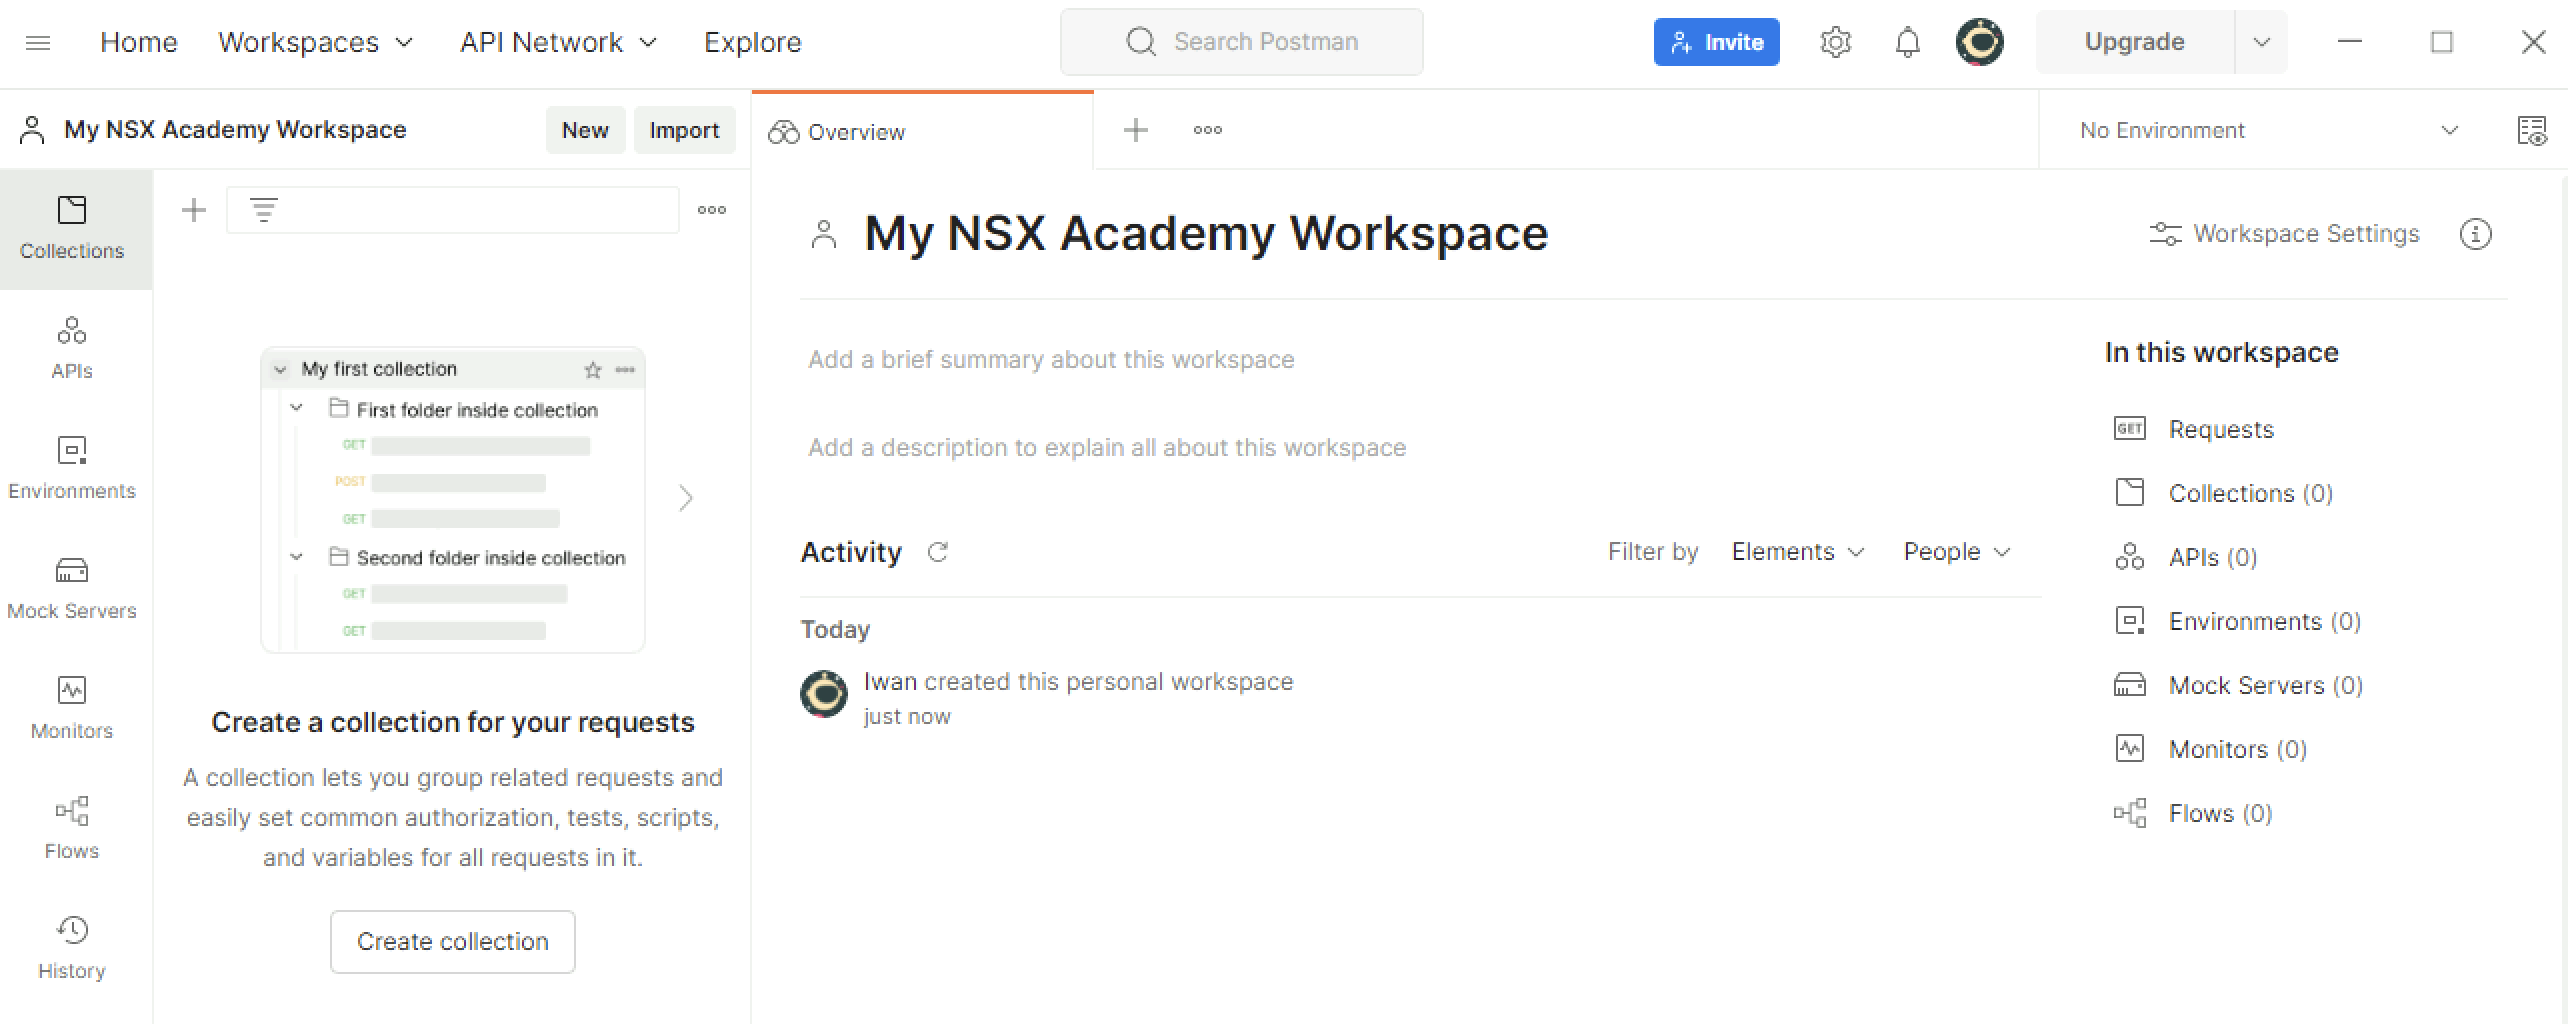
When I created the workspace I am immediately inside this workspace.
I can switch to other workspaces from the workspace menu.
STEP 5: Create an environment
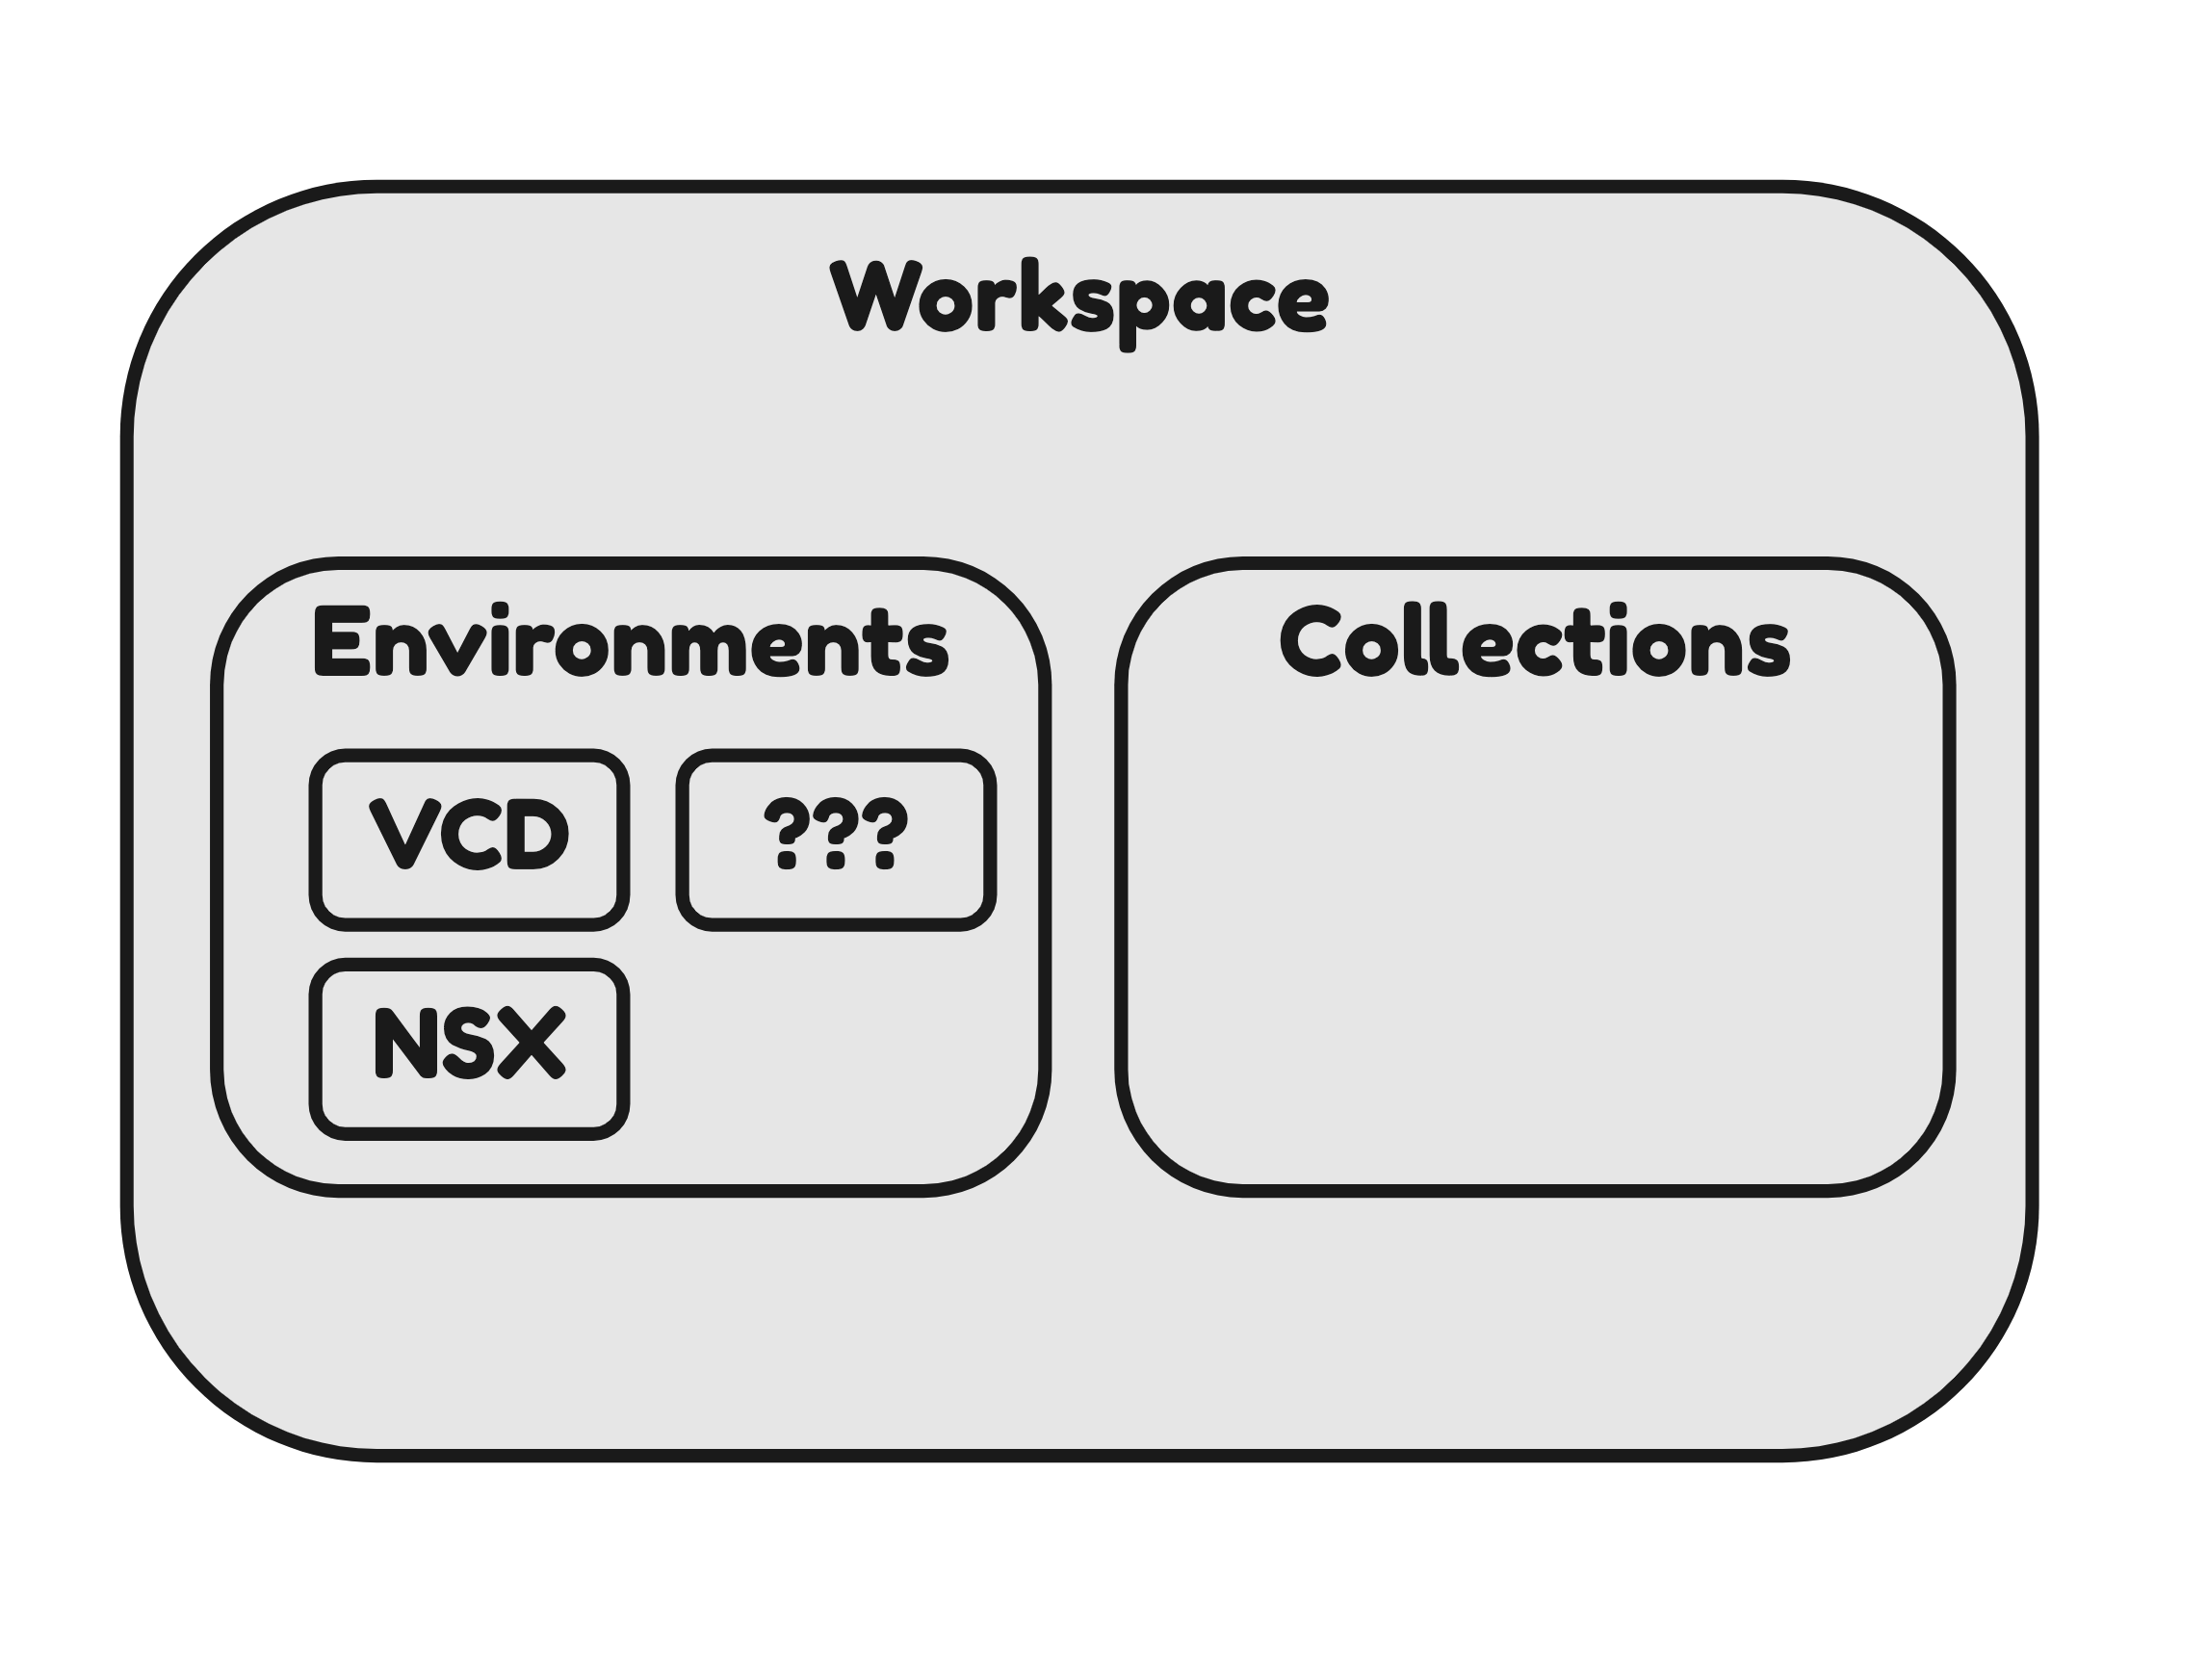
Now that my workspace is ready I need to create an environment. Inside the environment I can create saved variables that I am using ofter for a specific environment. When I am working with VCD and with NSX at the same time for example the hostname, username and password is different for the VCD environment than for the NSX environment. Inside an “Environment” I specify these variables.
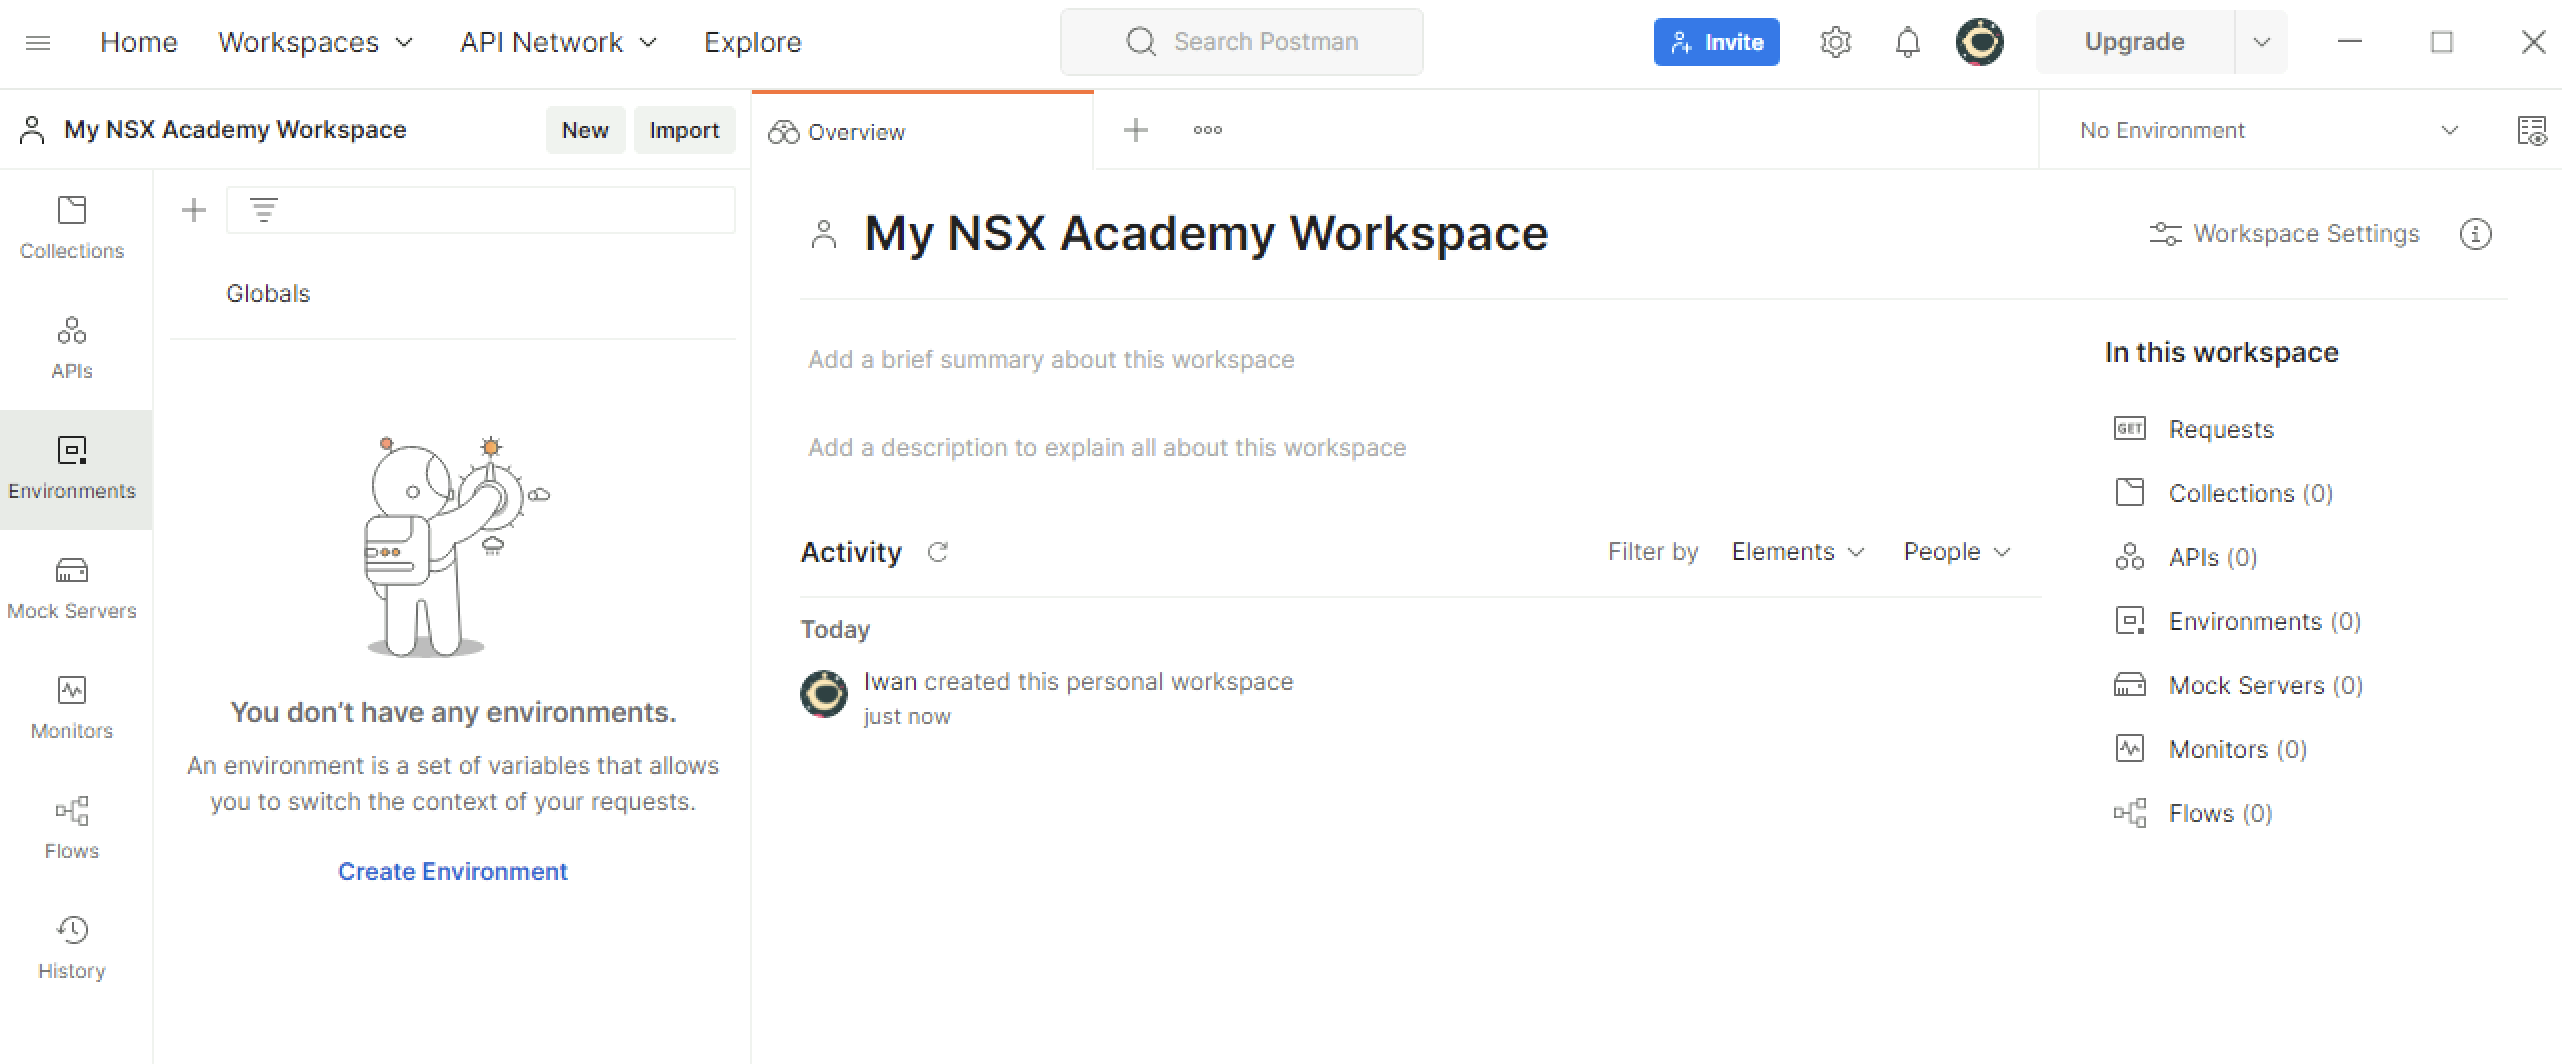
Click on the button on the left “Environments” and “Create Environment”
Name the environment something like “My NSX environment” and specify a few variables.
I used the following variables:
| Initial Value | ||
|---|---|---|
| username | default | admin |
| password | secret | VMware1!VMware1! |
| hostname-vip | default | pod-120-nsxt-lm.sddc.lab |
| hostname-lm1 | default | pod-120-nsxt-lm-1.sddc.lab |
| hostname-lm2 | default | pod-120-nsxt-lm-2.sddc.lab |
| hostname-lm3 | default | pod-120-nsxt-lm-3.sddc.lab |
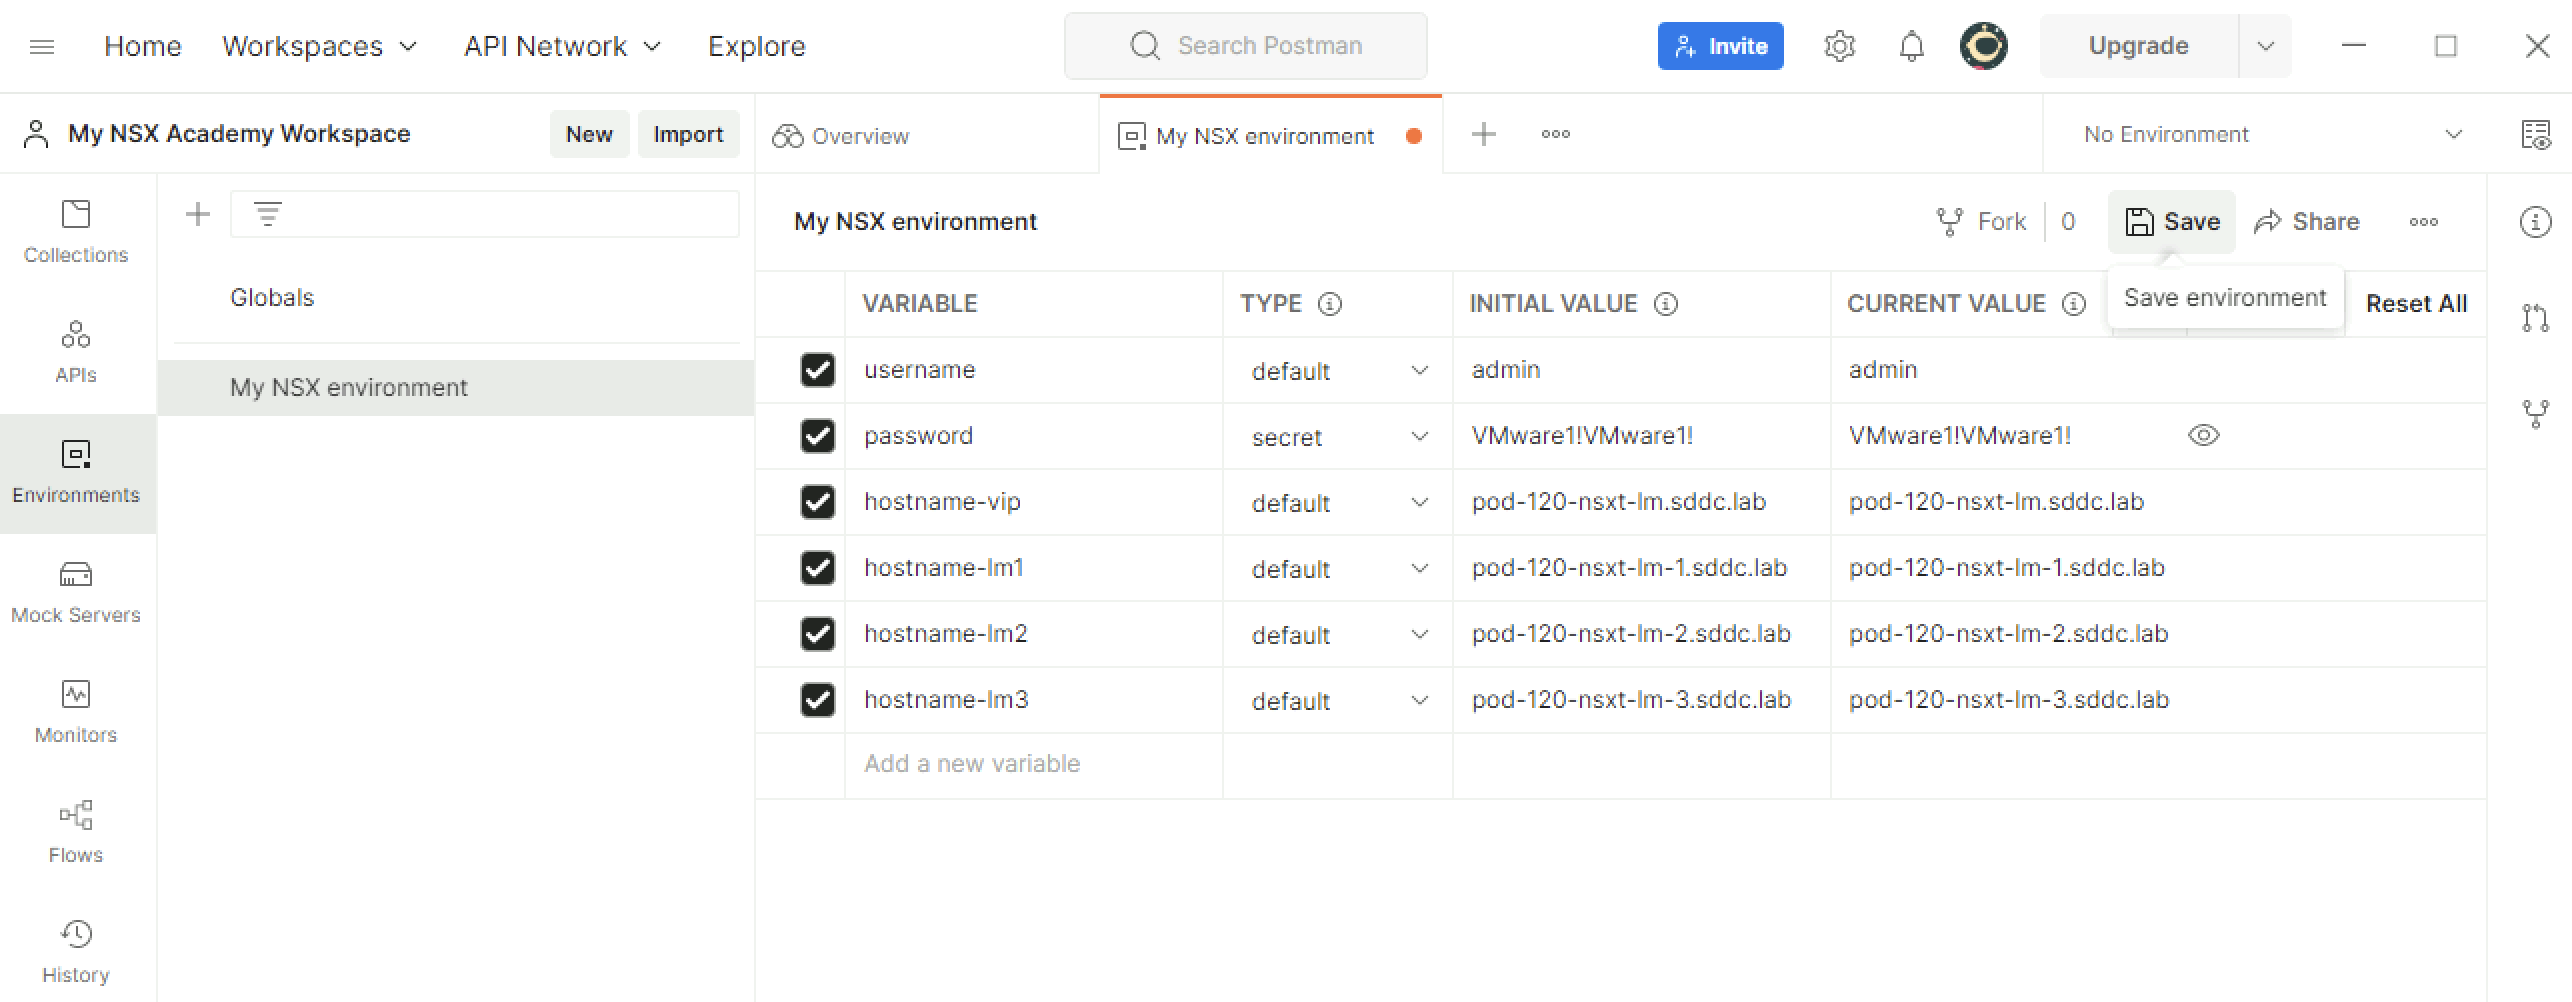
Don’t forget to click on Save when I have my environment set up with the desired variables.
I can call (or use) these variables by using Template:Variablename anywhere inside my workspace.
A good example is when I need to use my hostname somewhere for an API request, I will use Template:Hostname-vip instead of pod-120-nsxt-lm.sddc.lab.
STEP 6: Create an collection
Before I am going to create a collection with the API requests I first need to get them from the API Guide.
As stated earlier in the lab tasks I want to work with groups (in this article) I need to search for the groups section in the API guide.
The API guide contains a lot of information and hunting down the one API requests I need can be time-consuming and for this reason it is good to save it in a collection so I can use it later.
When I browse trough the API guide I need yo go to the Policy → Inventory → Groups section to find the API requests related to work with Groups.
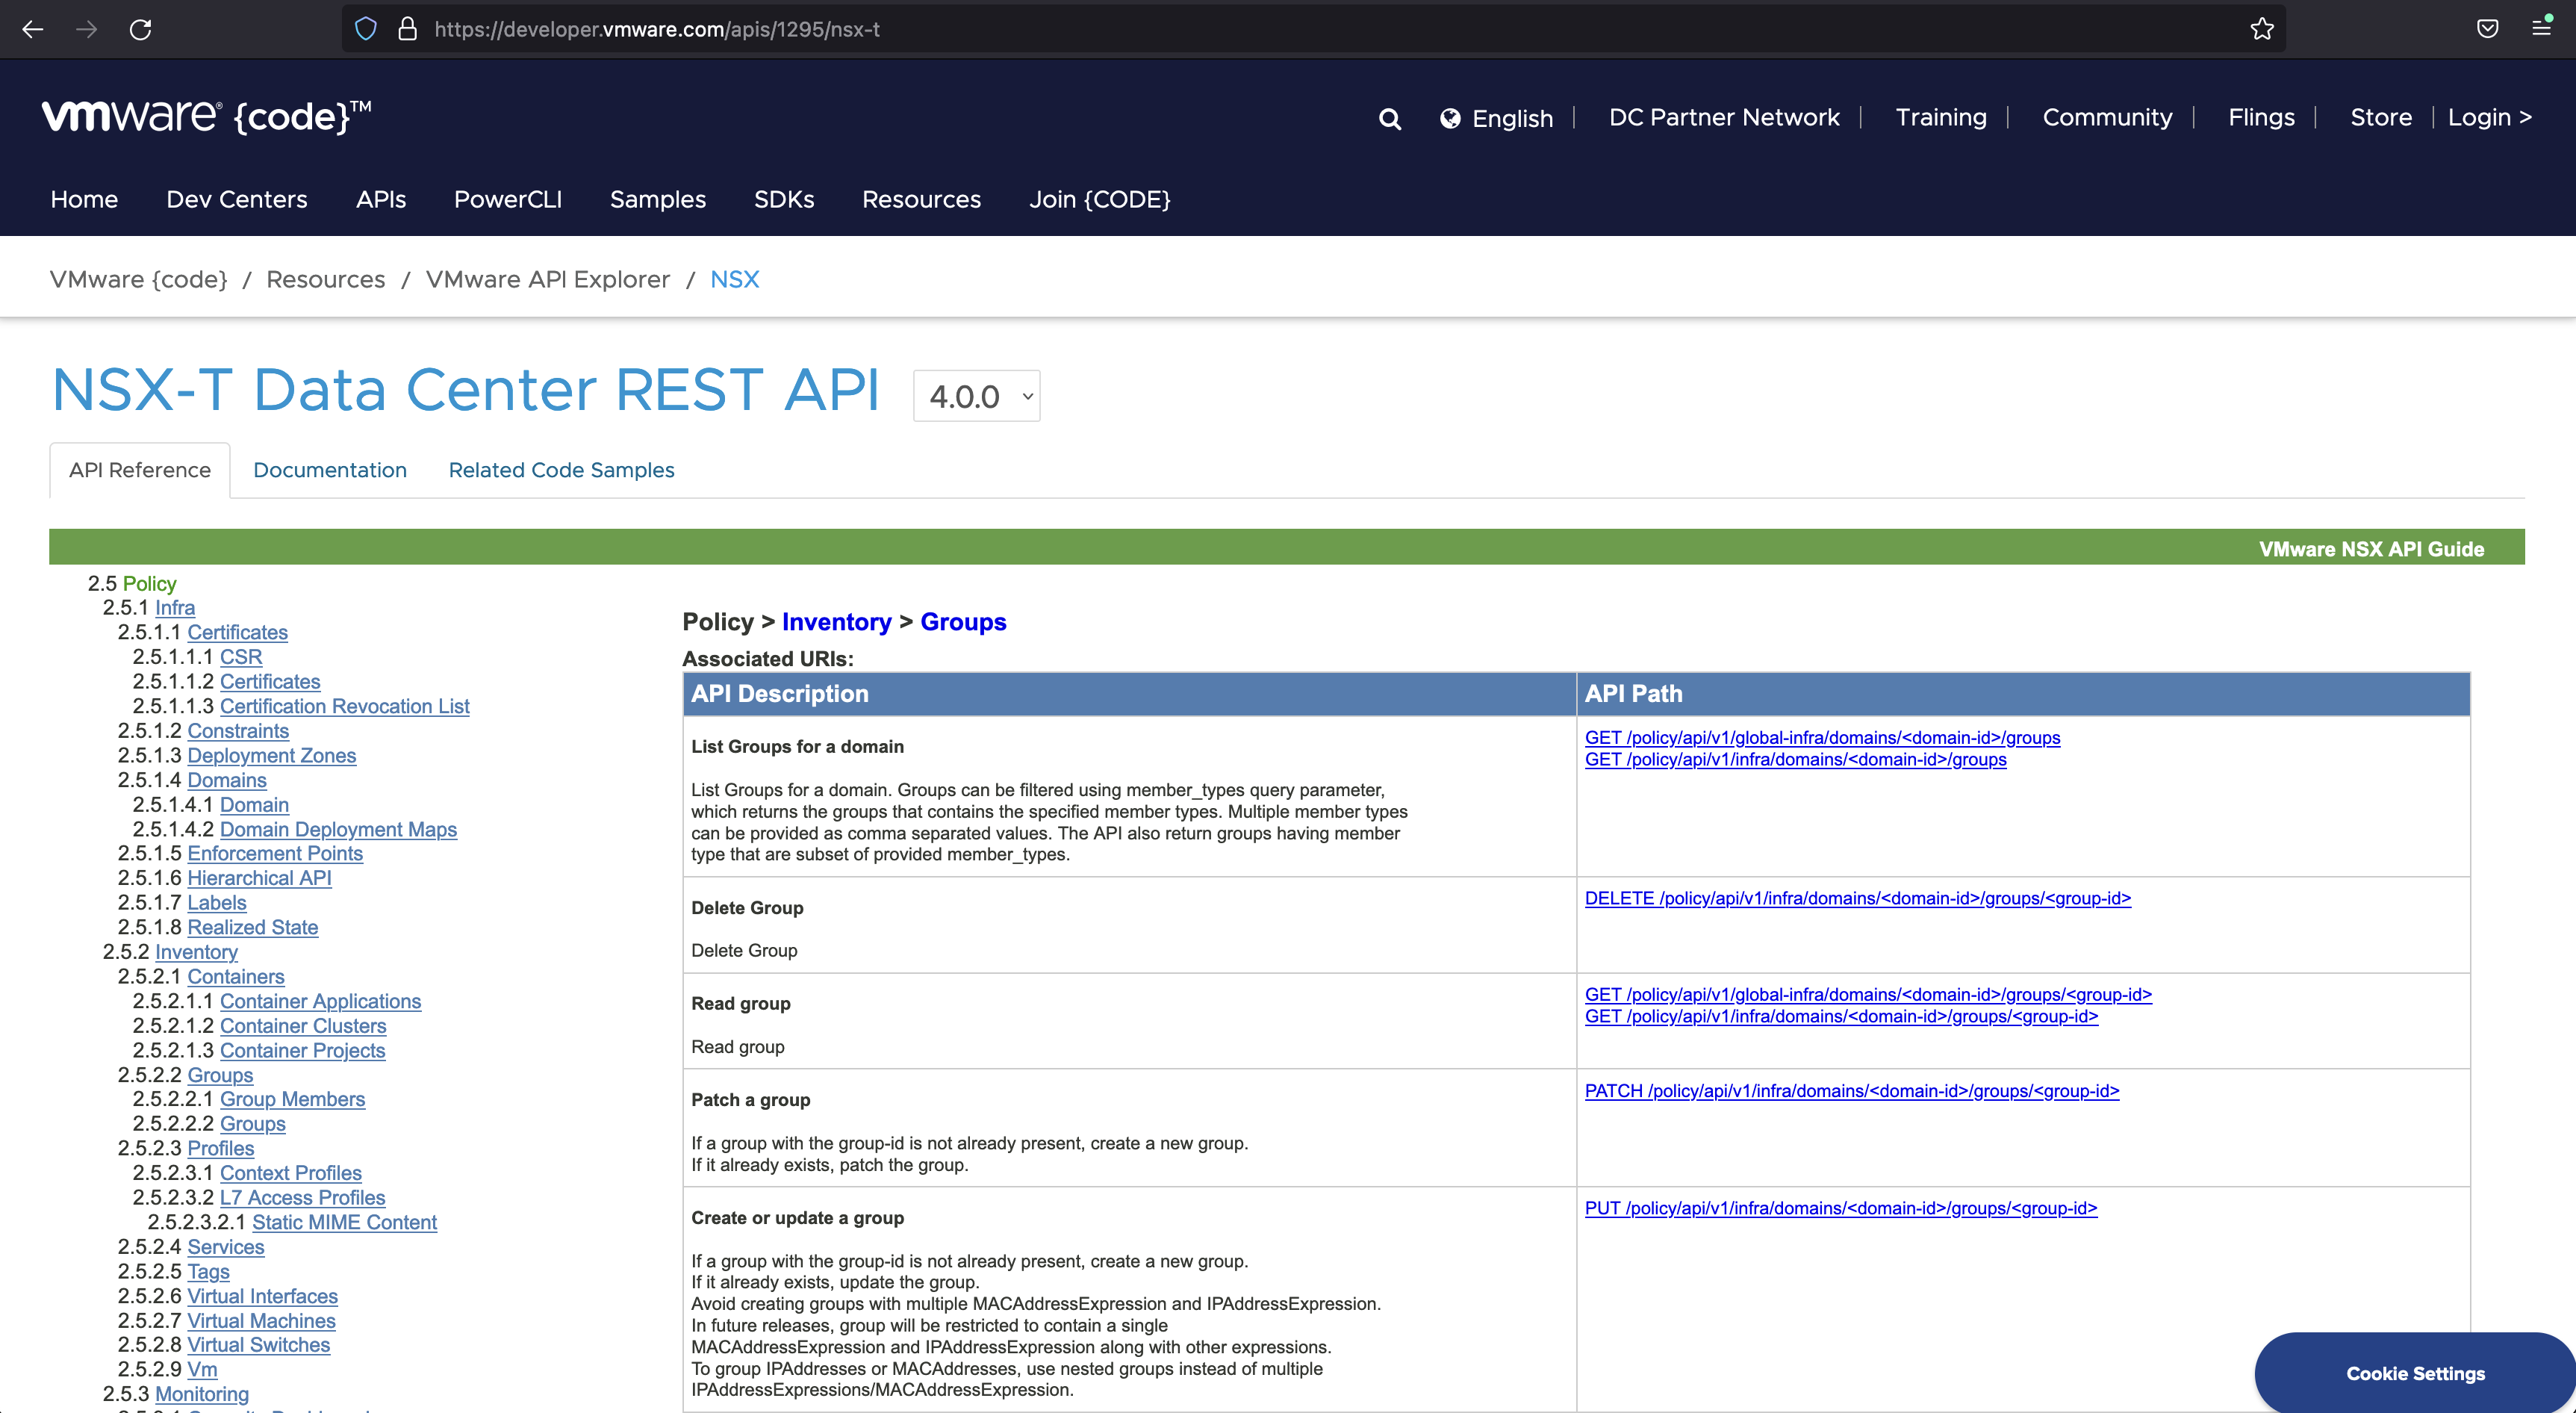
Based on the lab tasks I want to have the following API request:
GET /policy/api/v1/infra/domains/
GET /policy/api/v1/infra/domains/<domain-id>/groups
PATCH /policy/api/v1/infra/domains/<domain-id>/groups/<group-id>
DELETE /policy/api/v1/infra/domains/<domain-id>/groups/<group-id>
⚠️ Inside the Group related API requests I need to specify the domain-id. For this reason I also need to find out what the domain-id is and this is also done using an API request.
Click on the button on the left “Collections” and “Create collection”
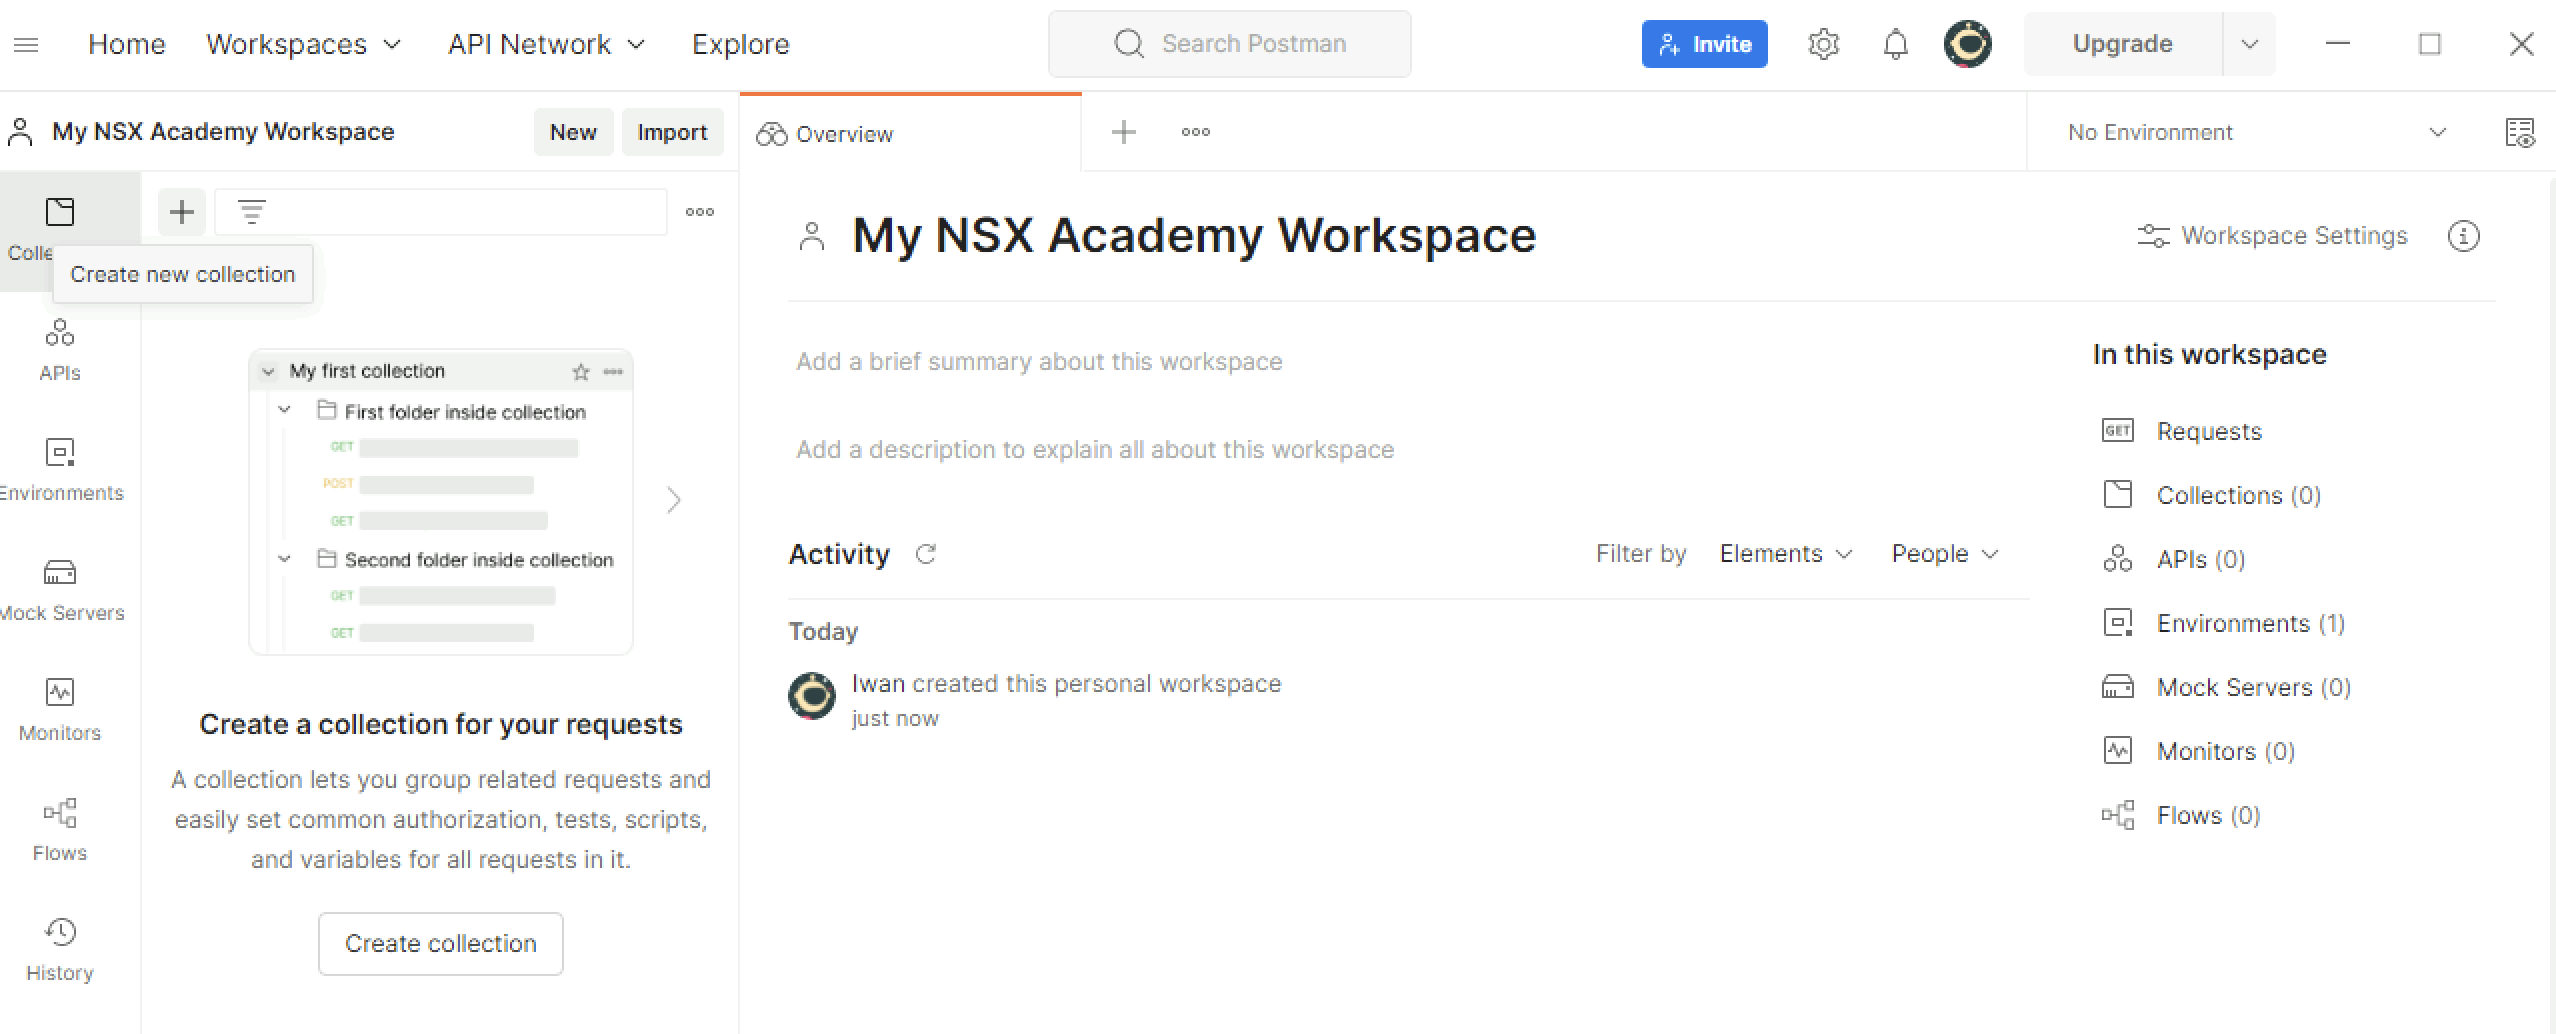
Name the collection something like “My NSX API Call Collection” and click Save.
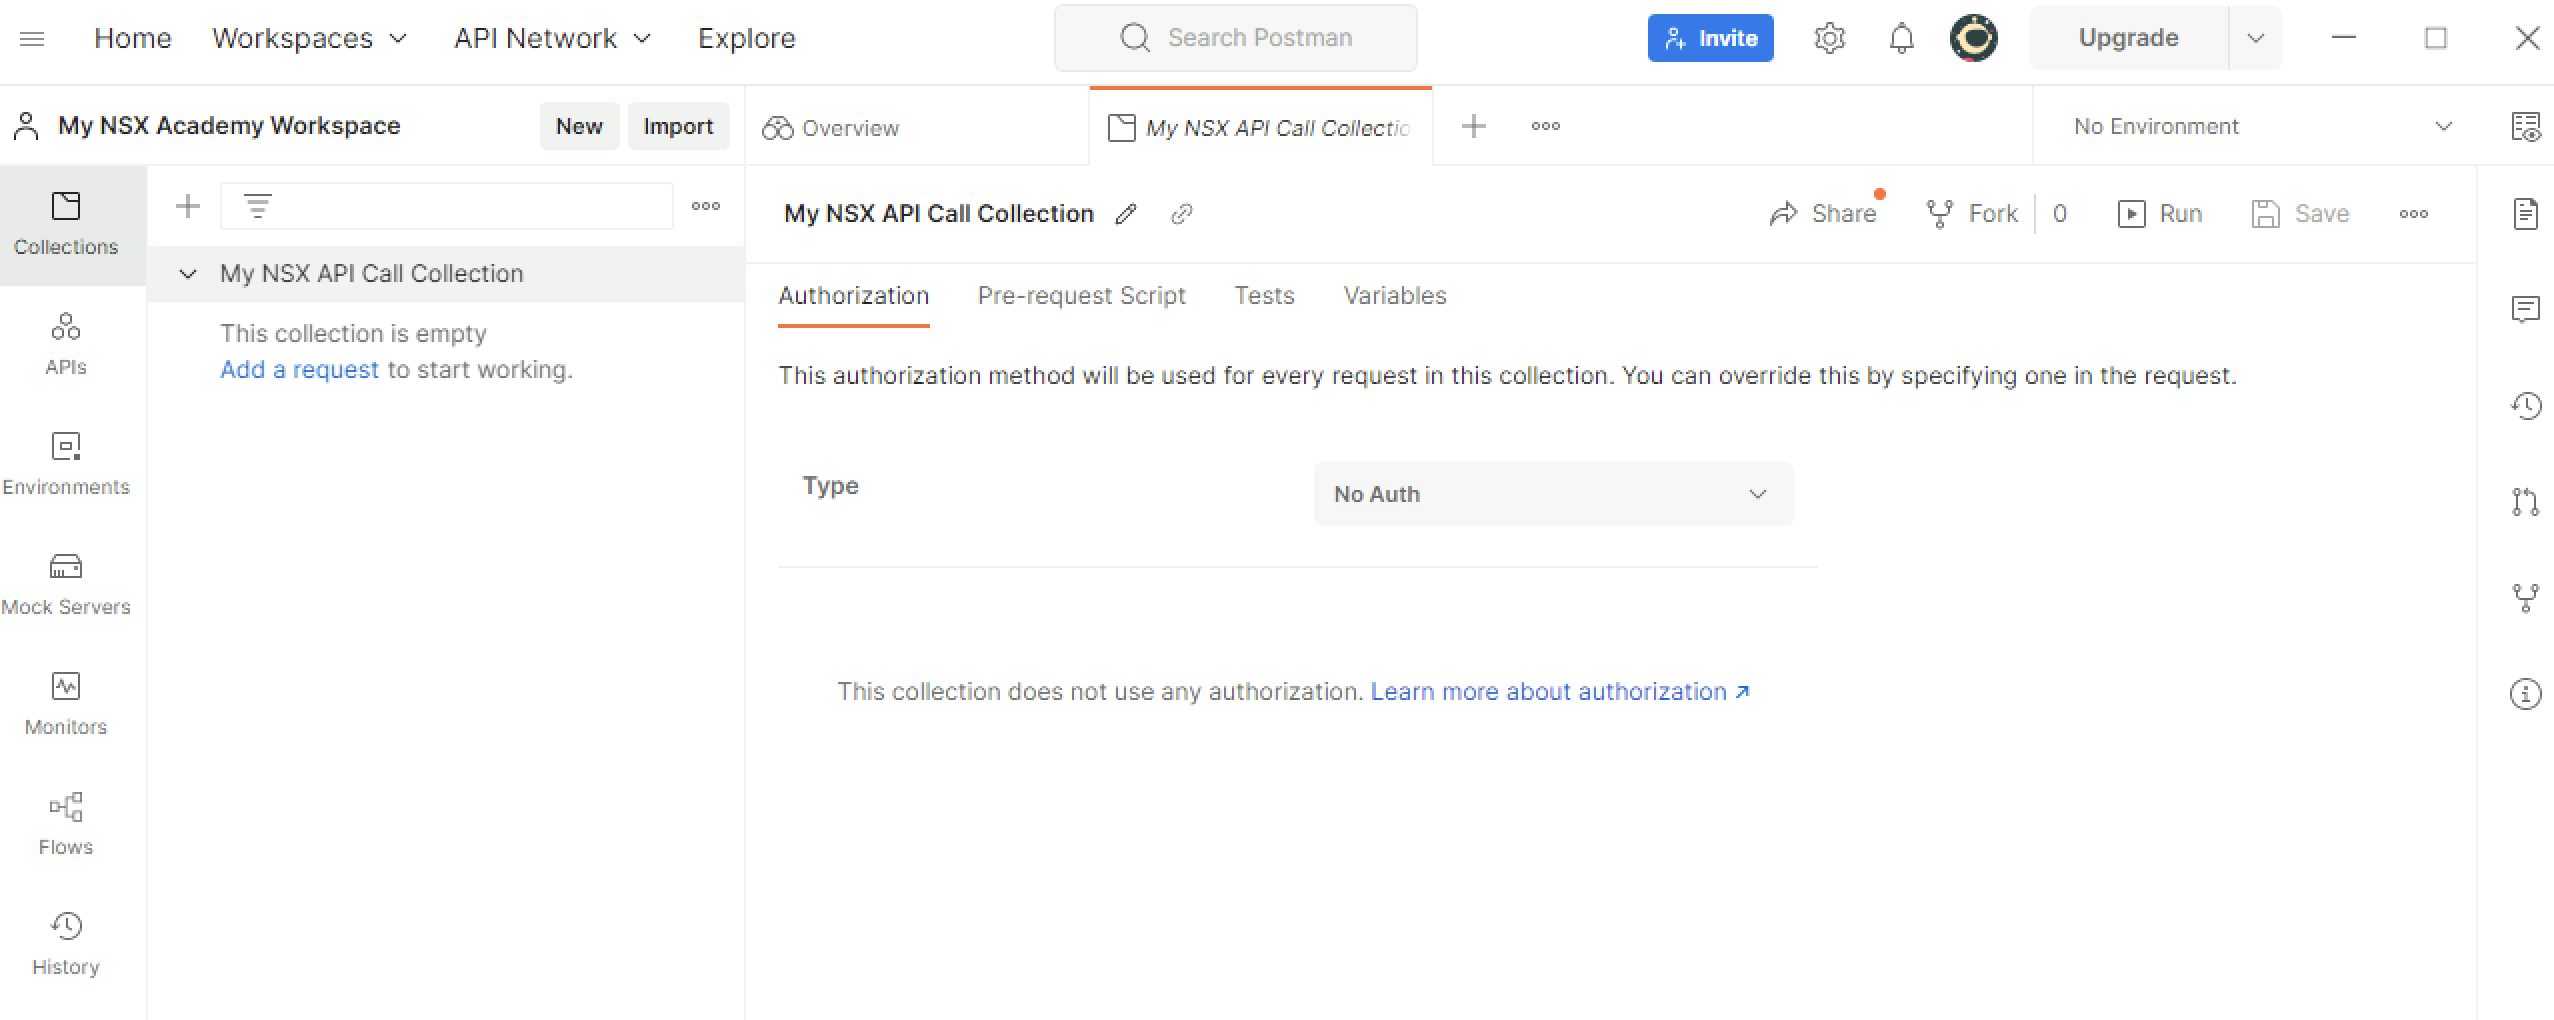
A collection is some kind of “folder” where I can store all my API requests in.

STEP 7: Perform my first GET API request on NSX (read the groups)
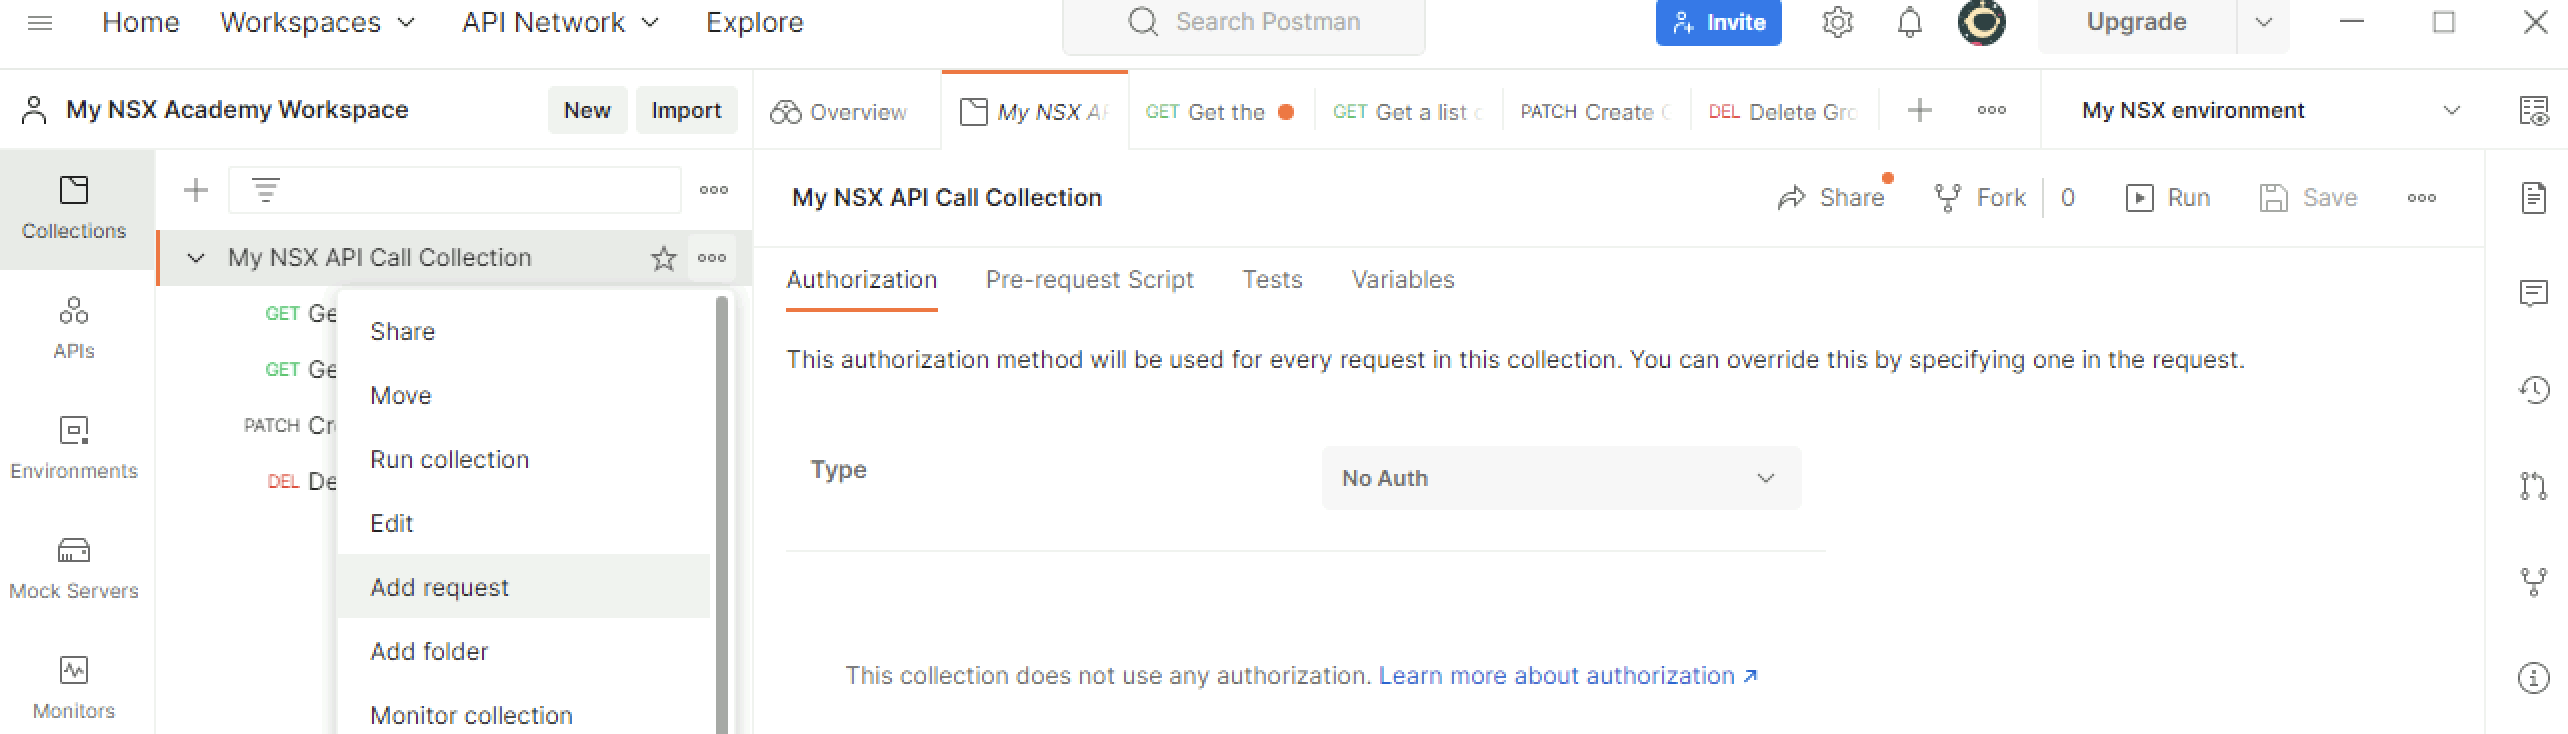
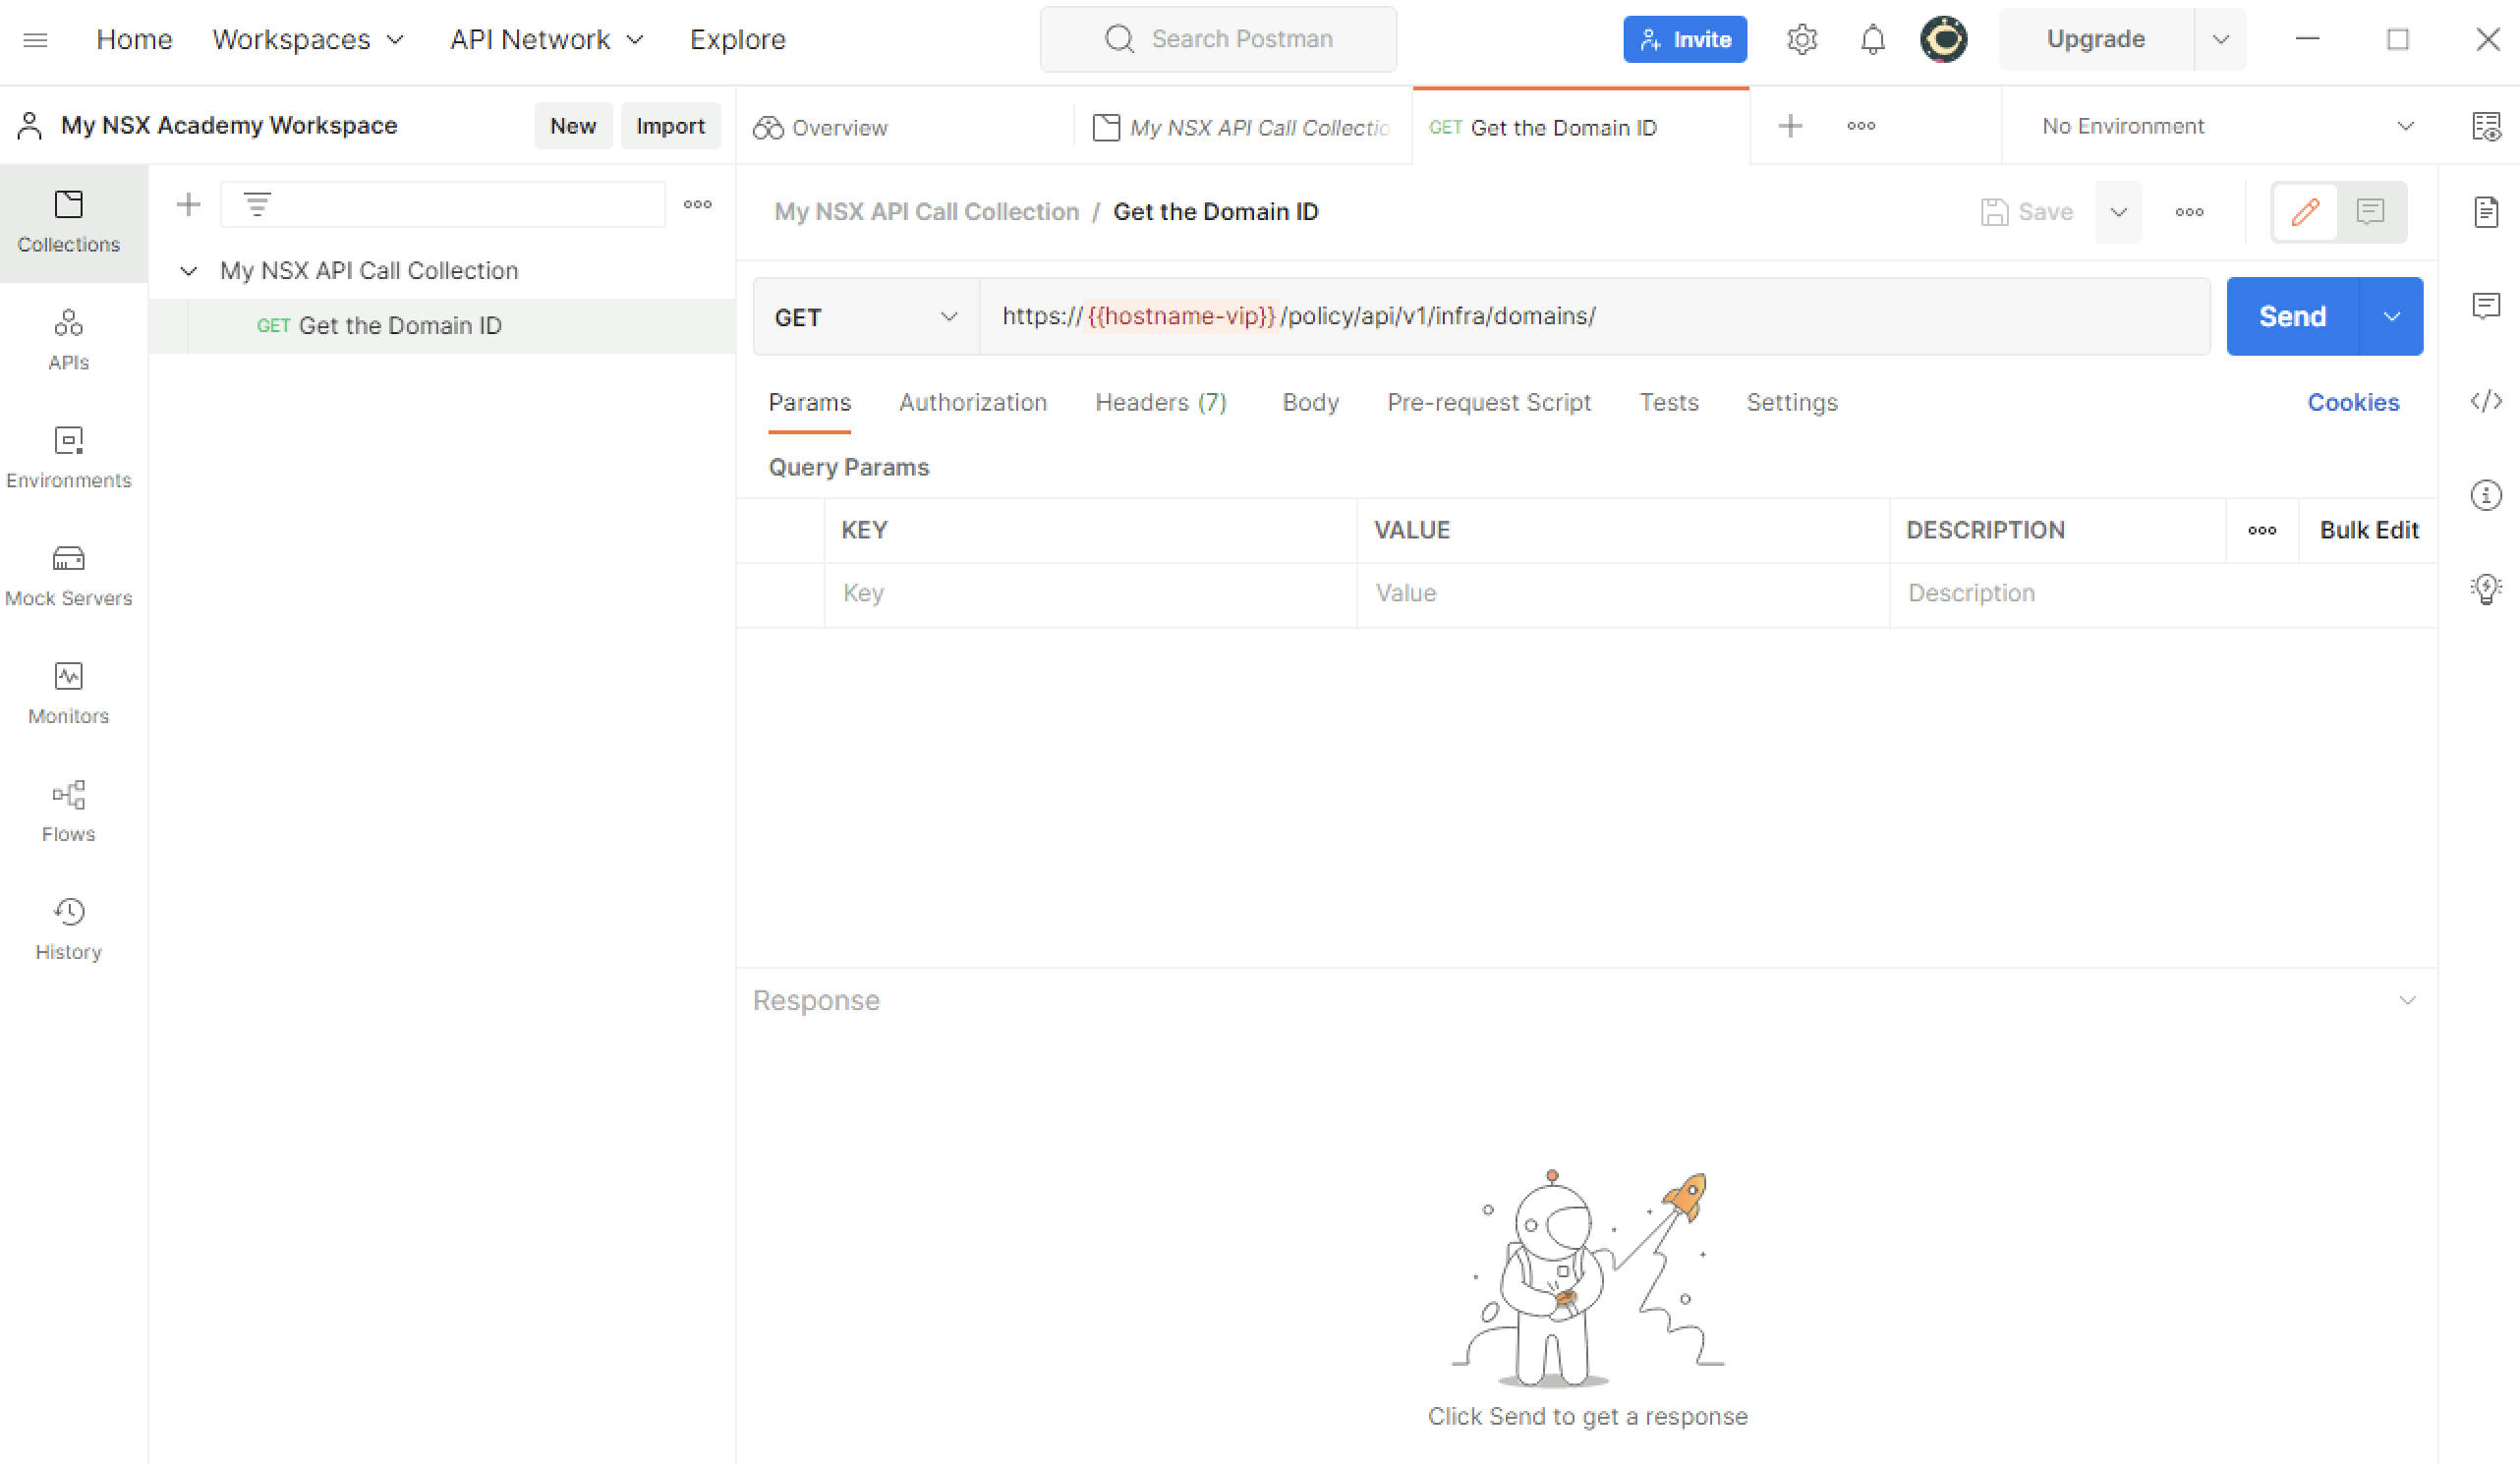
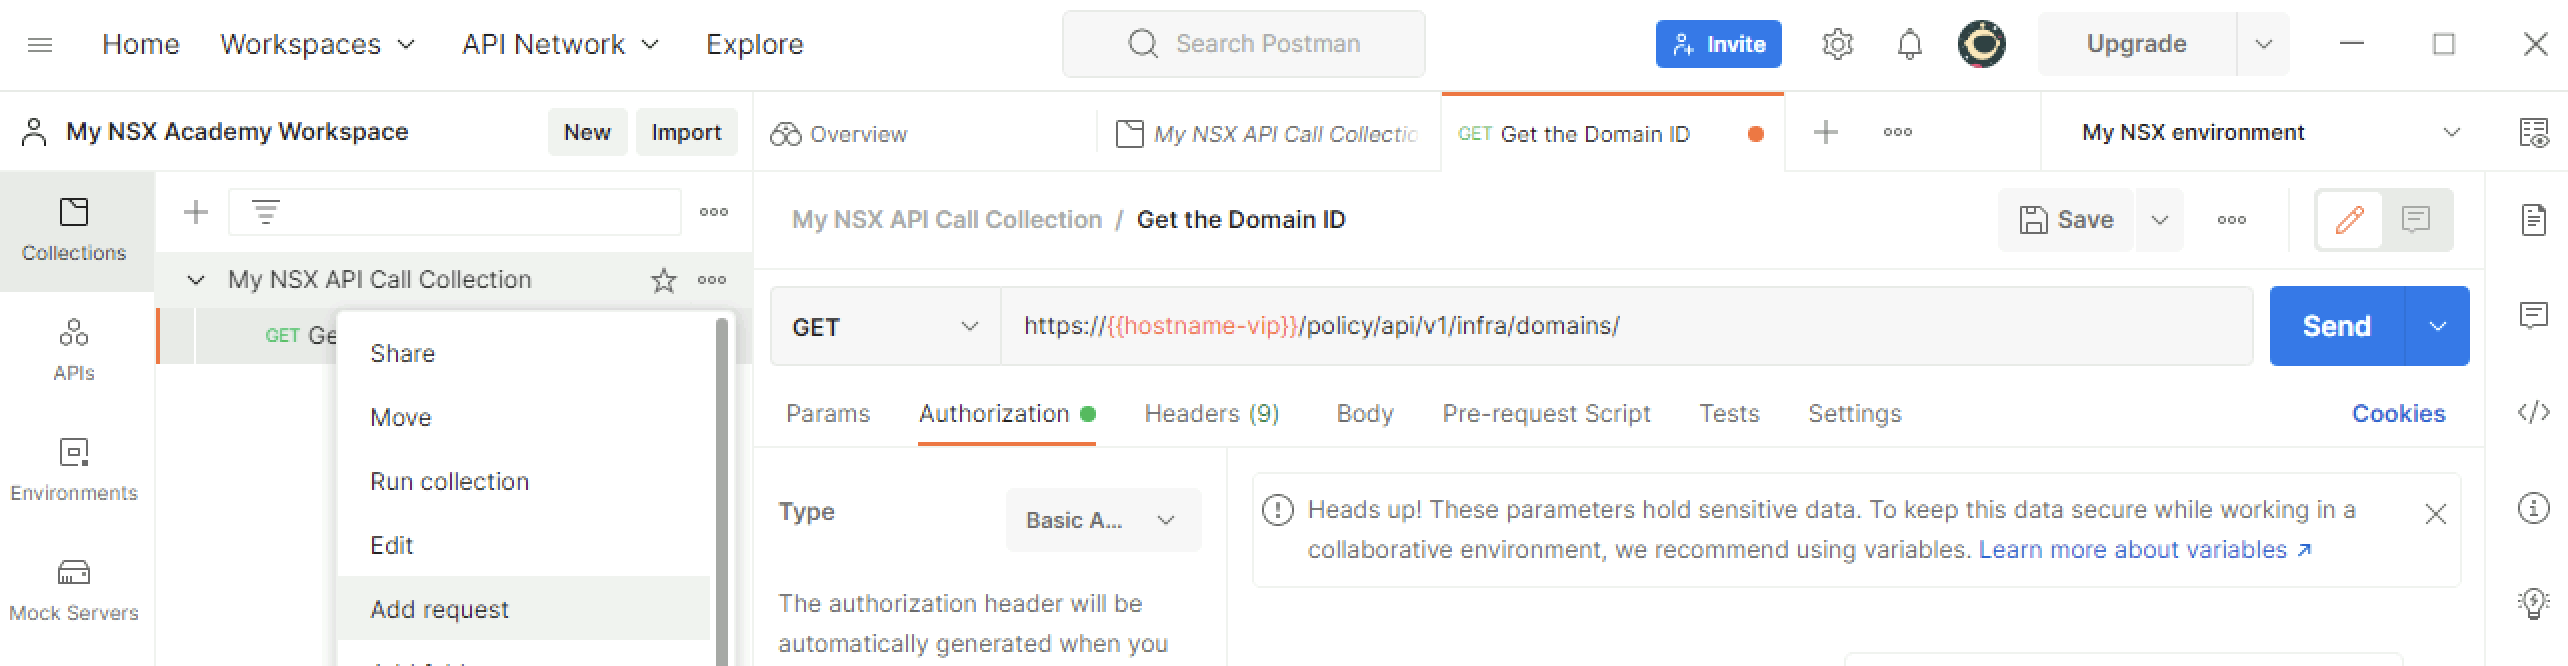
Click on the three dots in the Collection (folder) and select “Add request” to add a new API request .
Use the following URL to find out what the domain-id is.
GET https://{{hostname-vip}}/policy/api/v1/infra/domains/
Name the request something like “Get the Domain ID” type in the API URL and click Save.
Go to the Authorization tab and select “Basic Auth”. This is the Authentication type that I need to connect to NSX.
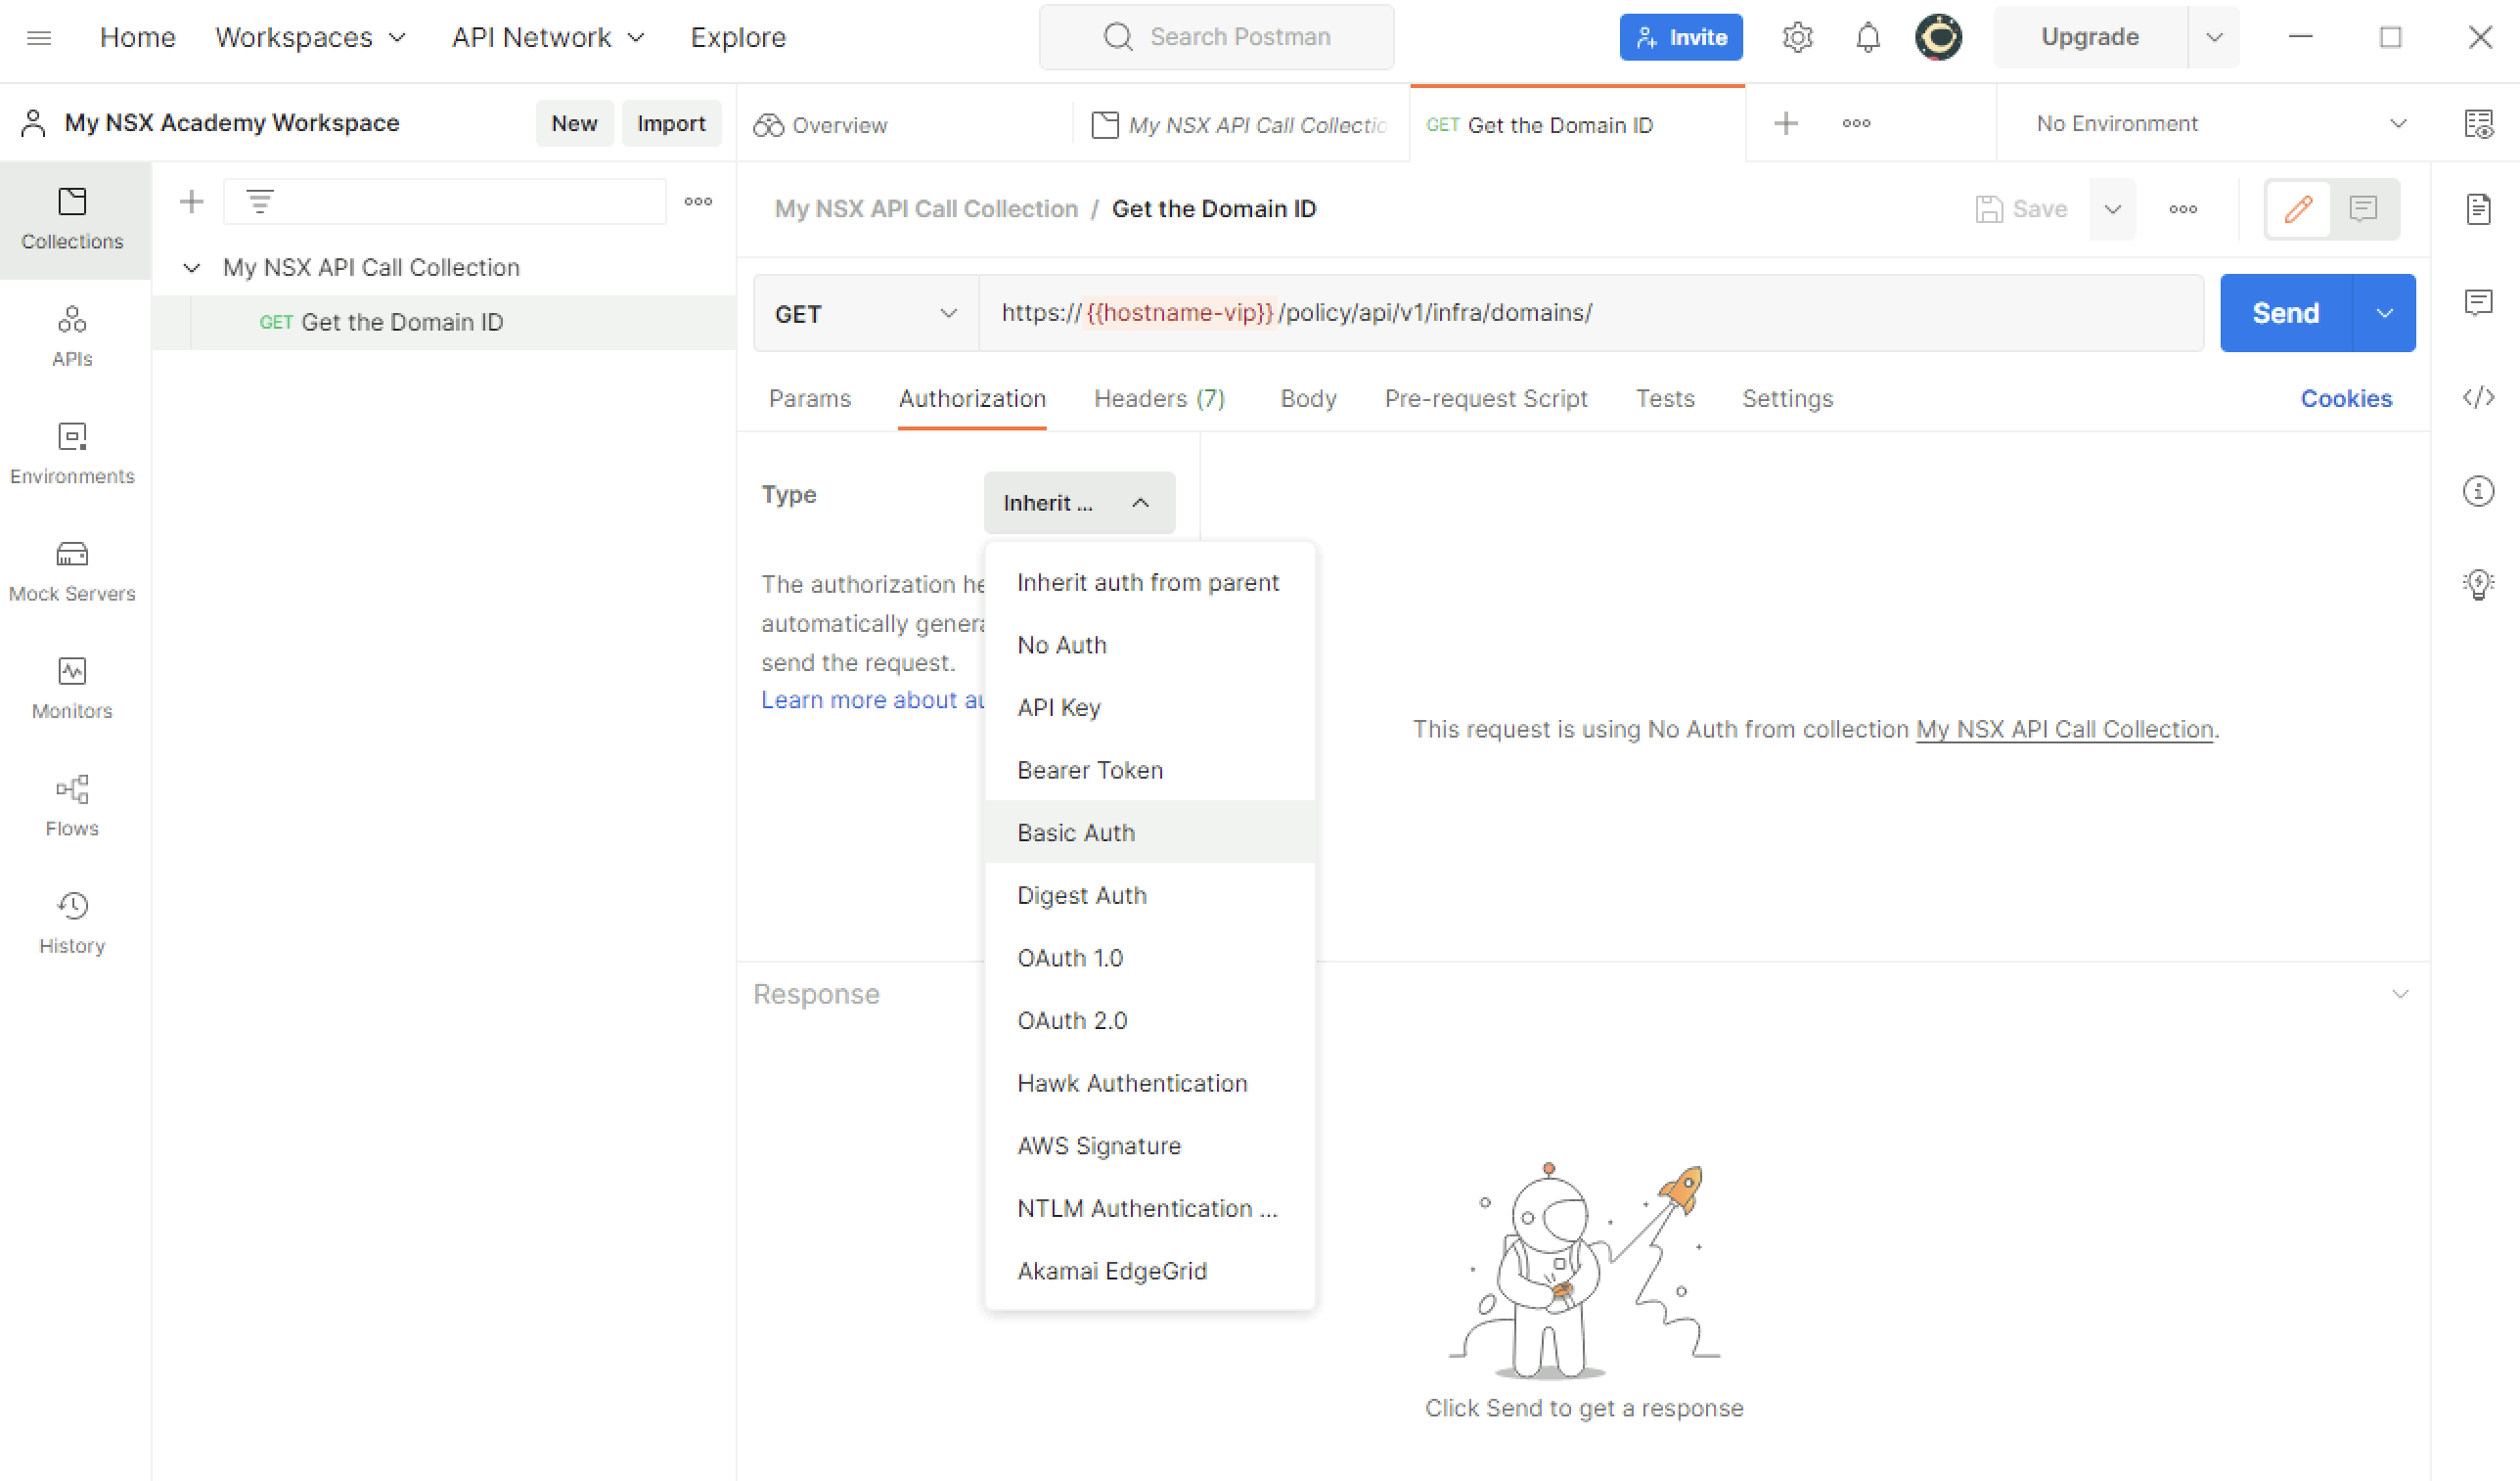
Make sure I select my “Environment” to bring in the correct variables that I will need like Template:Hostname-vip, Template:Username and Template:Password.

Type in Template:Hostname-vip, Template:Username after I have selected the correct Authorization Type, and click Save again.
Note that I have:
- Created the API request
- Specified the URL
- Specified the Authorization type + username and password
- And clicked on Save.
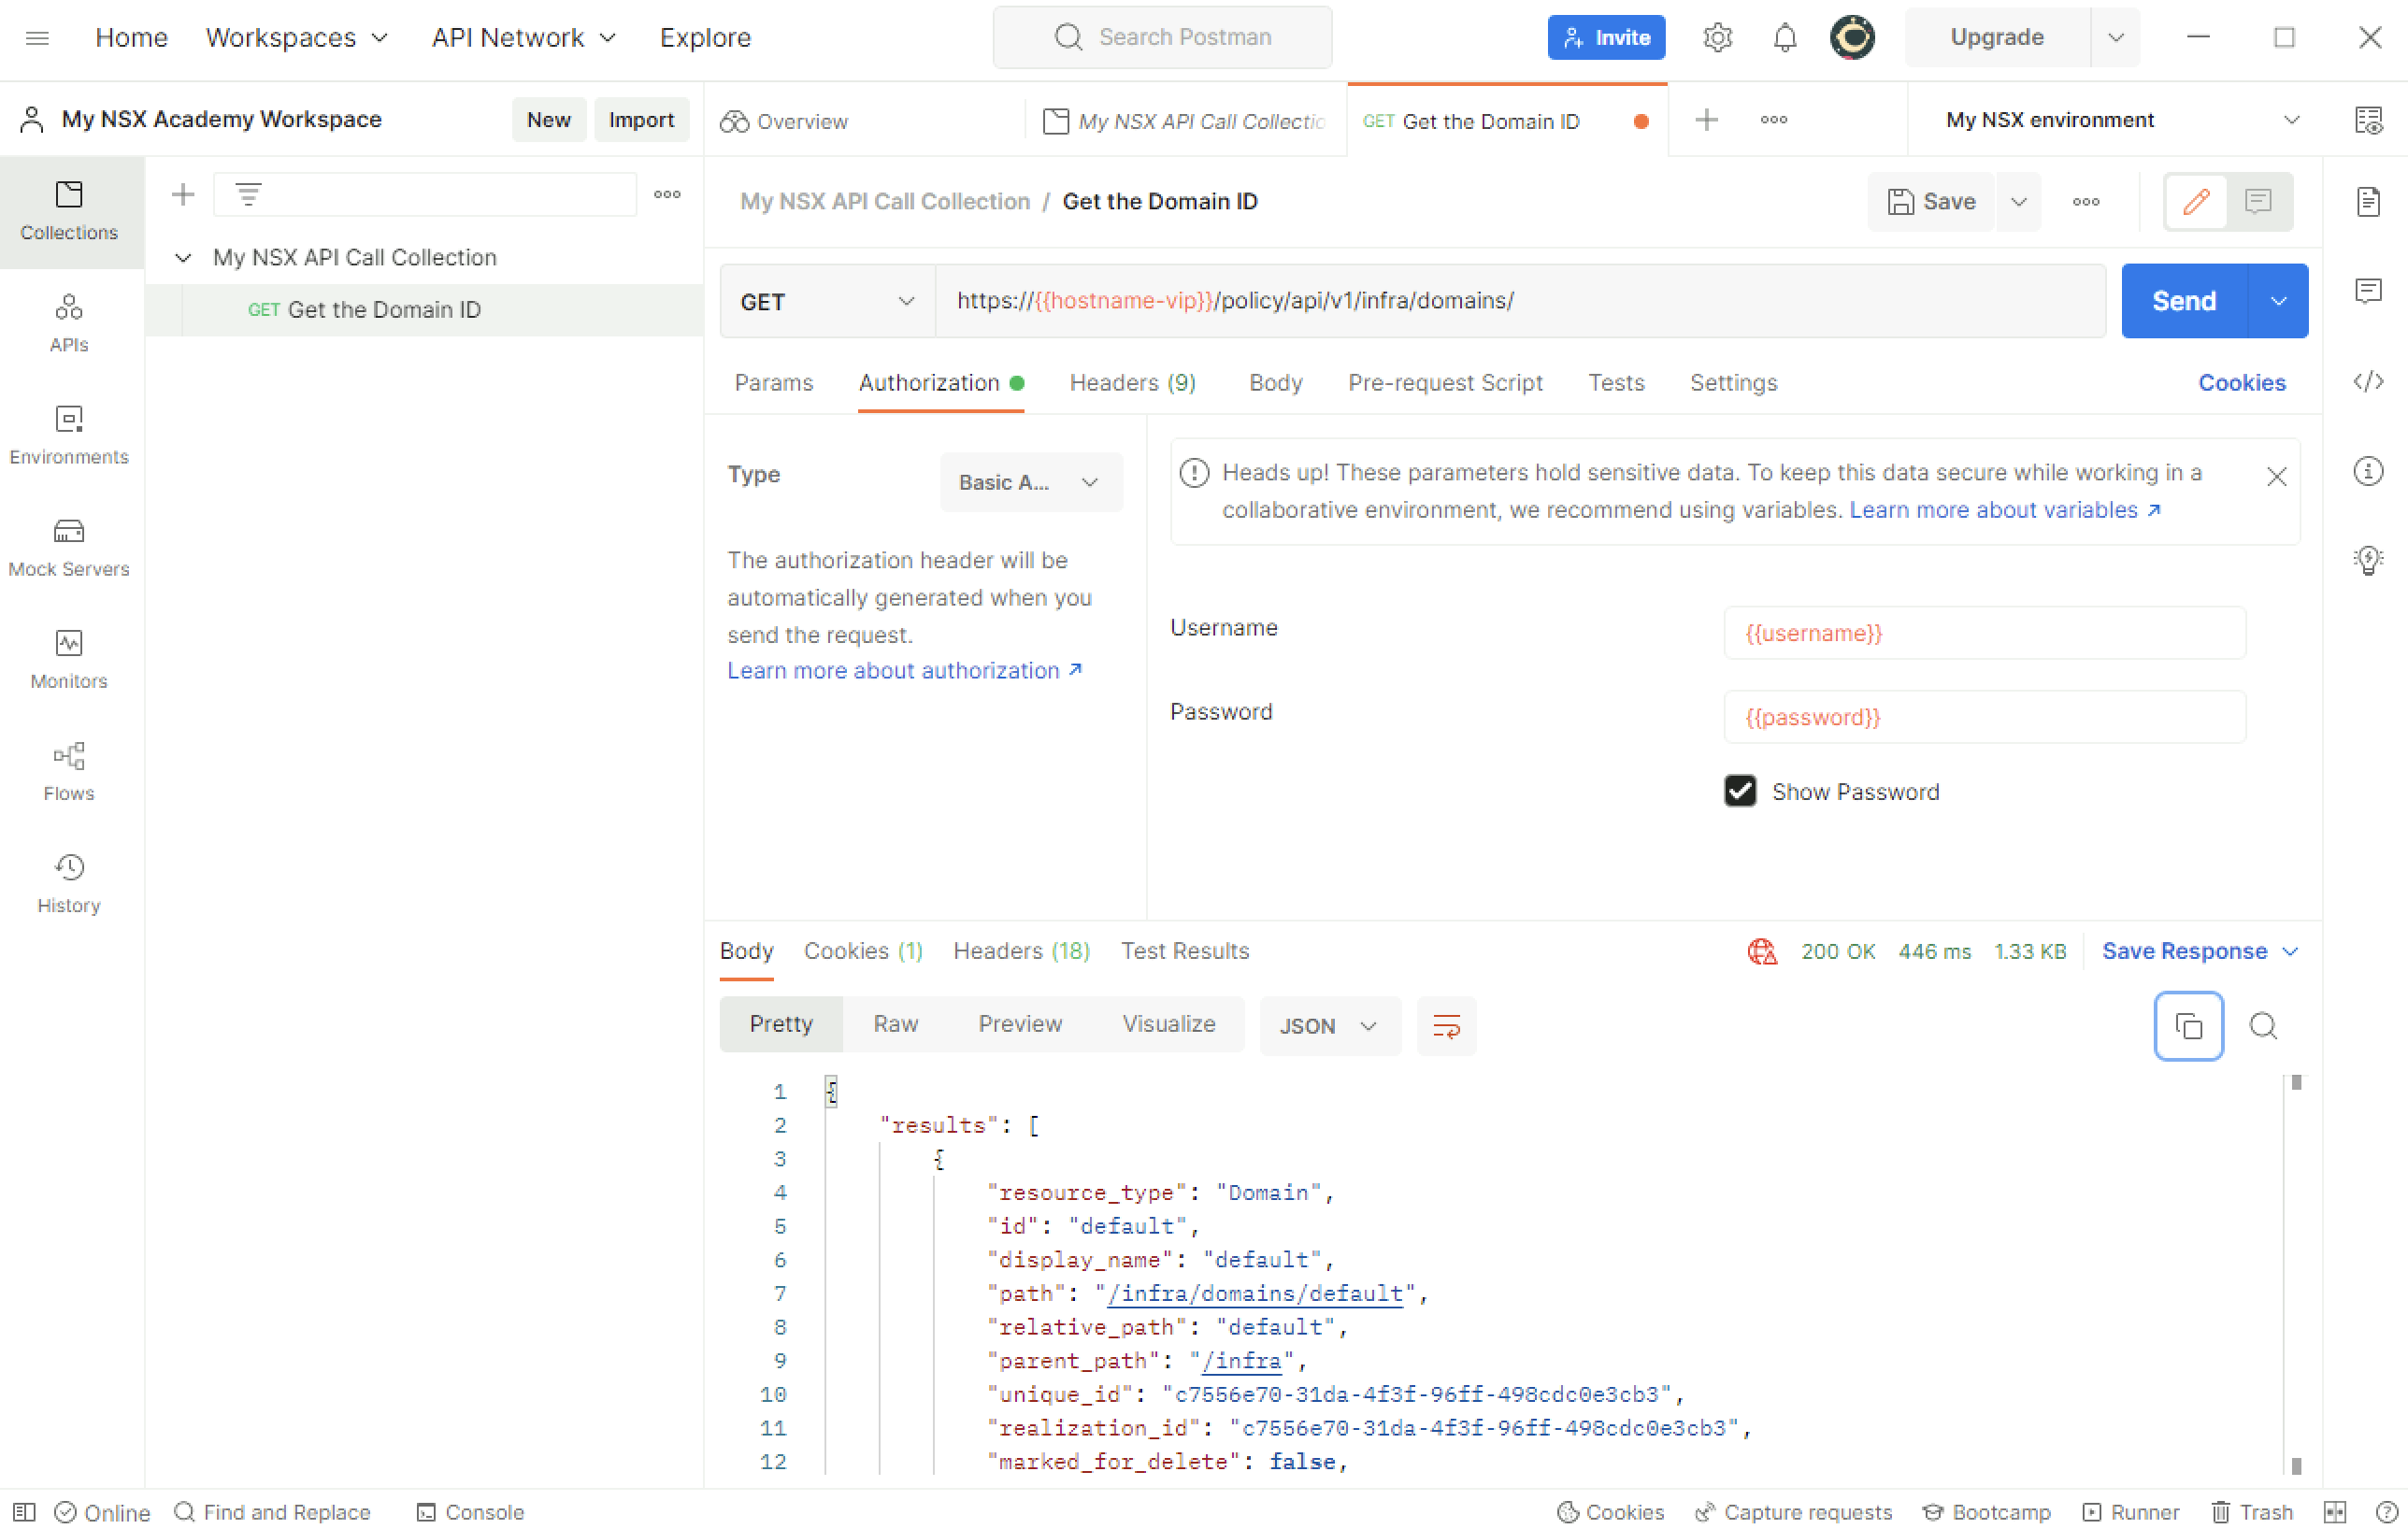
Now I can finally click on “Send” to get the information I want (The domain-id remember?)
When I clicked on “Send” and everything is working correctly look for “200 OK” message and look at output.
{
    "results": [
        {
            "resource_type": "Domain",
            "id": "default",
            "display_name": "default",
            "path": "/infra/domains/default",
            "relative_path": "default",
            "parent_path": "/infra",
            "unique_id": "c7556e70-31da-4f3f-96ff-498cdc0e3cb3",
            "realization_id": "c7556e70-31da-4f3f-96ff-498cdc0e3cb3",
            "marked_for_delete": false,
            "overridden": false,
            "_create_time": 1661418527897,
            "_create_user": "system",
            "_last_modified_time": 1661418527897,
            "_last_modified_user": "system",
            "_system_owned": true,
            "_protection": "NOT_PROTECTED",
            "_revision": 0
        }
    ],
    "result_count": 1,
    "sort_by": "display_name",
    "sort_ascending": true
}
The ID is:
"id": "default",
Now I can use this domain-id in the API request URL to continue with the other group related API requests.
Use the following URL to retrieve the existing groups.
GET https://{{hostname-vip}}/policy/api/v1/infra/domains/default/groups
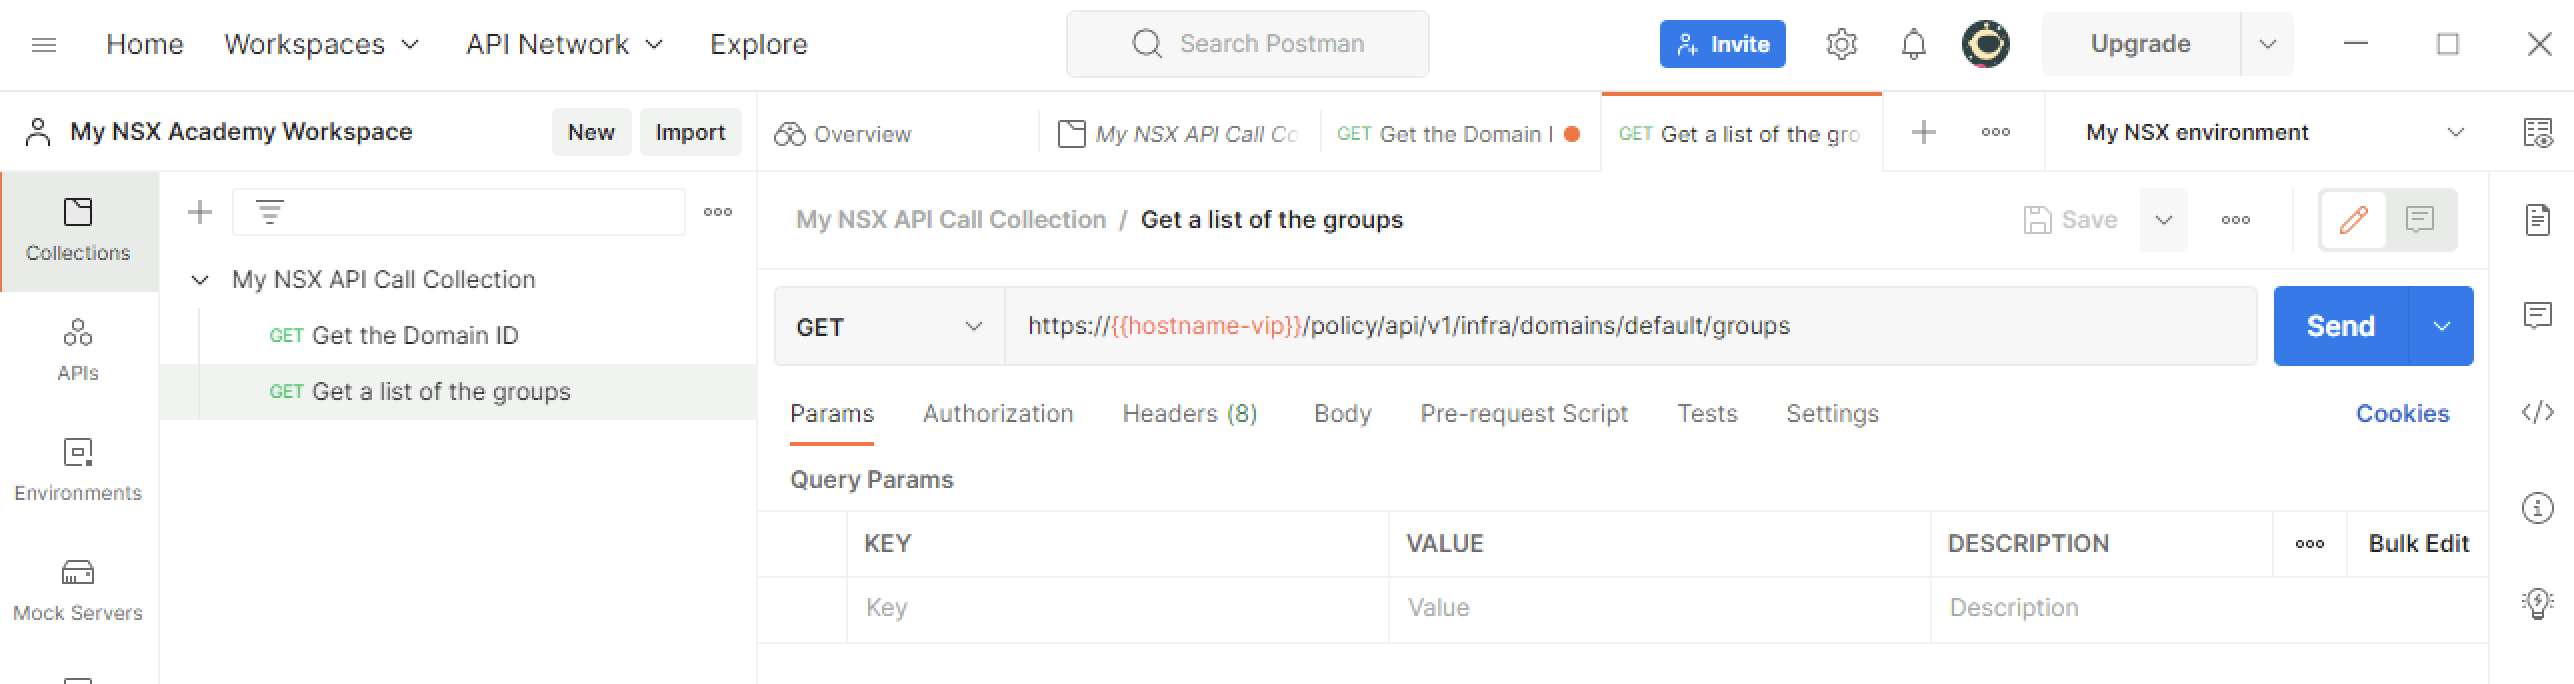
Add a new request to the collection. I see what I am doing here right?
Name the request something like “Get a list of the groups” type in the API URL and click Save.
When clicking on send right away I will get the following error, as I need to specifiy the Authorization type + username and password again. I need to so this for each API request. There is also a way to make these settings “from parent” but in my case I want to stay flexible.
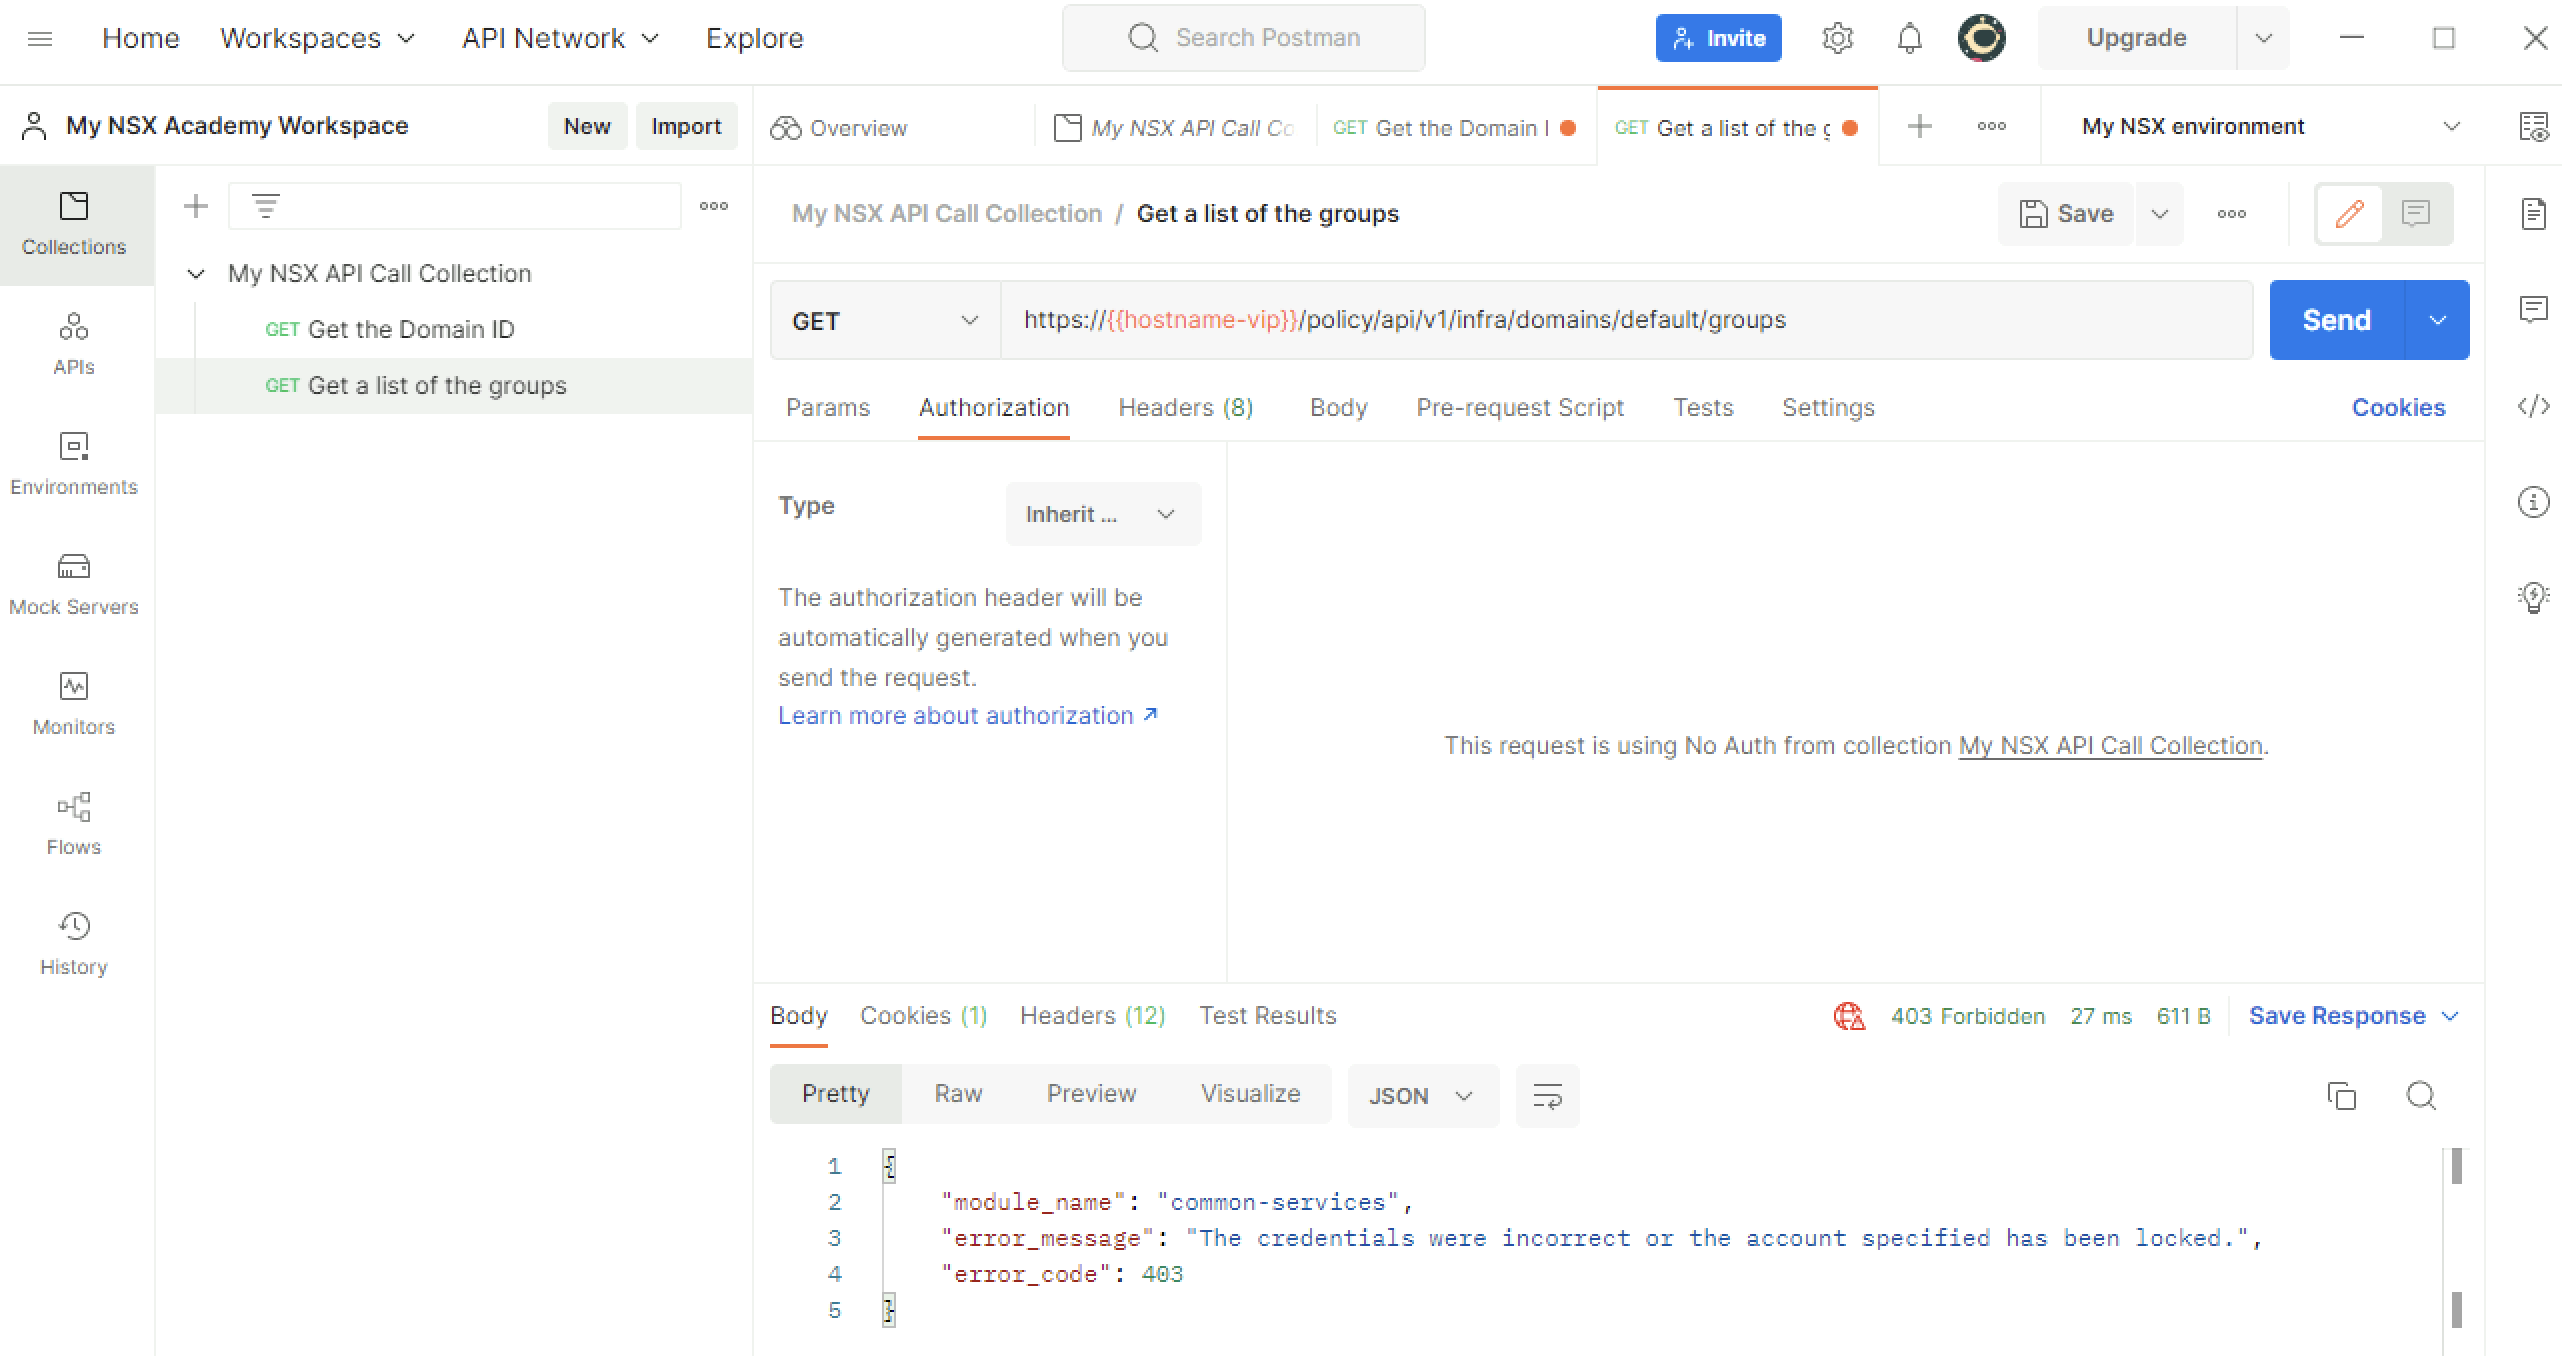
So make sure to configure the Authorization type + username and password again again and click Save.
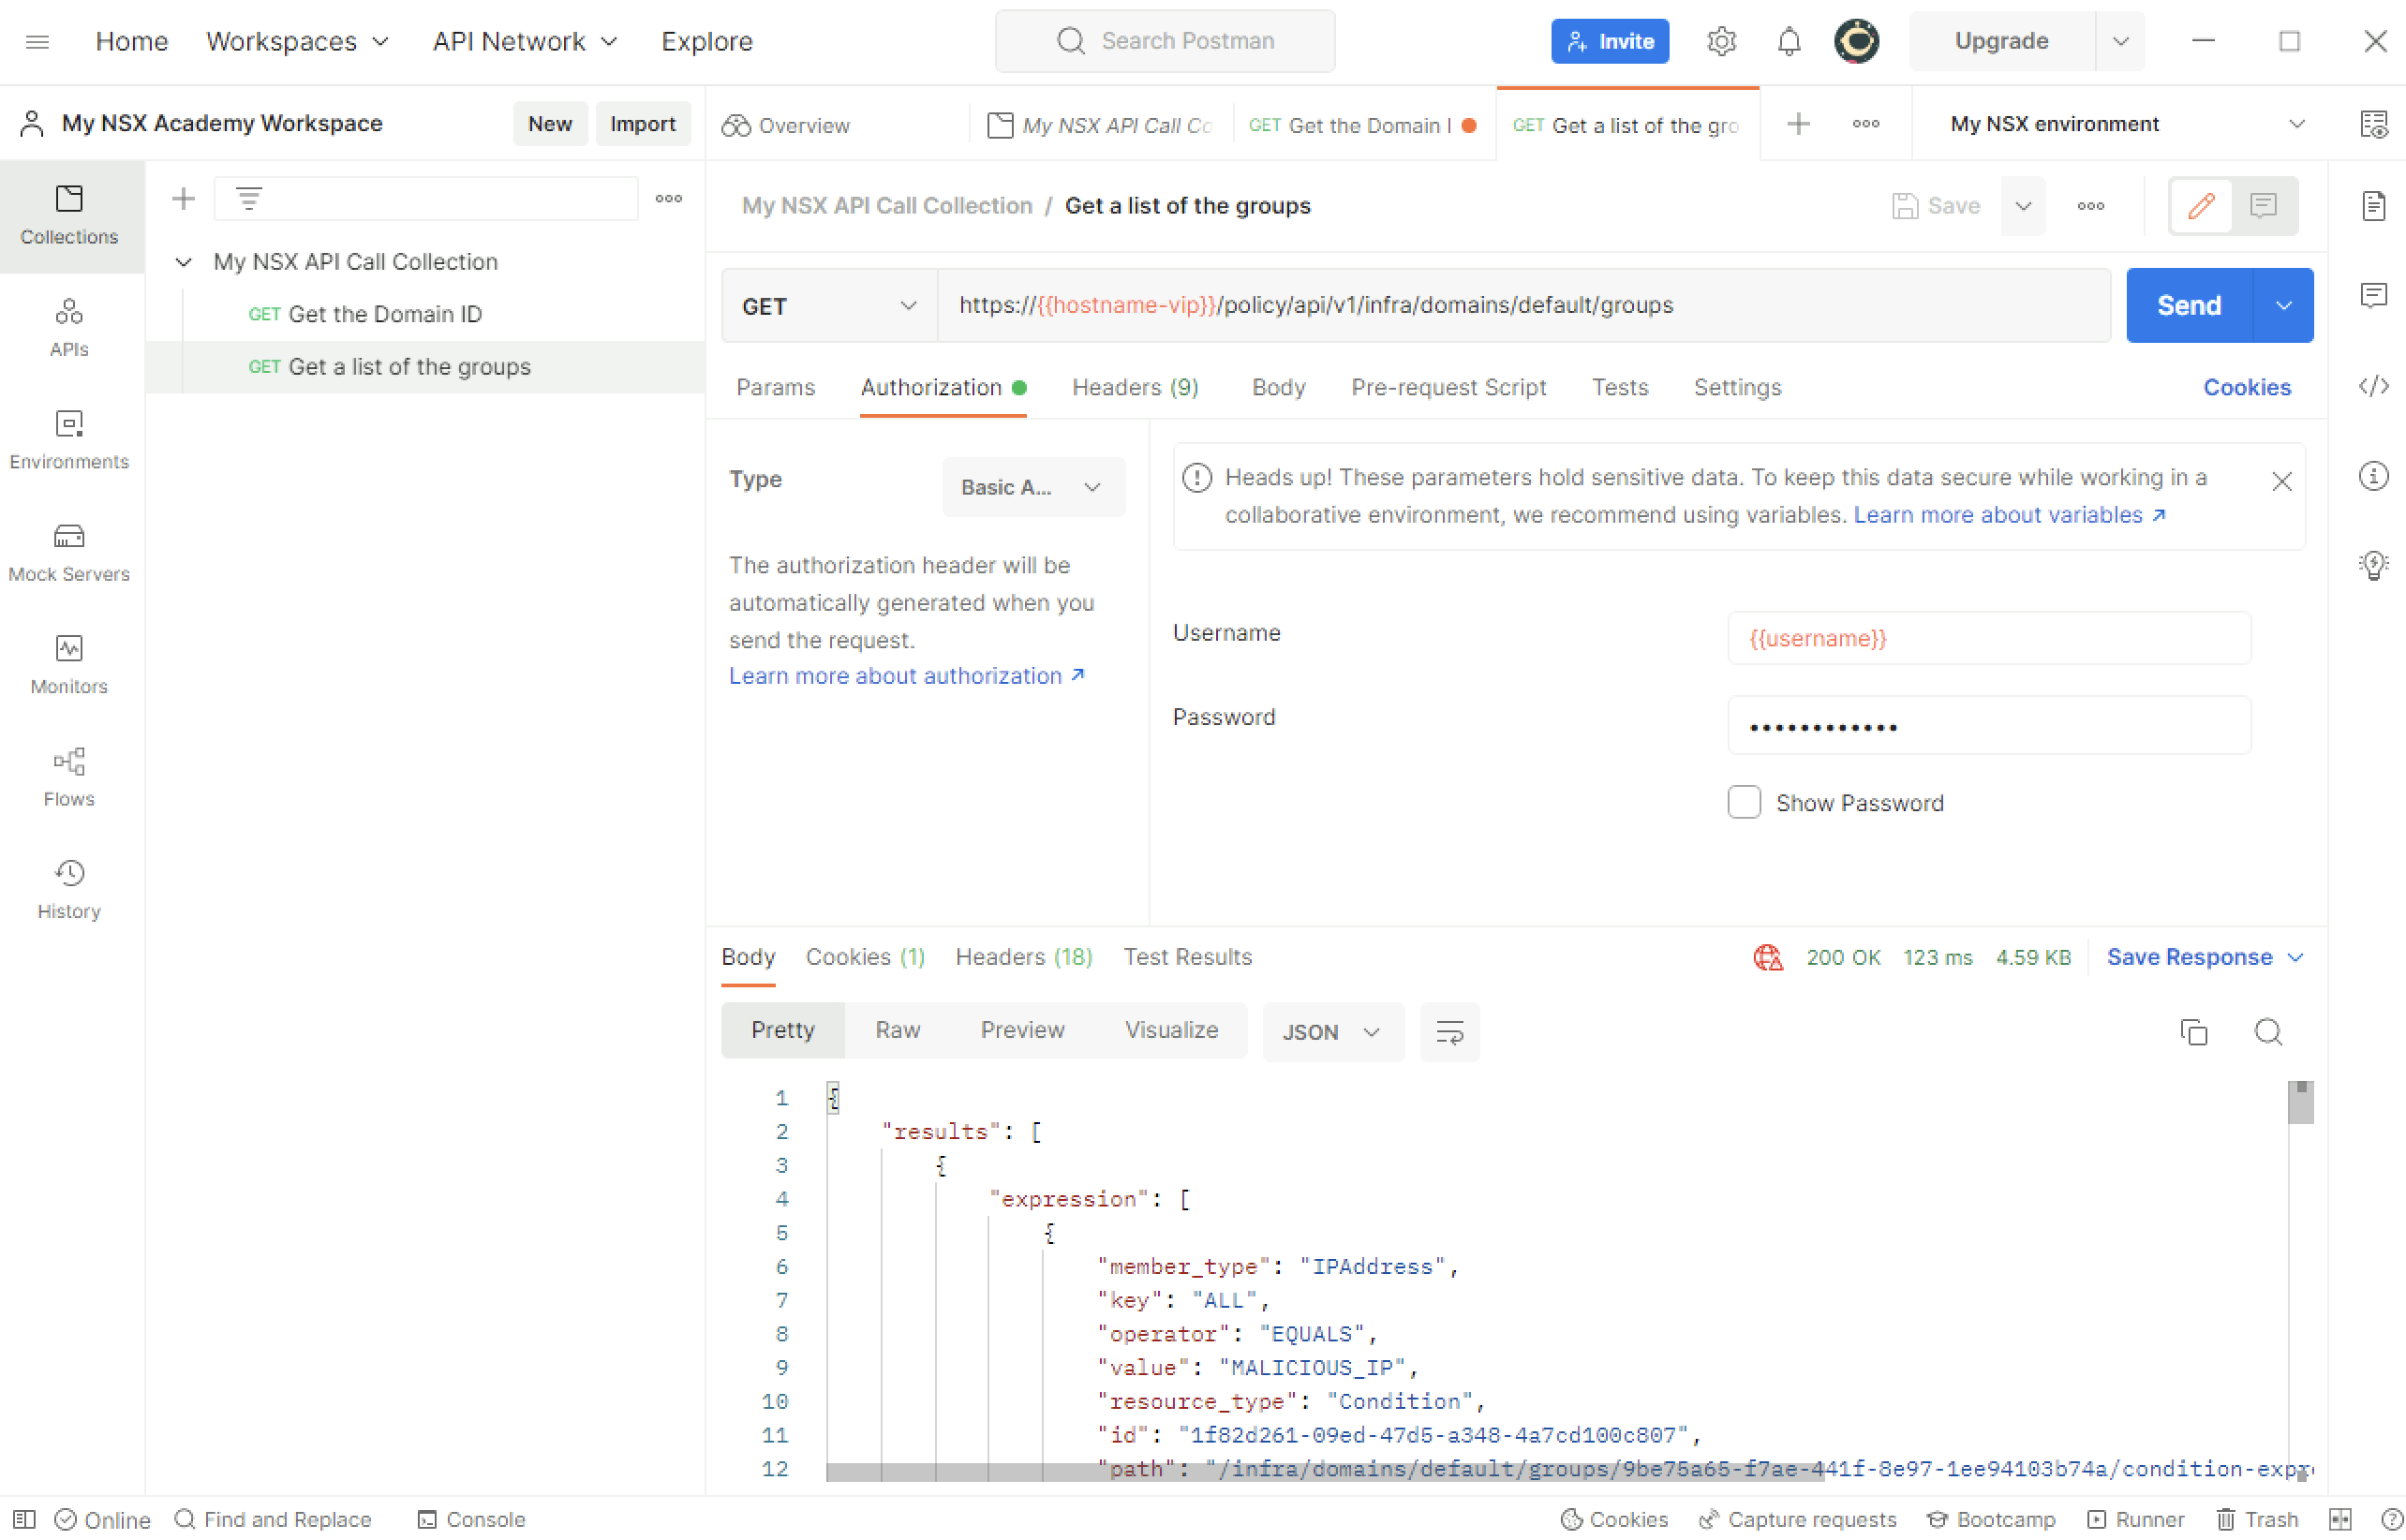
When I clicked on “Send” and everything is working correctly look for “200 OK” message and look at output.
{
"results": [
{
"expression": [
{
"member_type": "IPAddress",
"key": "ALL",
"operator": "EQUALS",
"value": "MALICIOUS_IP",
"resource_type": "Condition",
"id": "1f82d261-09ed-47d5-a348-4a7cd100c807",
"path": "/infra/domains/default/groups/9be75a65-f7ae-441f-8e97-1ee94103b74a/condition-expressions/1f82d261-09ed-47d5-a348-4a7cd100c807",
"relative_path": "1f82d261-09ed-47d5-a348-4a7cd100c807",
"parent_path": "/infra/domains/default/groups/9be75a65-f7ae-441f-8e97-1ee94103b74a",
"marked_for_delete": false,
"overridden": false,
"_protection": "NOT_PROTECTED"
}
],
"extended_expression": [],
"reference": false,
"group_type": [
"IPAddress"
],
"resource_type": "Group",
"id": "9be75a65-f7ae-441f-8e97-1ee94103b74a",
"display_name": "DefaultMaliciousIpGroup",
"description": "Default Malicious IP group",
"path": "/infra/domains/default/groups/9be75a65-f7ae-441f-8e97-1ee94103b74a",
"relative_path": "9be75a65-f7ae-441f-8e97-1ee94103b74a",
"parent_path": "/infra/domains/default",
"unique_id": "efc4b58e-bbda-4f16-93b0-83f0b8745921",
"realization_id": "efc4b58e-bbda-4f16-93b0-83f0b8745921",
"marked_for_delete": false,
"overridden": false,
"_create_time": 1661418528470,
"_create_user": "system",
"_last_modified_time": 1661418528470,
"_last_modified_user": "system",
"_system_owned": false,
"_protection": "NOT_PROTECTED",
"_revision": 0
},
{
"expression": [
{
"member_type": "VirtualMachine",
"key": "Tag",
"operator": "EQUALS",
"value": "Edge_NSGroup",
"resource_type": "Condition",
"id": "da122c92-8205-41fc-9f19-10ba6069333f",
"path": "/infra/domains/default/groups/a8b7ddce-a5d6-11e8-a7e5-43344e310957/condition-expressions/da122c92-8205-41fc-9f19-10ba6069333f",
"relative_path": "da122c92-8205-41fc-9f19-10ba6069333f",
"parent_path": "/infra/domains/default/groups/a8b7ddce-a5d6-11e8-a7e5-43344e310957",
"marked_for_delete": false,
"overridden": false,
"_protection": "NOT_PROTECTED"
}
],
"extended_expression": [],
"reference": false,
"resource_type": "Group",
"id": "a8b7ddce-a5d6-11e8-a7e5-43344e310957",
"display_name": "Edge_NSGroup",
"description": "Edge VMs are added to DFW exclude list via Edge_NSGroup",
"path": "/infra/domains/default/groups/a8b7ddce-a5d6-11e8-a7e5-43344e310957",
"relative_path": "a8b7ddce-a5d6-11e8-a7e5-43344e310957",
"parent_path": "/infra/domains/default",
"unique_id": "dcda0fe0-0df9-40ca-aa5c-f4e7f7a706ae",
"realization_id": "dcda0fe0-0df9-40ca-aa5c-f4e7f7a706ae",
"marked_for_delete": false,
"overridden": false,
"_create_time": 1661418542929,
"_create_user": "system",
"_last_modified_time": 1661418542929,
"_last_modified_user": "system",
"_system_owned": true,
"_protection": "NOT_PROTECTED",
"_revision": 0
},
{
"expression": [],
"extended_expression": [],
"reference": false,
"resource_type": "Group",
"id": "03335585-9574-4d44-a001-818ca9a9c282",
"display_name": "ServiceInsertion_NSGroup",
"description": "SVMs deployed by ServiceInsertion are added to this NSGroup",
"path": "/infra/domains/default/groups/03335585-9574-4d44-a001-818ca9a9c282",
"relative_path": "03335585-9574-4d44-a001-818ca9a9c282",
"parent_path": "/infra/domains/default",
"unique_id": "658b5425-d2ba-48fa-9306-f86502fb433a",
"realization_id": "658b5425-d2ba-48fa-9306-f86502fb433a",
"marked_for_delete": false,
"overridden": false,
"_create_time": 1661418545074,
"_create_user": "system",
"_last_modified_time": 1661418545074,
"_last_modified_user": "system",
"_system_owned": true,
"_protection": "NOT_PROTECTED",
"_revision": 0
}
],
"result_count": 3,
"sort_by": "display_name",
"sort_ascending": true
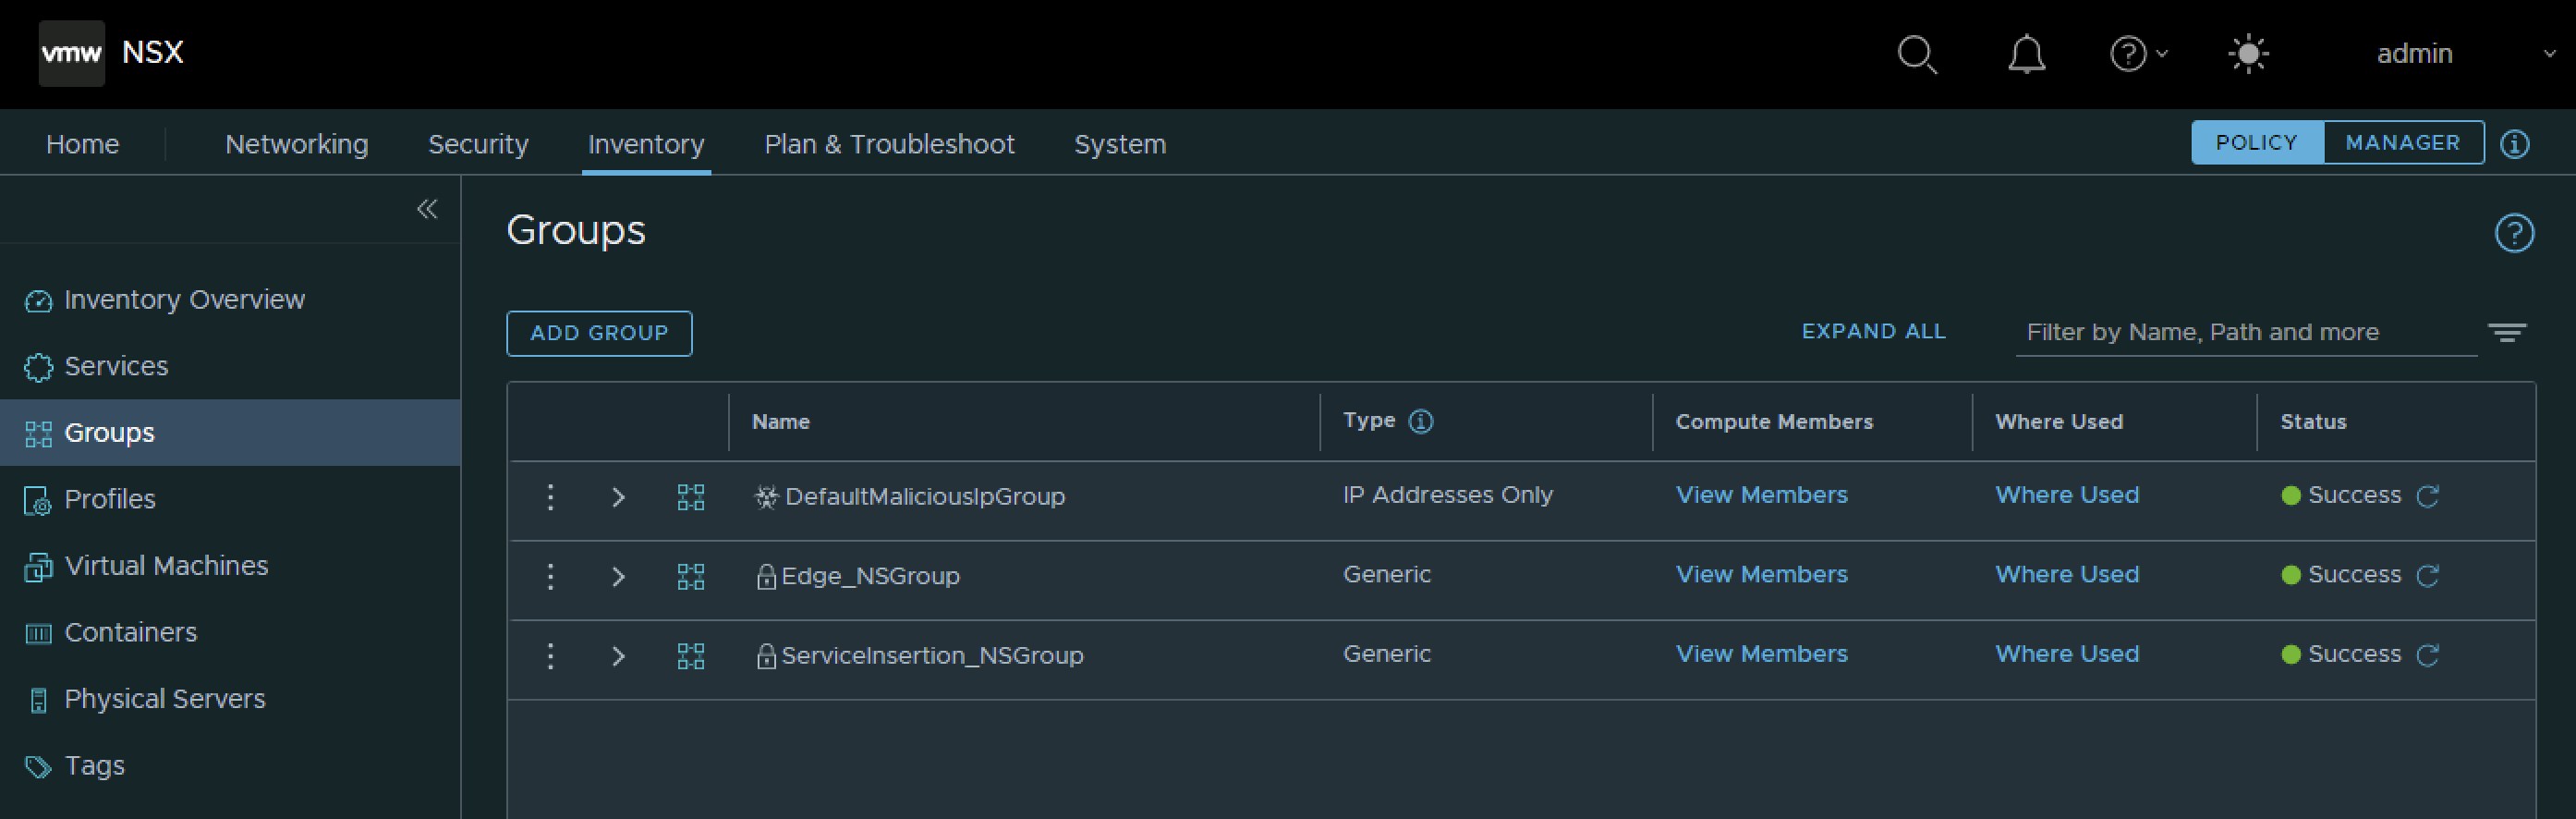
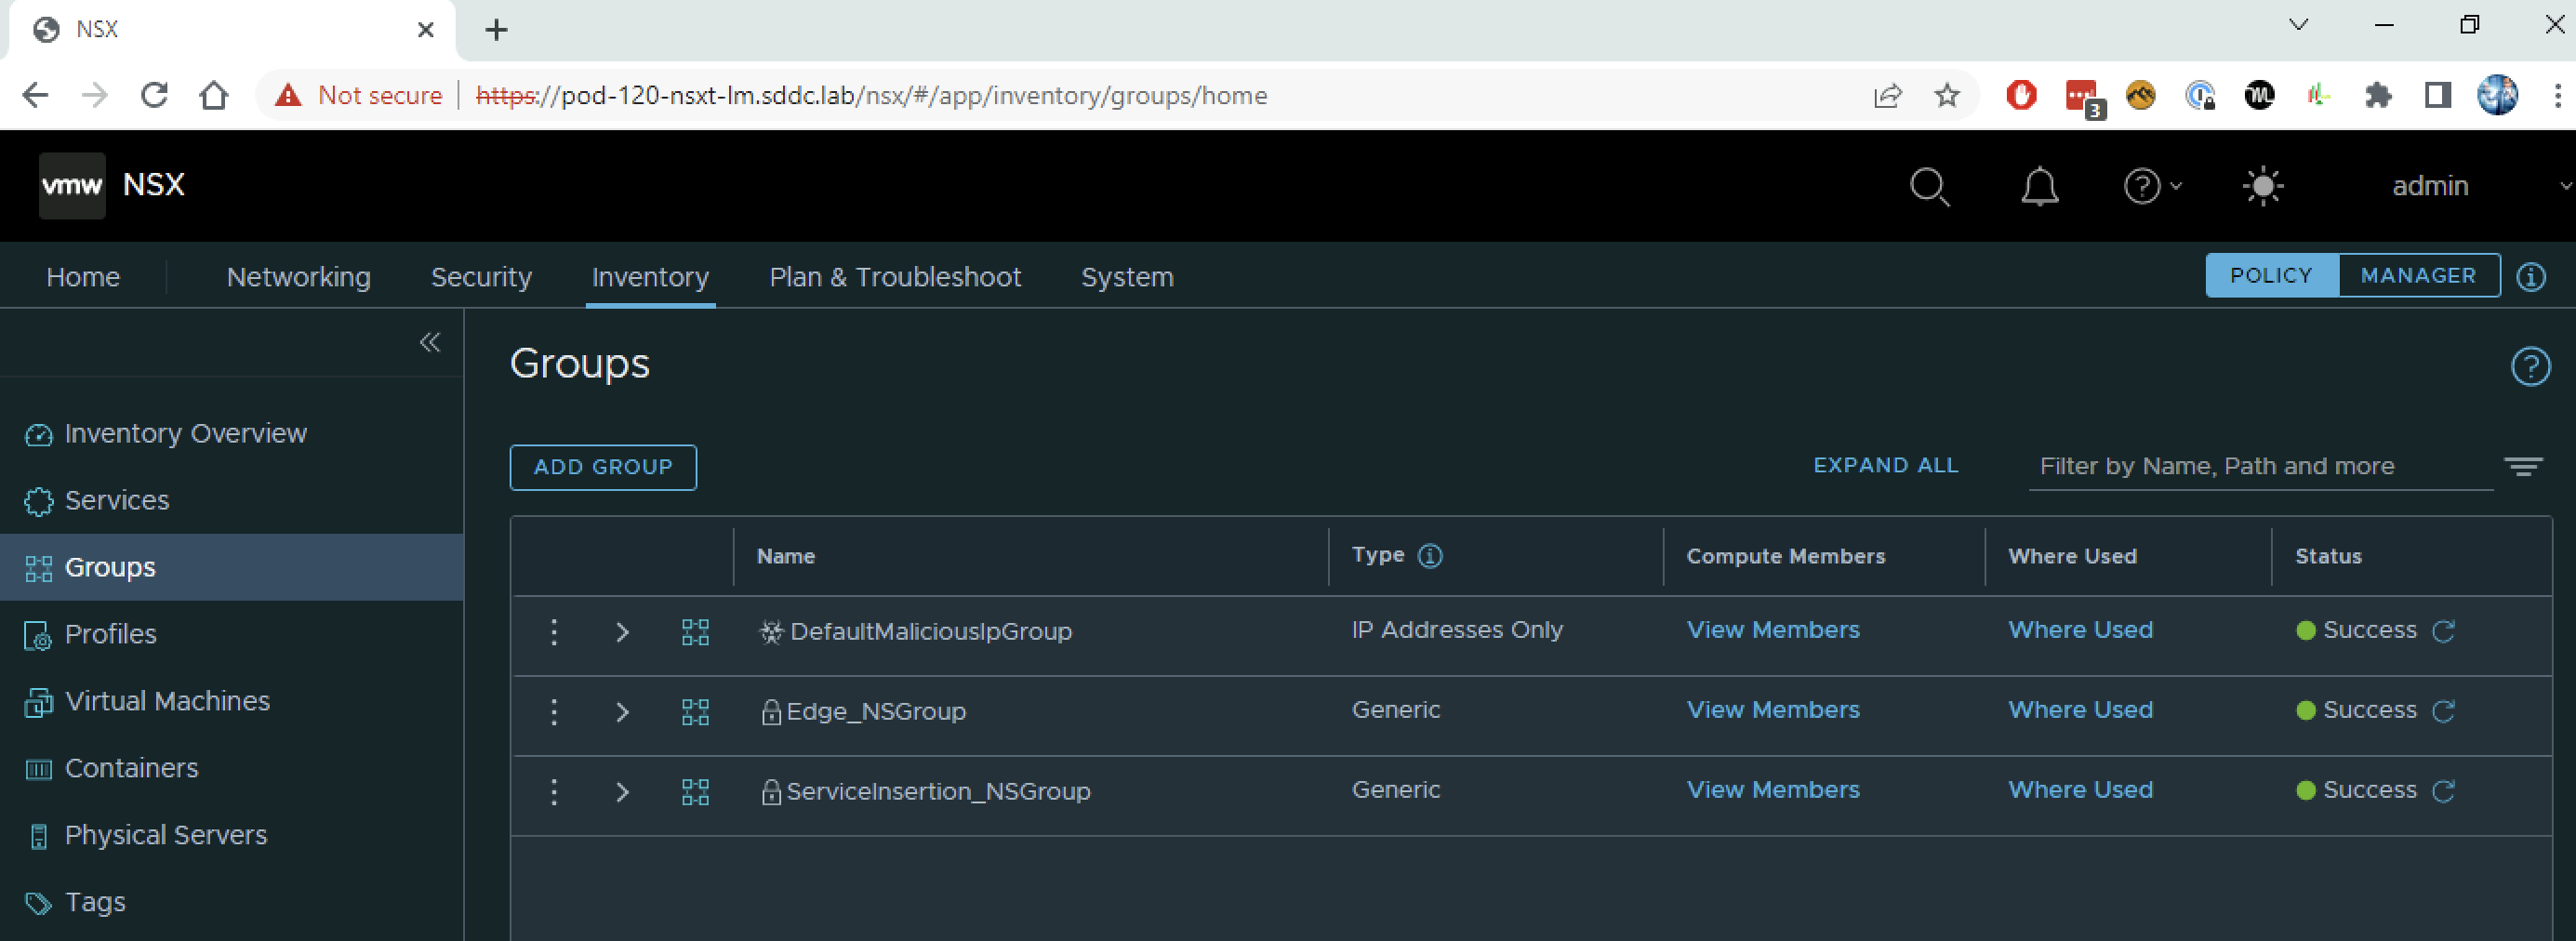
}The same groups are also visible in the NSX GUI when I go to Inventory → Groups.
STEP 8: Perform my first PATCH API request on NSX (create and update the group)
Now I are going to create my first Group using an API request.
Use the following URL to create the new group.
PATCH https://{{hostname-vip}}/policy/api/v1/infra/domains/default/groups/webgroup
To create a new group I need to provide some information about the group, like the name, and I can also specify what Virtual Machines needs to be part of the group etc,. This is all done by using a JSON input that holds the information I need. When I take a closer look at the API documentation in the “Patch a group” section I see an example of this JSON input.
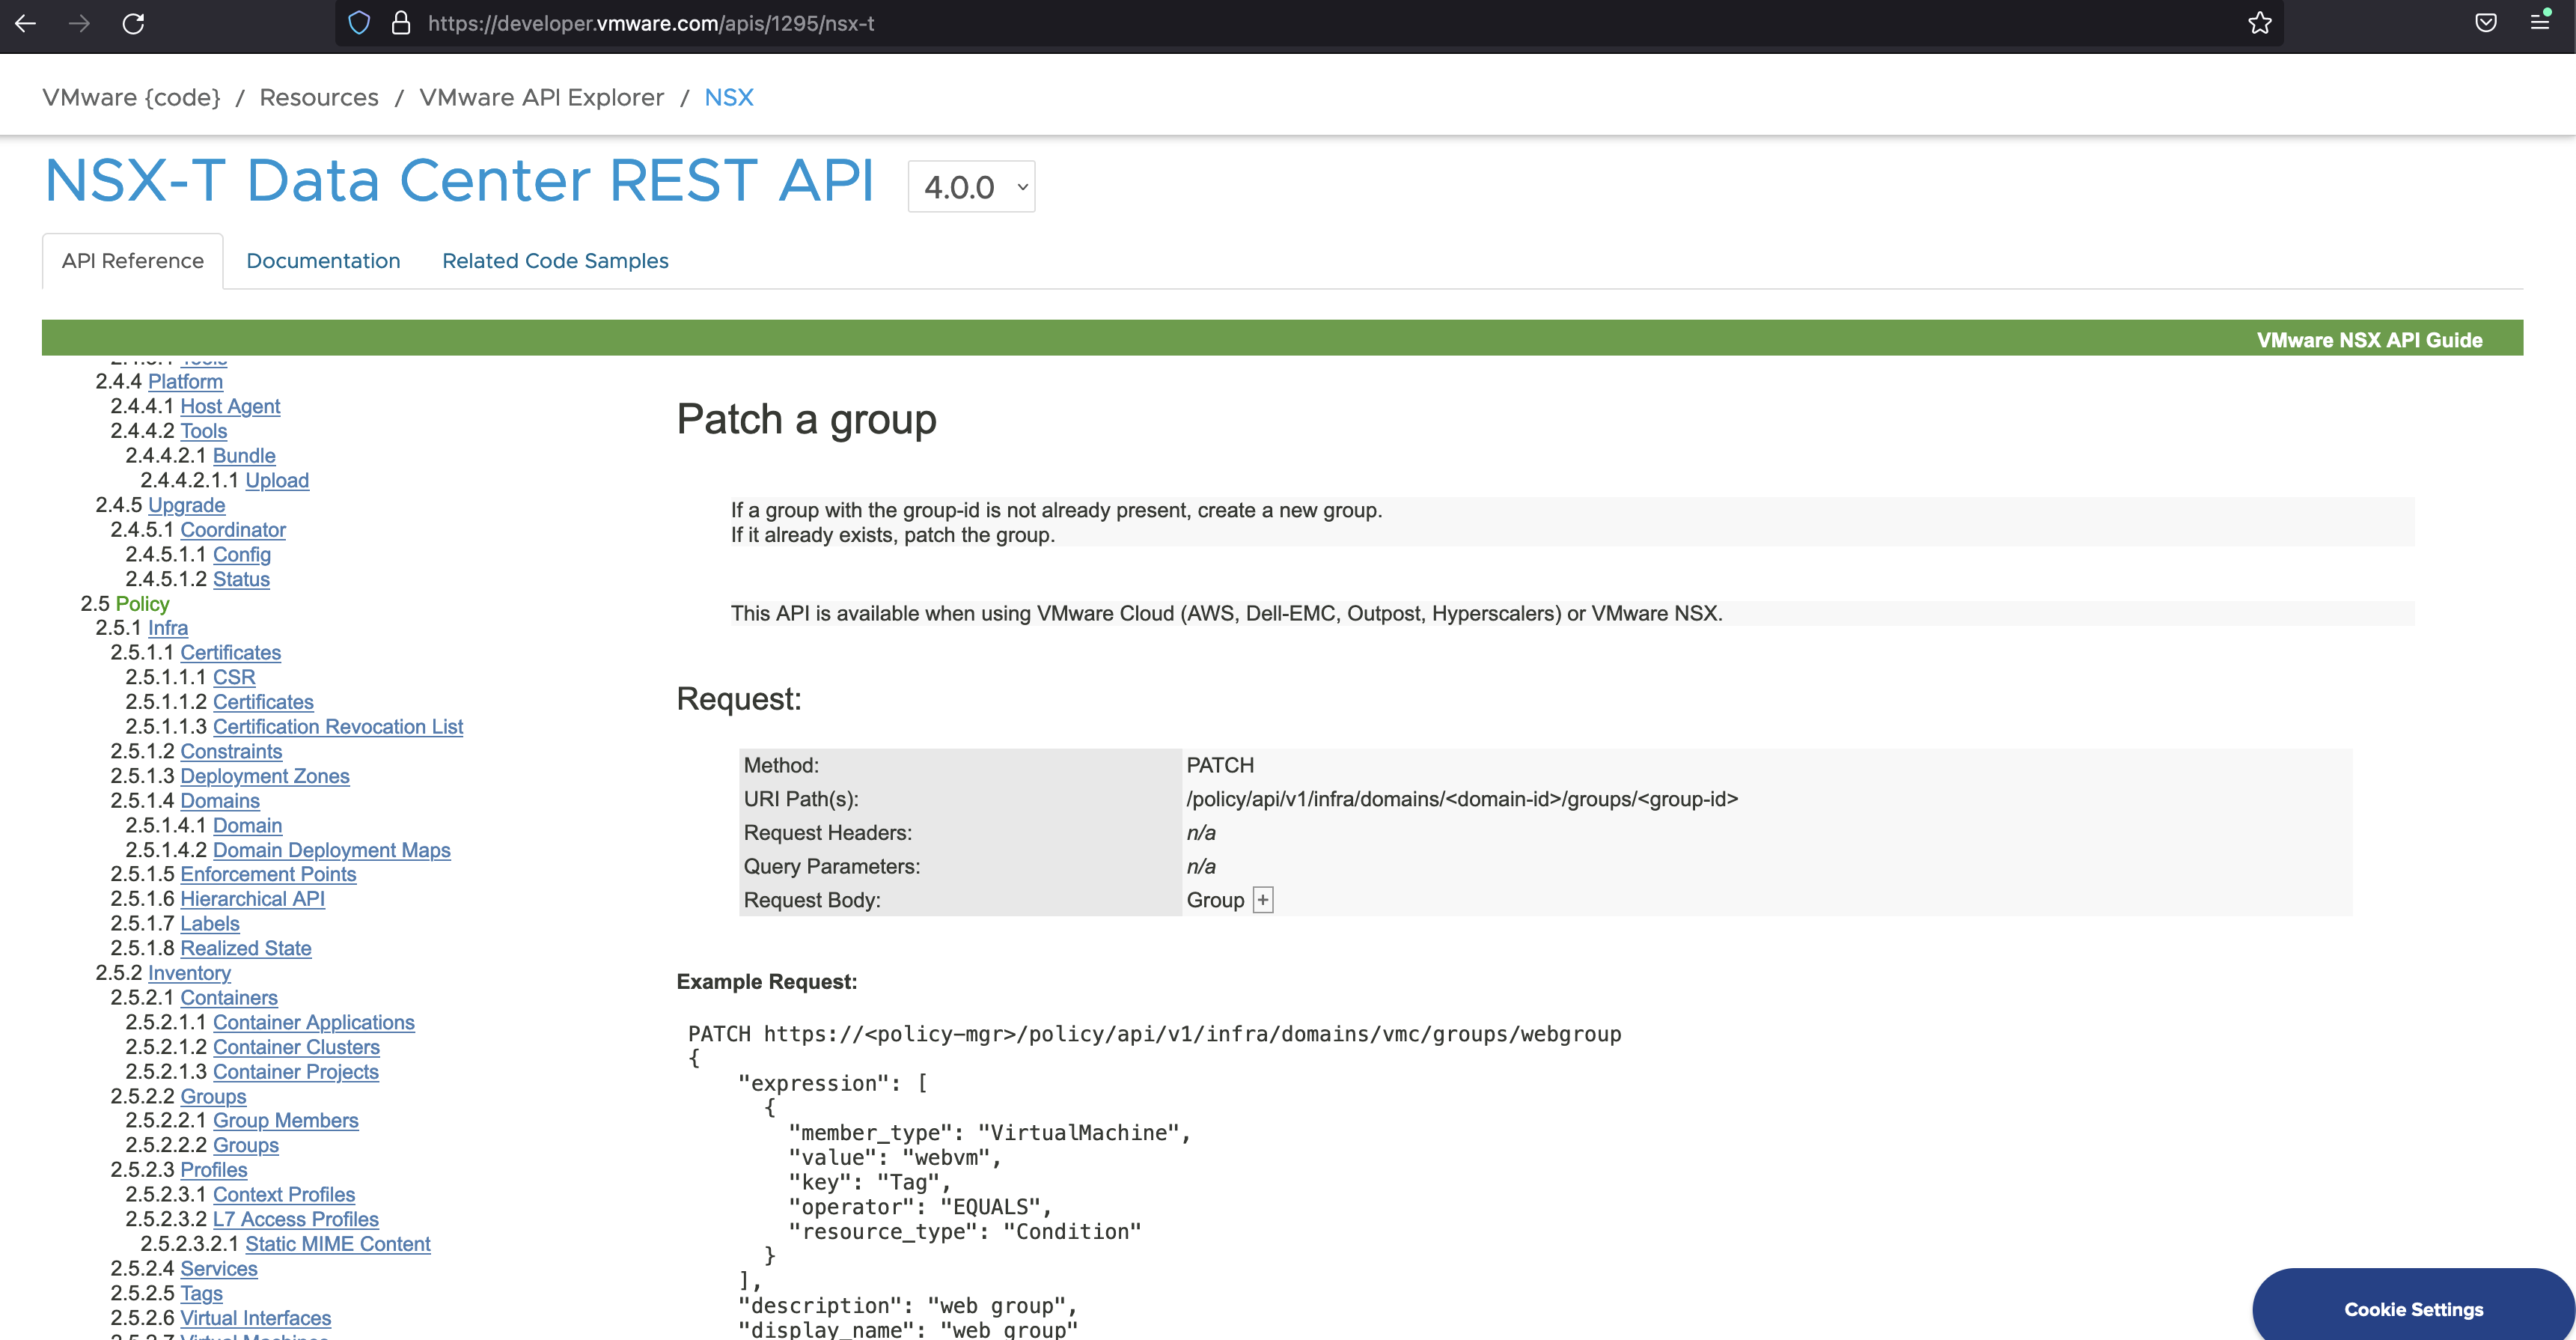
Based on the API documentation I have created the following JSON input that I will use in the API request to create a new Group.
{
    "expression": [
      {
        "member_type": "VirtualMachine",
        "value": "webvm",
        "key": "Tag",
        "operator": "EQUALS",
        "resource_type": "Condition"
      }
    ],
    "description": "NSX Academy Web VMs",
    "display_name": "NSX Academy Web VMs",
    "_revision":0
}
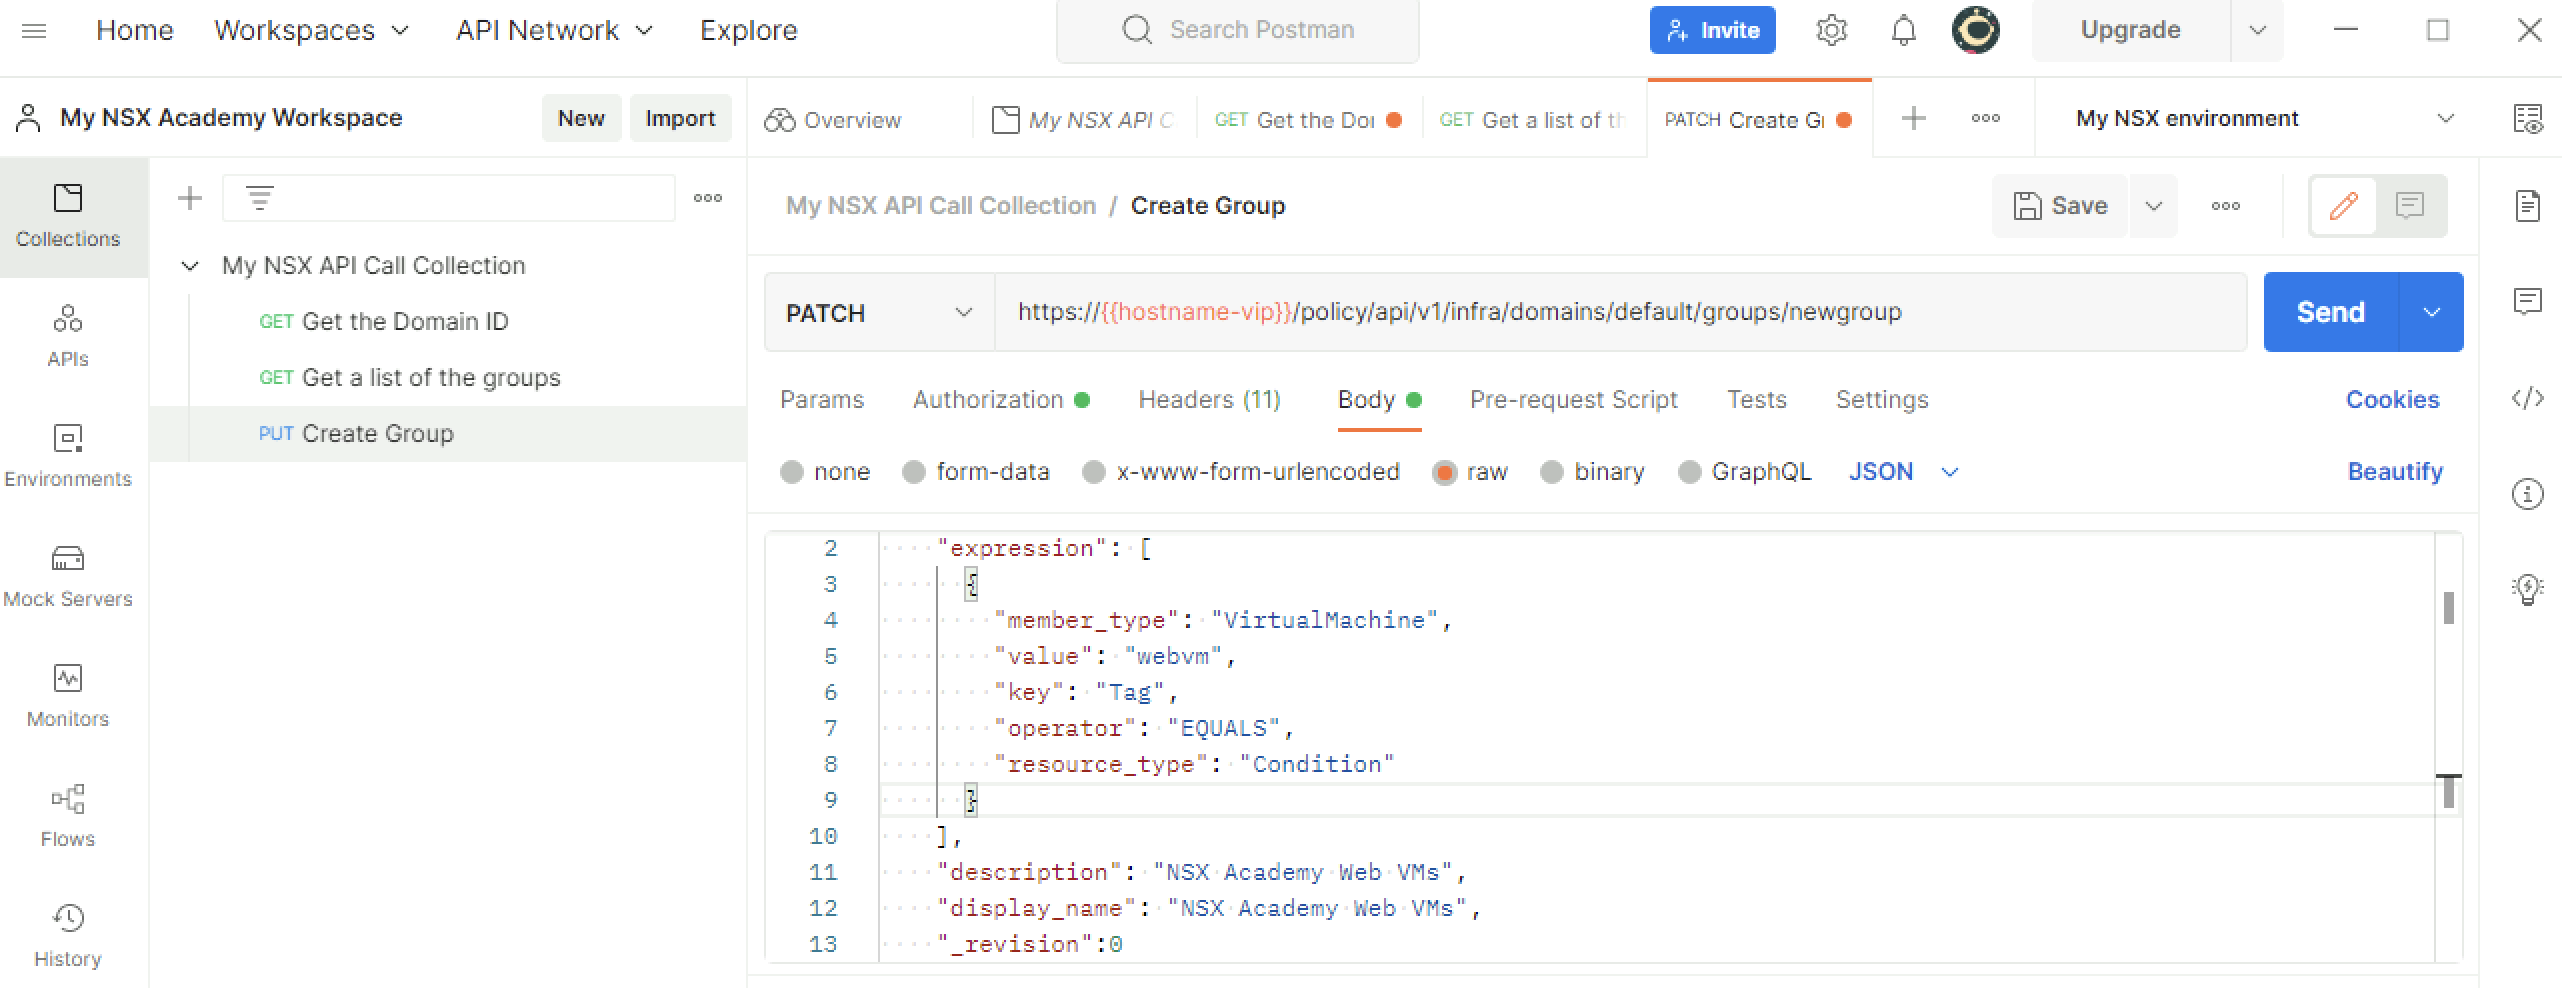
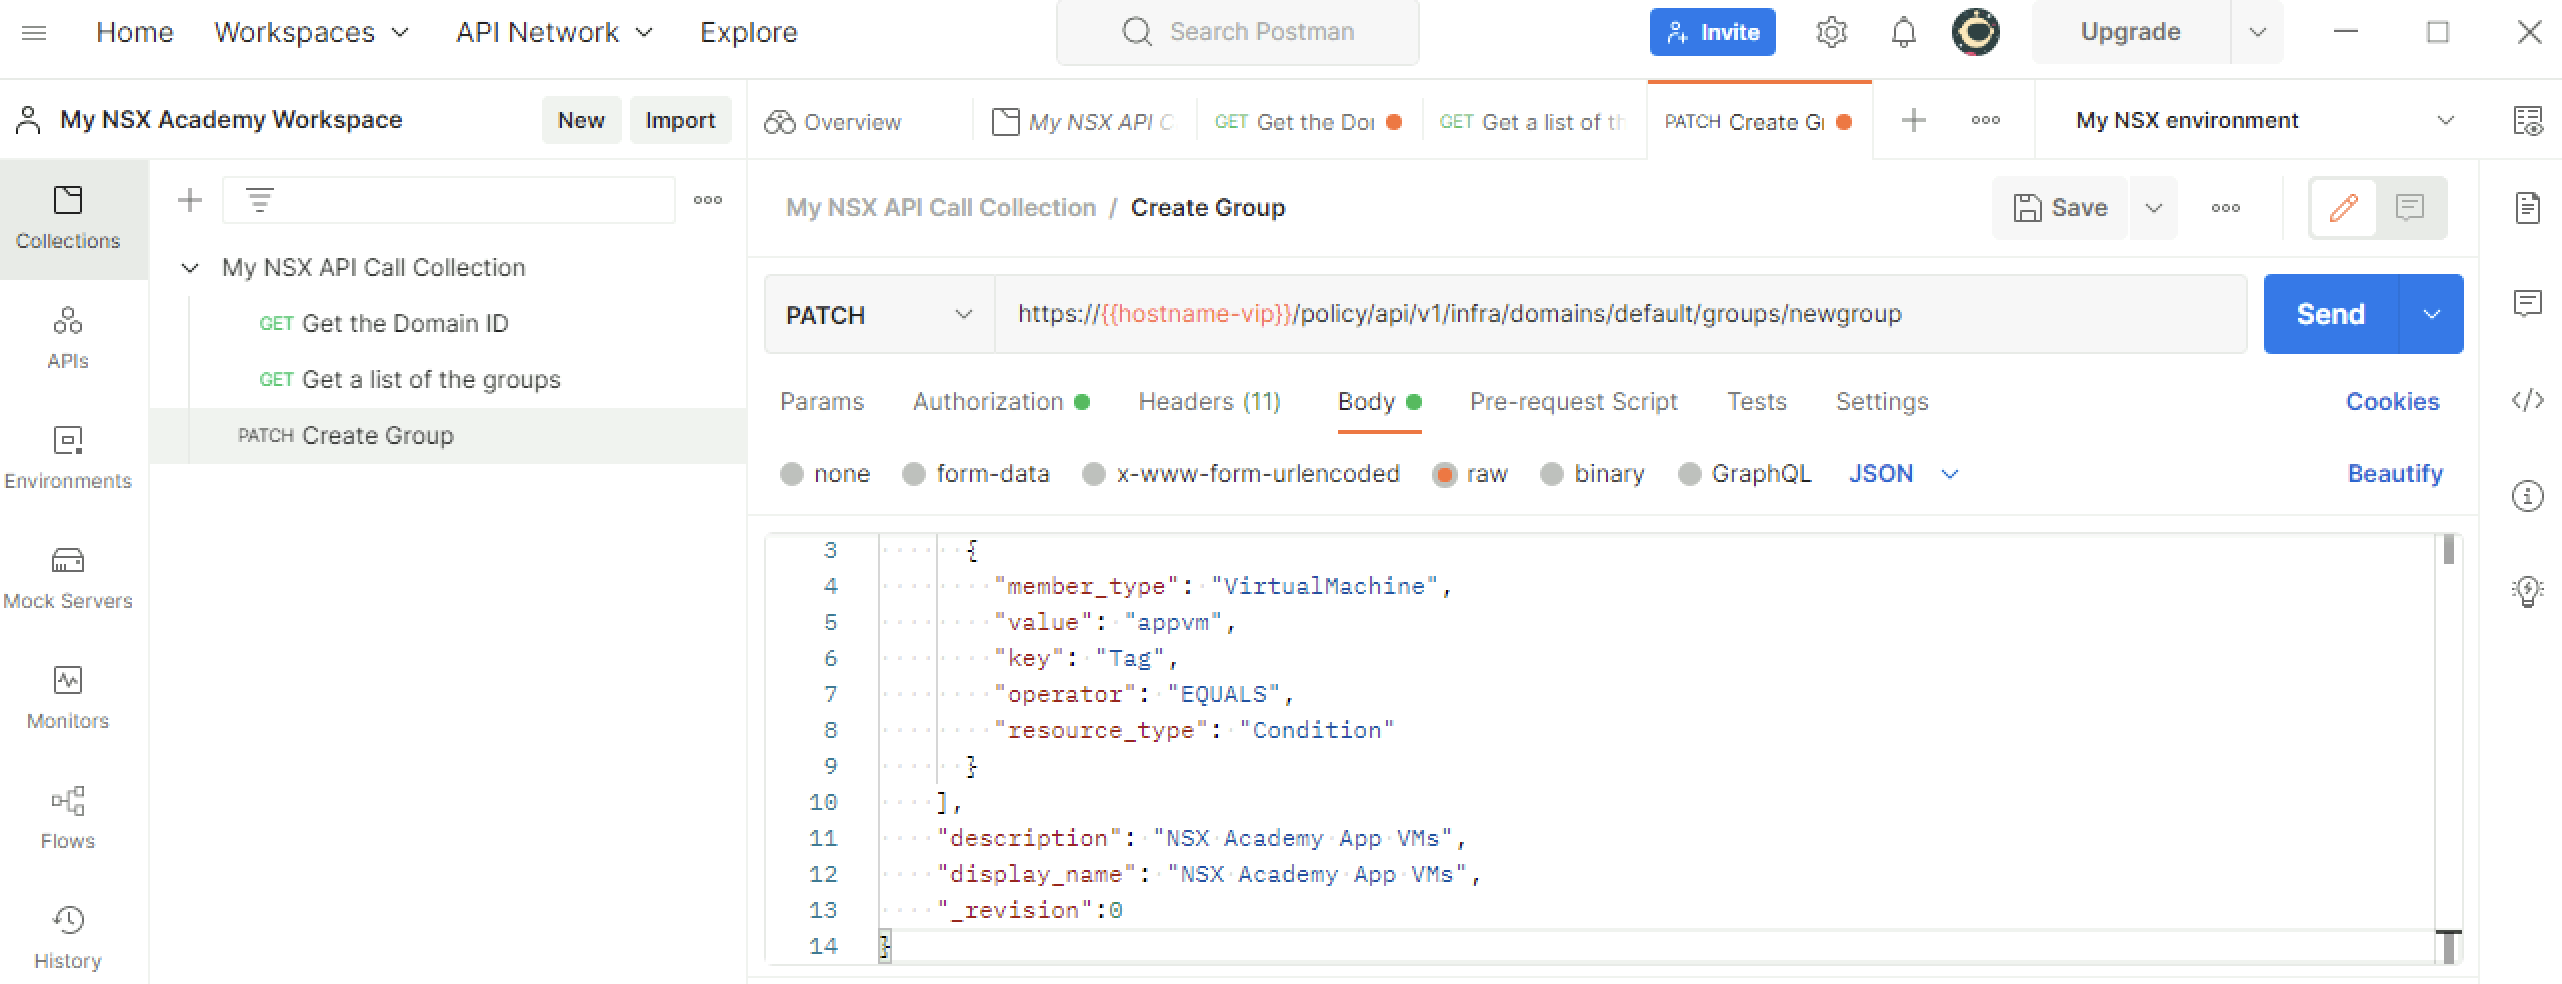
I know the drill now, as for each new API Request I am creating a new Request in the collection. Next to the URL specification (note I am using PATCH instead of GET) and the Authorization type + username and password settings I also need to specify the JSON input somewhere.
This is done in the “Body” tab, select “raw” and “JSON” and paste the input of the JSON file. Click on “Save” first before I click “Send”.
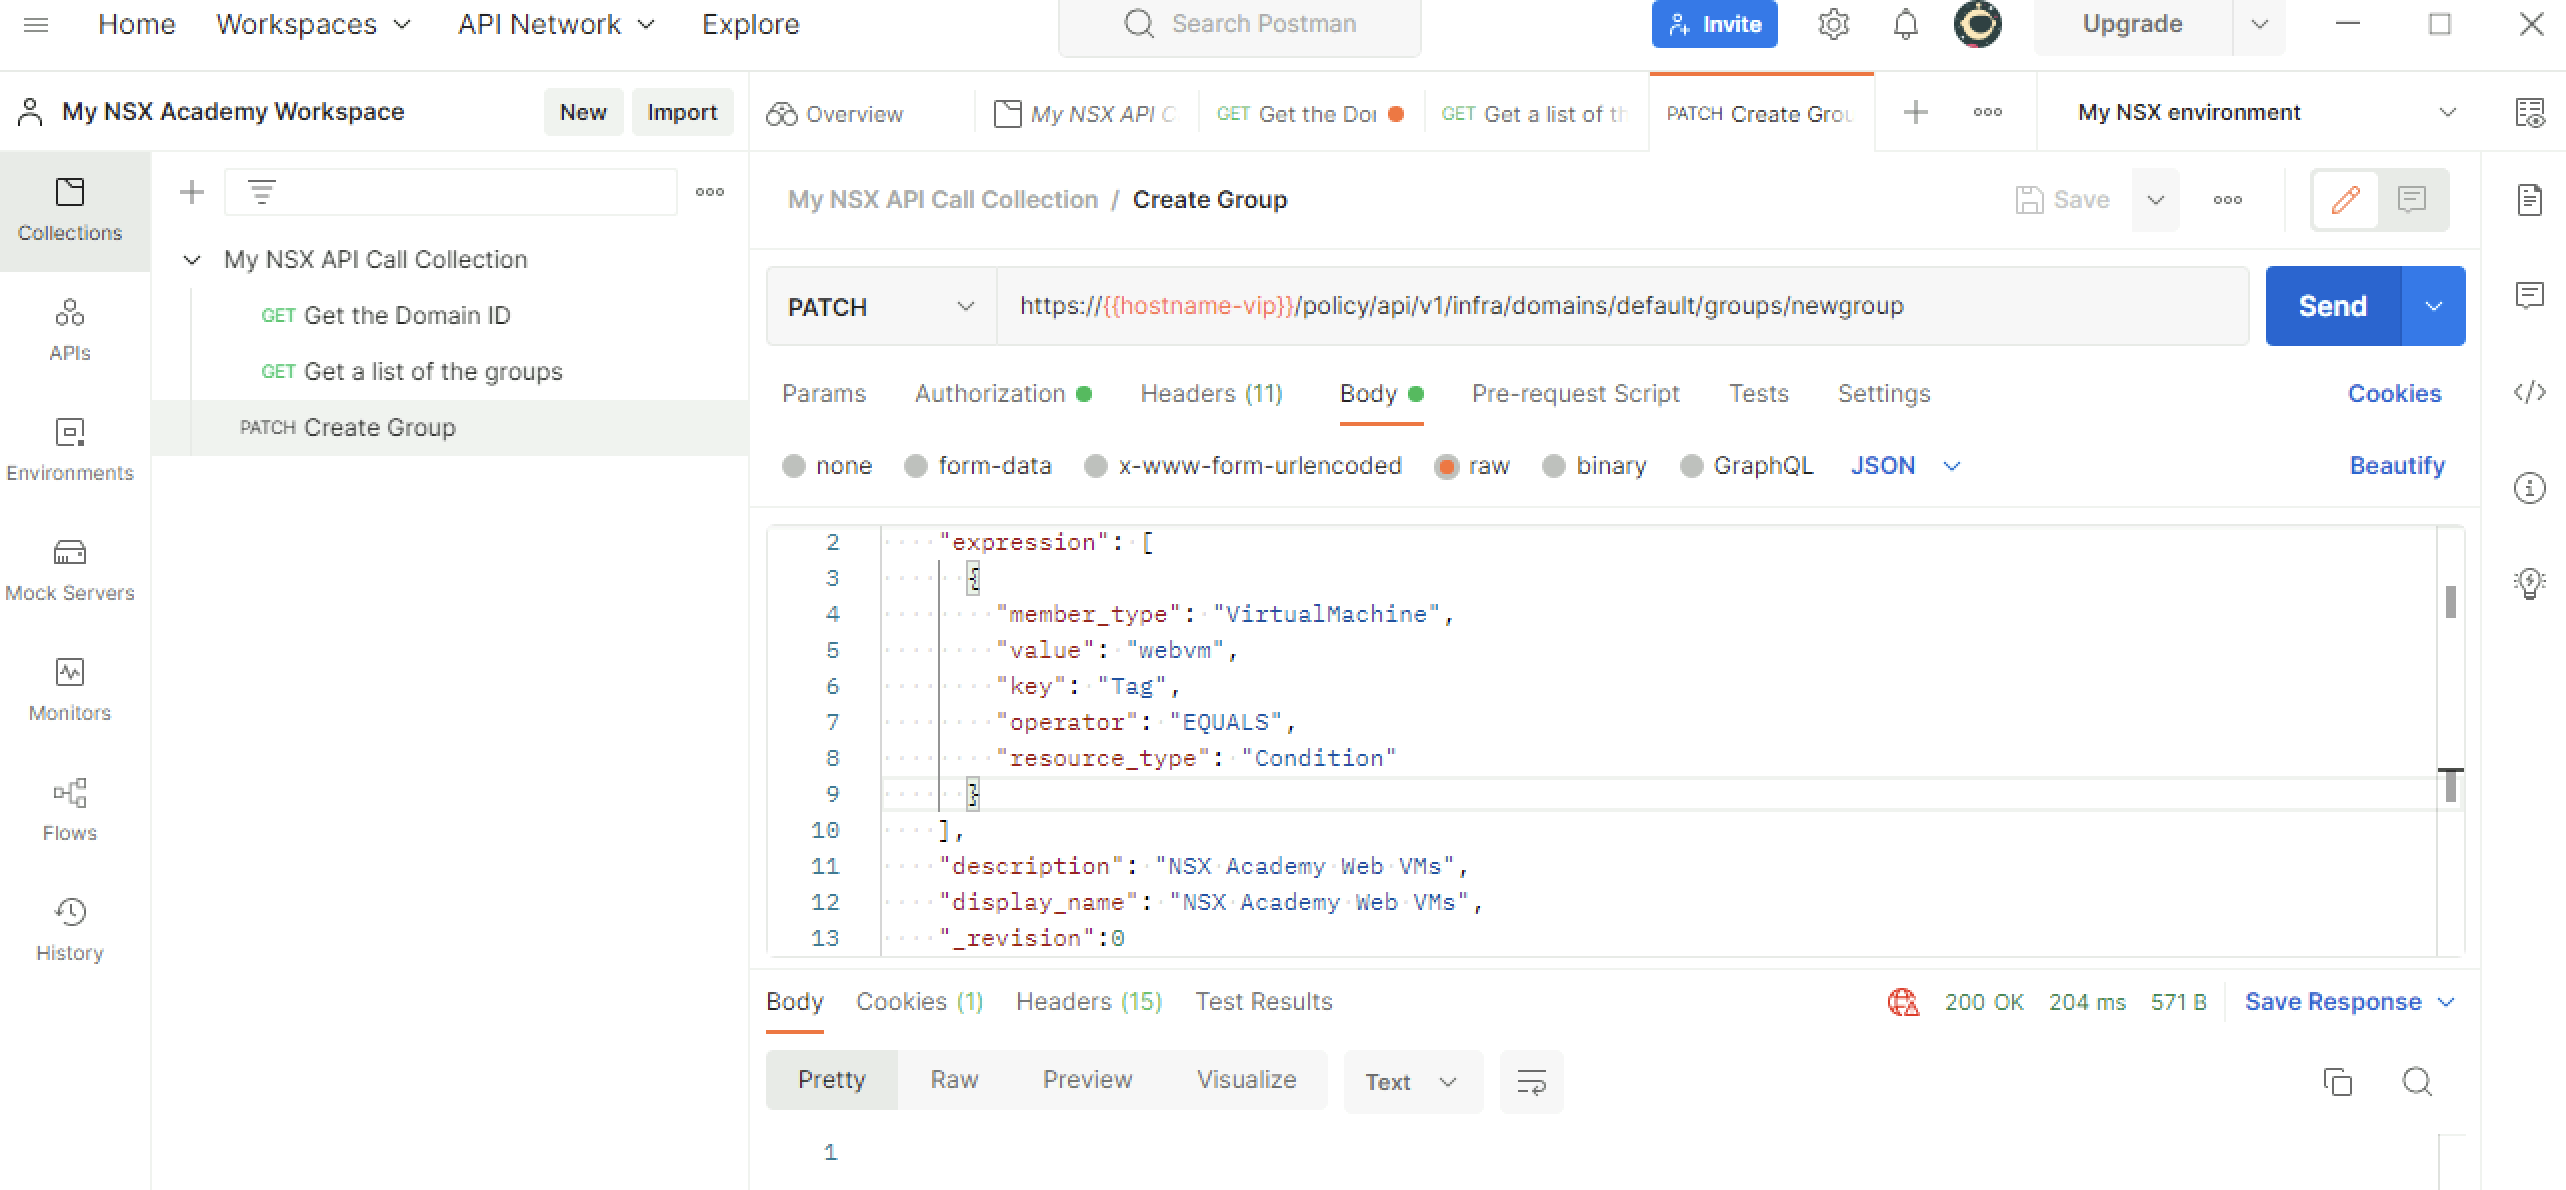
When I clicked on “Send” and everything is working correctly look for “200 OK” message and look at output.
The new group is now visible in the NSX GUI when I go to Inventory → Groups. I might need to click on “Refresh” below.
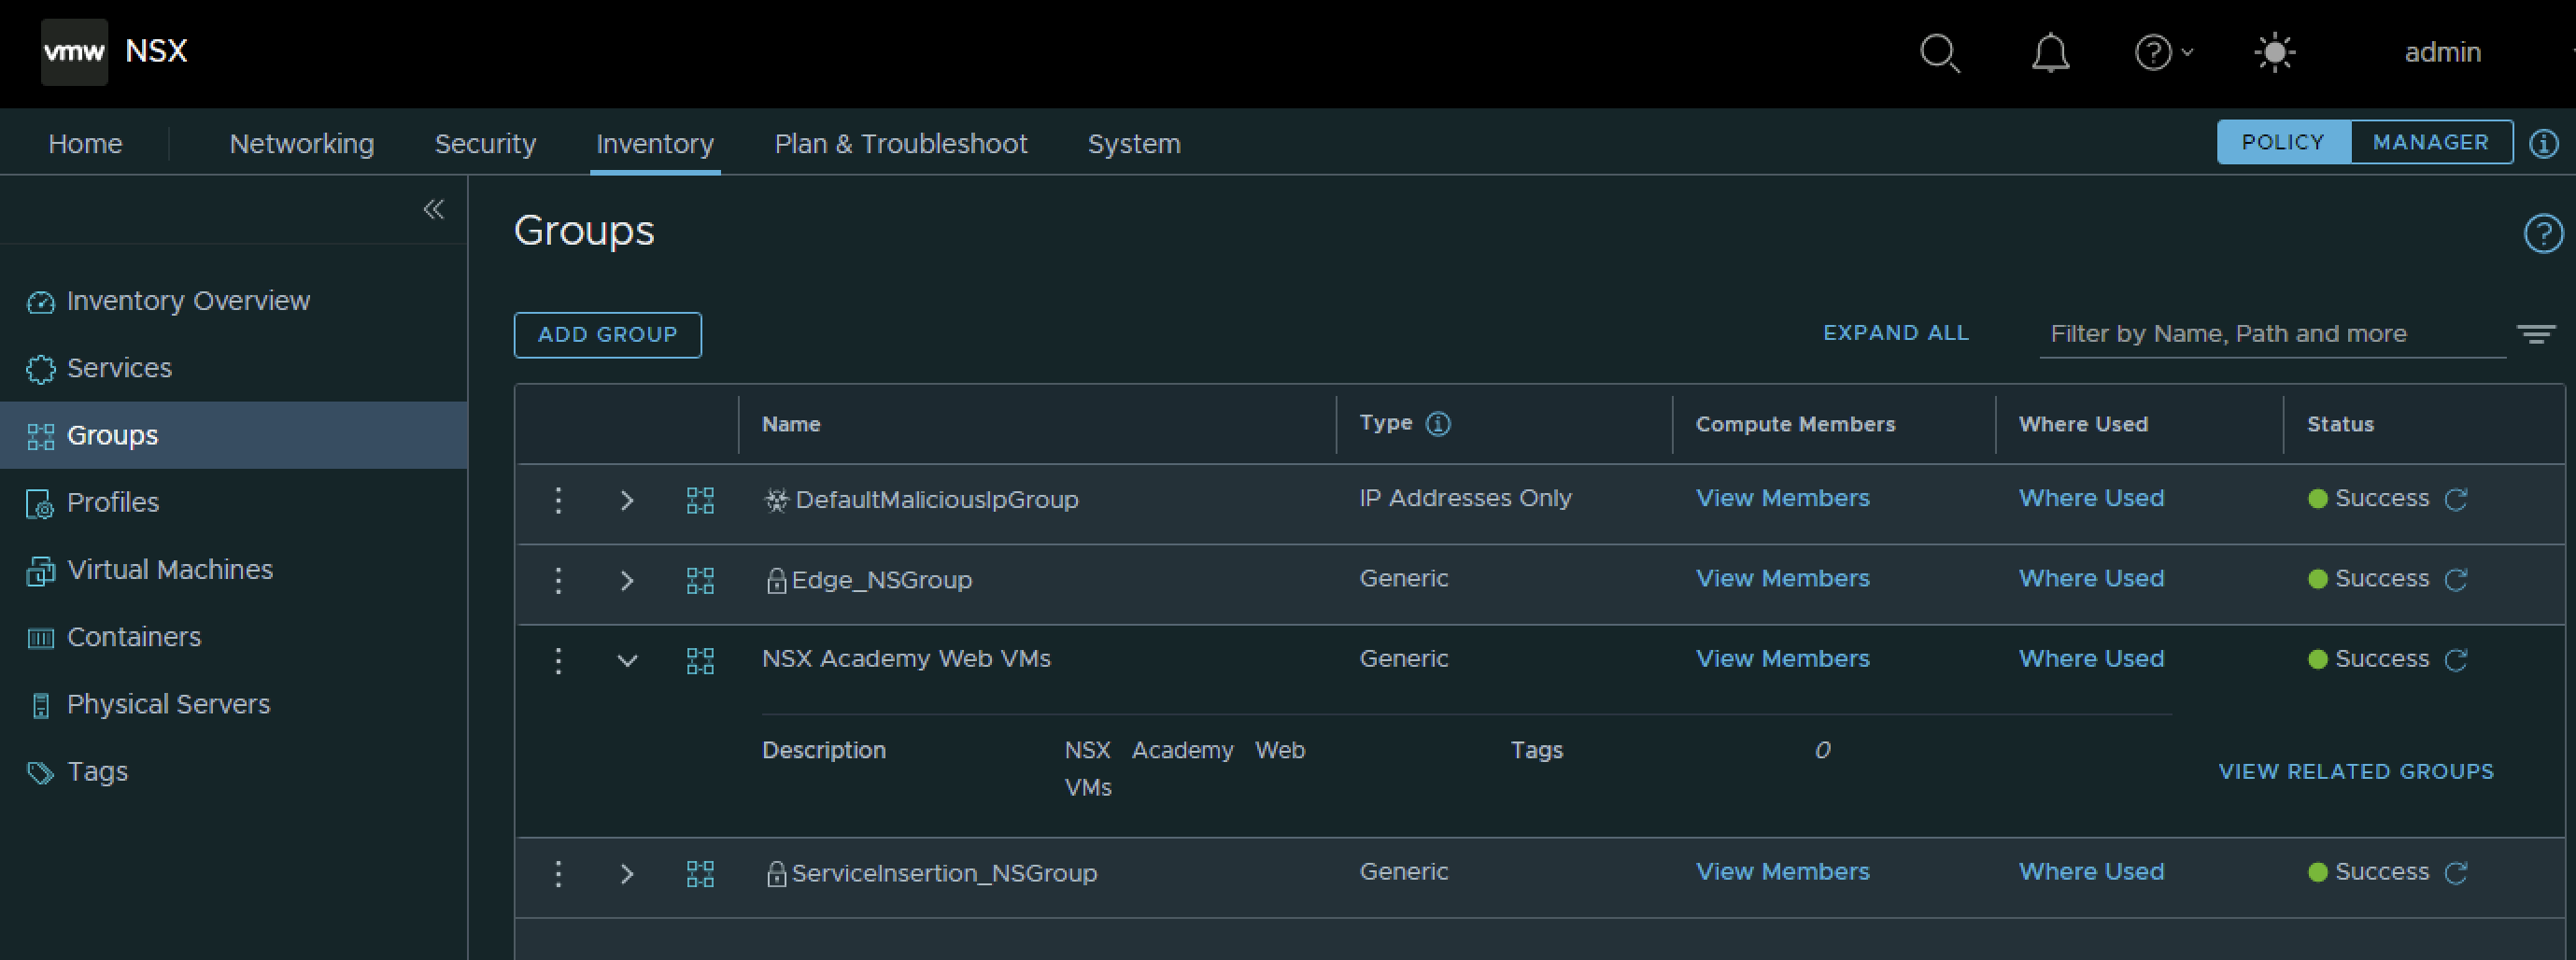
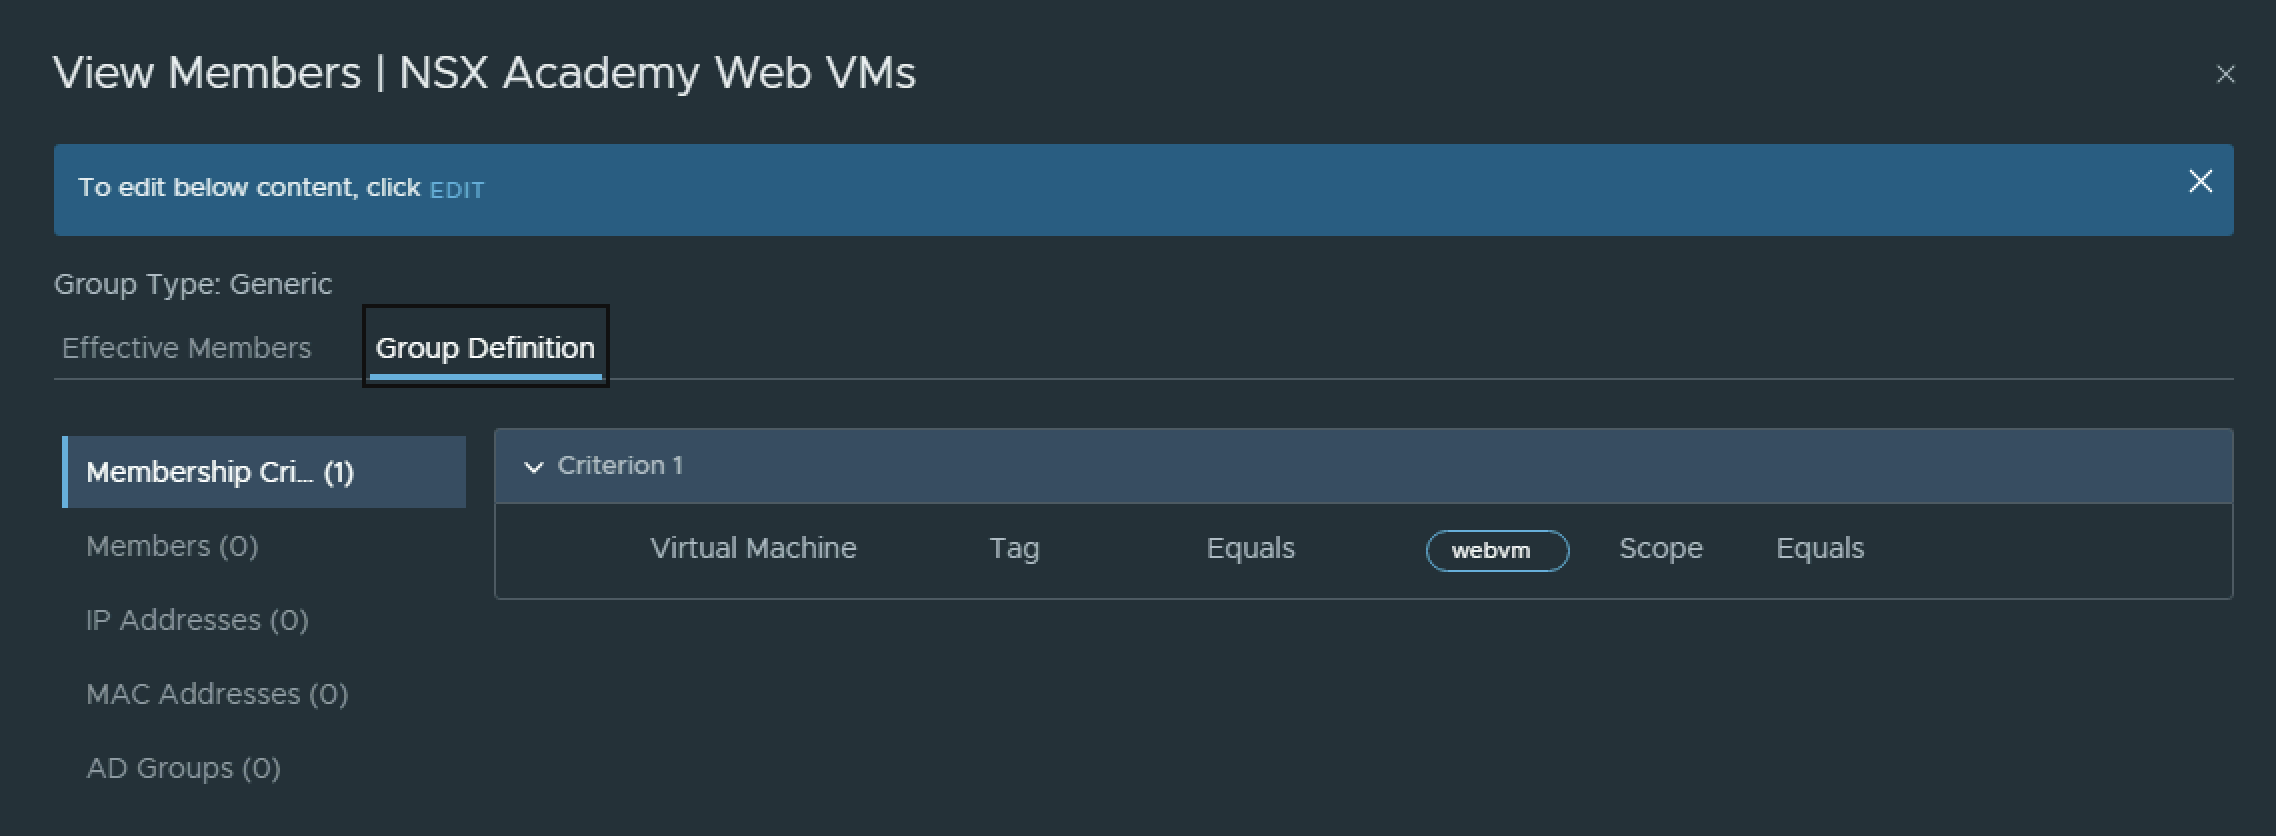
When I click on the group I can also see the additional settings I have specified on how what conditions a Virtual Machine needs to be a member of this Group.
Now that the Group is created lets modify it.
This is done with the same API URL I used for the creation of the group:
PATCH https://{{hostname-vip}}/policy/api/v1/infra/domains/default/groups/webgroup
However the JSON input needs to change to reflect our new names.
Note that I have changed “web” to app”.
{
    "expression": [
      {
        "member_type": "VirtualMachine",
        "value": "appvm",
        "key": "Tag",
        "operator": "EQUALS",
        "resource_type": "Condition"
      }
    ],
    "description": "NSX Academy App VMs",
    "display_name": "NSX Academy App VMs",
    "_revision":0
}
Go to the “Body” tab, select “raw” and “JSON” and paste the (new) input of the JSON file. Click on “Save” first before I click “Send”.
When I clicked on “Send” and everything is working correctly look for “200 OK” message and look at output.

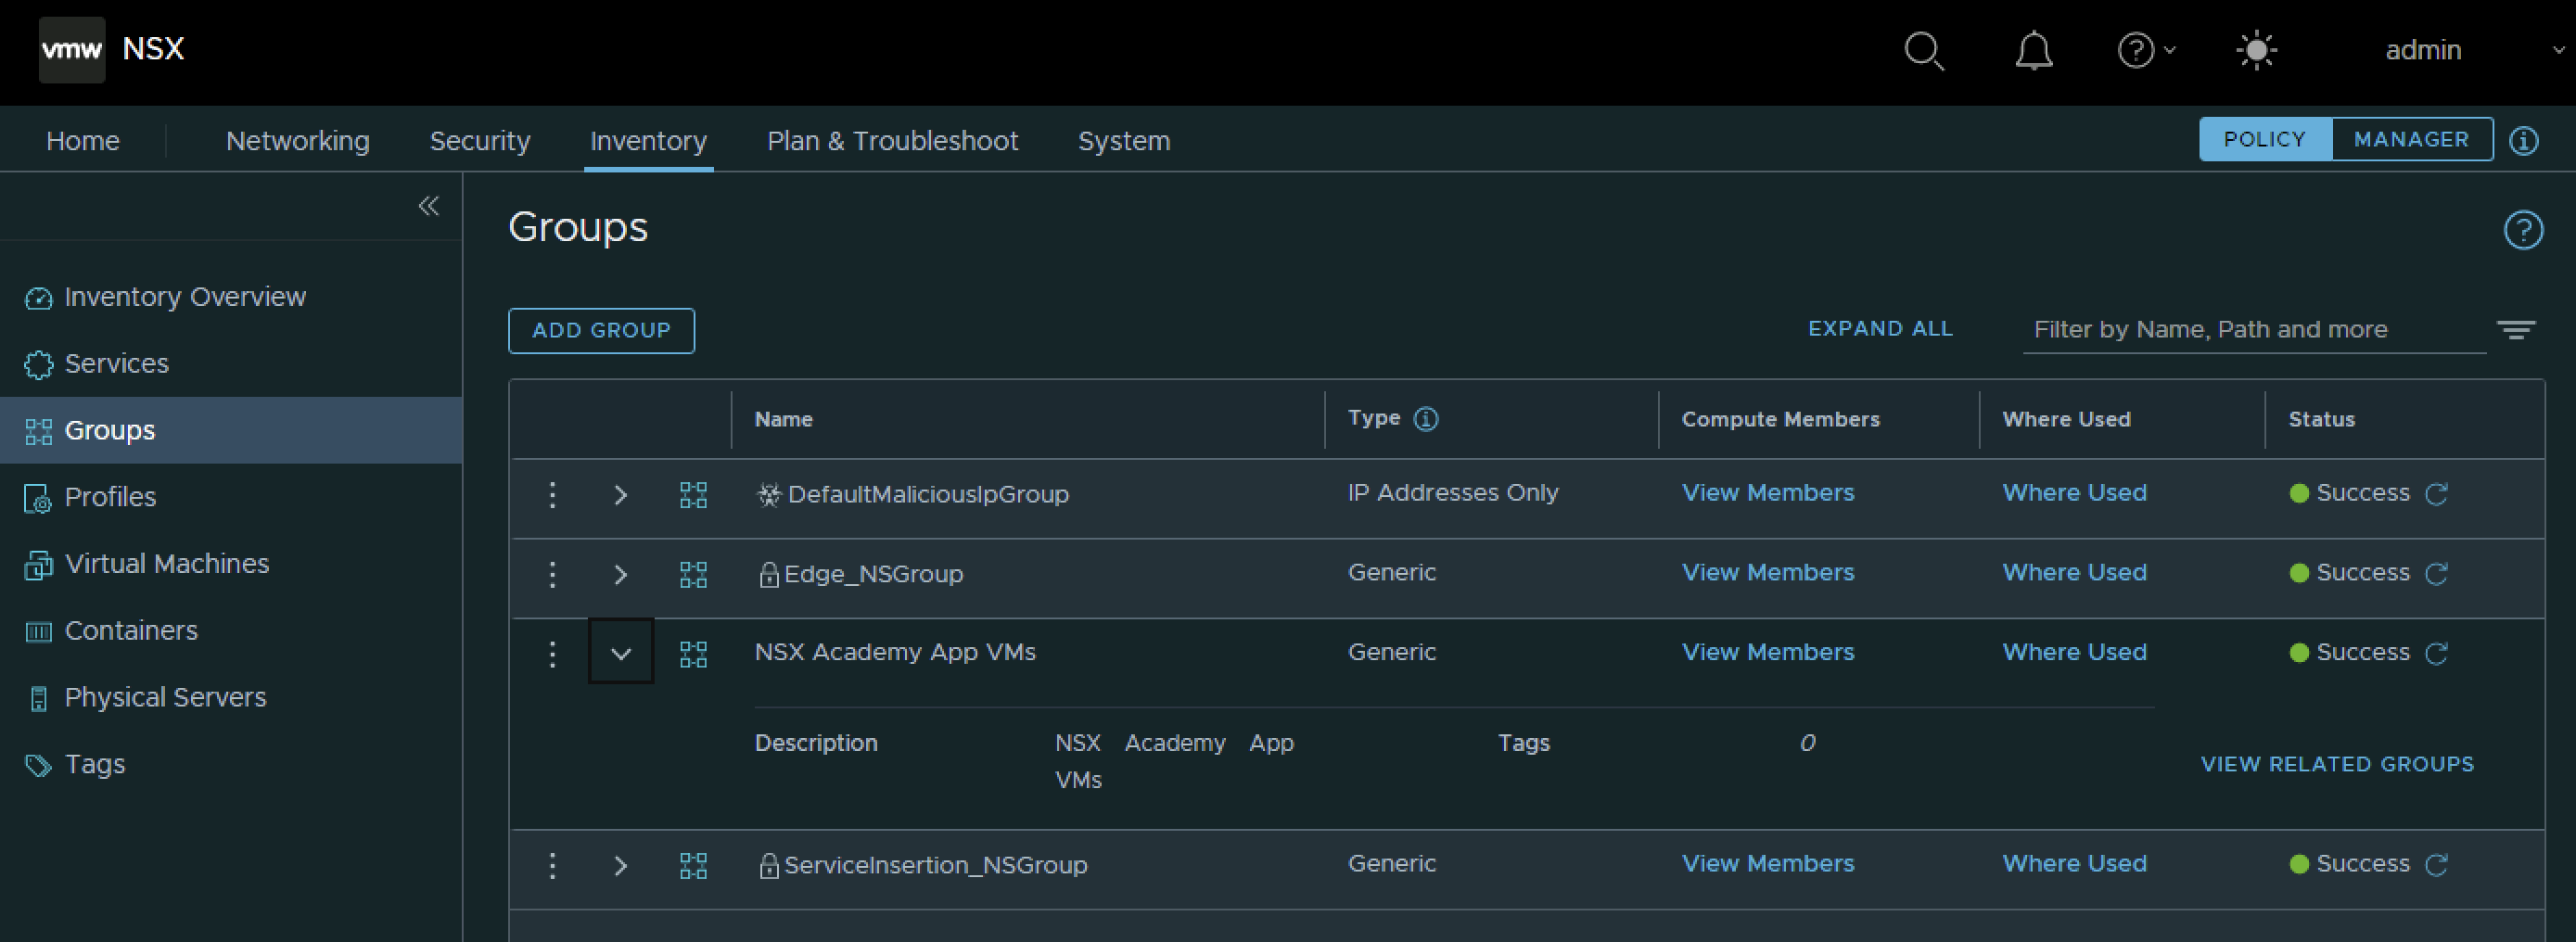
The group name is now changed and is now visible in the NSX GUI when I go to Inventory → Groups. I might need to click on “Refresh” below.
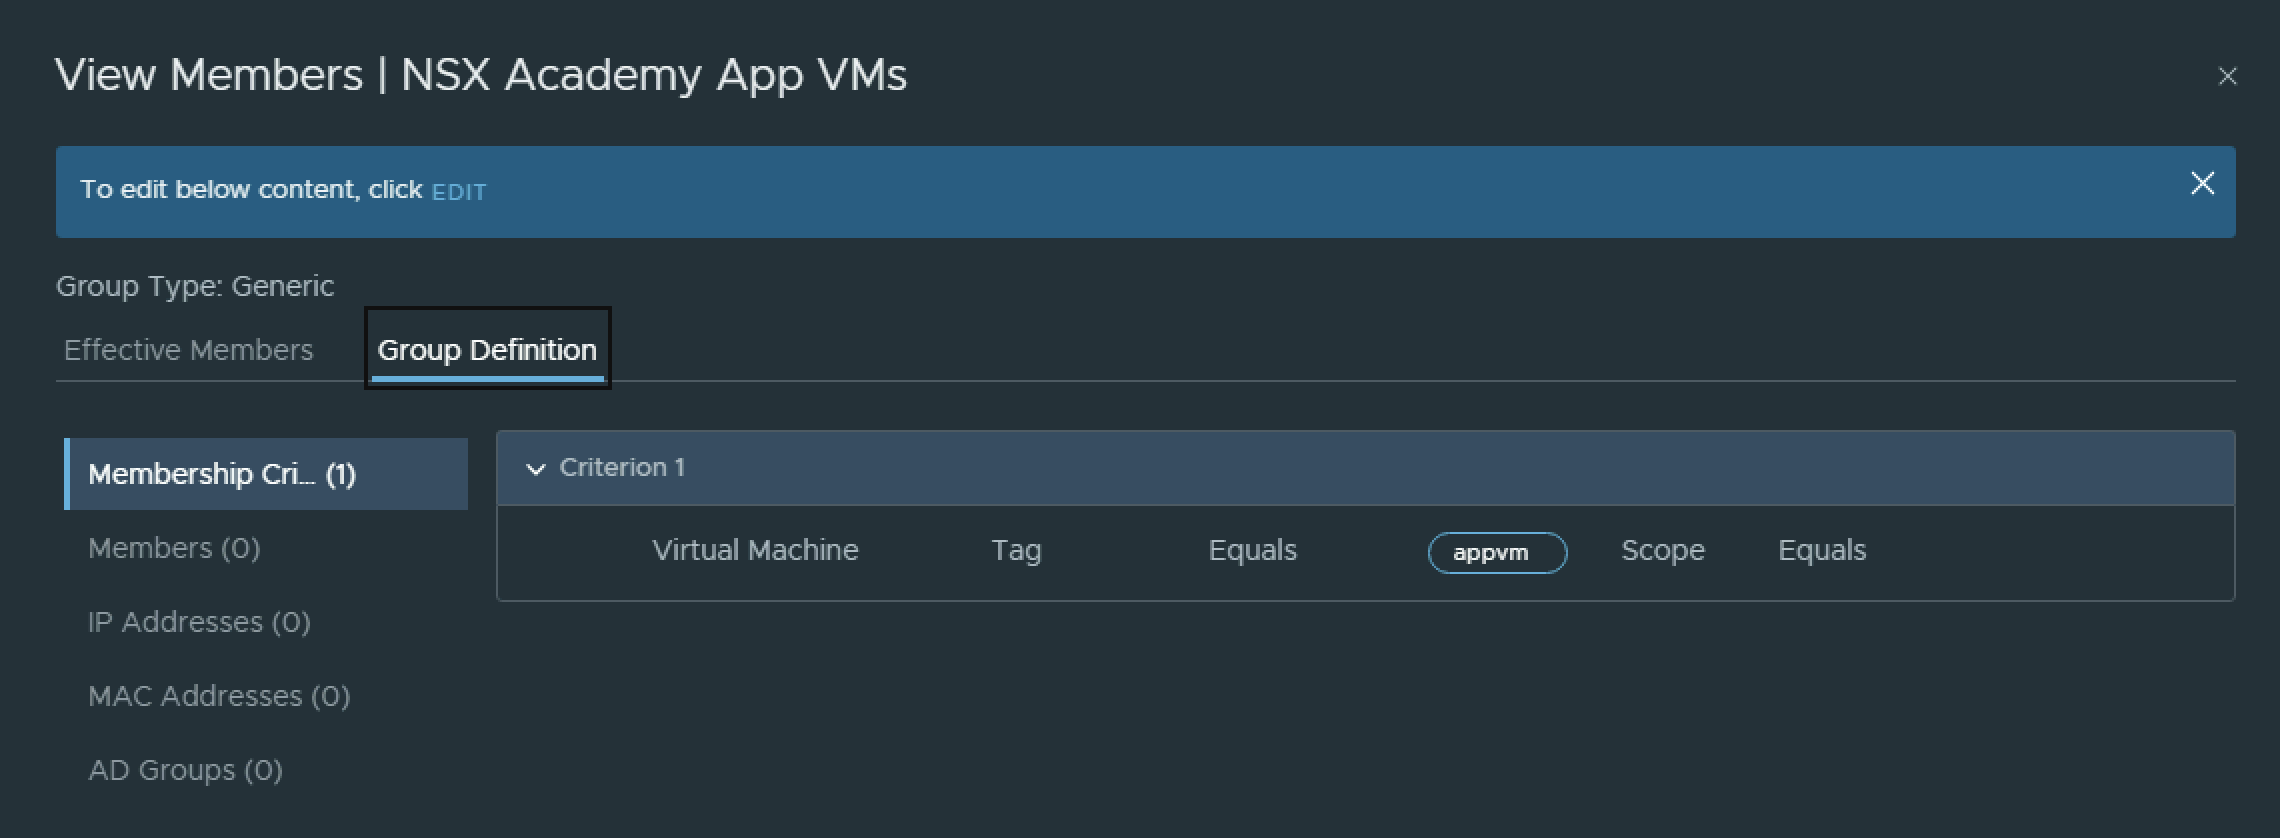
When I click on the group I can also see the additional settings I have specified on how what conditions a Virtual Machine needs to be a member of this Group and these are changed as well.
To retrieve all the group information again I can use this API request again that I have stored in the Collections.
GET https://{{hostname-vip}}/policy/api/v1/infra/domains/default/groups
{
    "results": [
        {
            "expression": [
                {
                    "member_type": "IPAddress",
                    "key": "ALL",
                    "operator": "EQUALS",
                    "value": "MALICIOUS_IP",
                    "resource_type": "Condition",
                    "id": "1f82d261-09ed-47d5-a348-4a7cd100c807",
                    "path": "/infra/domains/default/groups/9be75a65-f7ae-441f-8e97-1ee94103b74a/condition-expressions/1f82d261-09ed-47d5-a348-4a7cd100c807",
                    "relative_path": "1f82d261-09ed-47d5-a348-4a7cd100c807",
                    "parent_path": "/infra/domains/default/groups/9be75a65-f7ae-441f-8e97-1ee94103b74a",
                    "marked_for_delete": false,
                    "overridden": false,
                    "_protection": "NOT_PROTECTED"
                }
            ],
            "extended_expression": [],
            "reference": false,
            "group_type": [
                "IPAddress"
            ],
            "resource_type": "Group",
            "id": "9be75a65-f7ae-441f-8e97-1ee94103b74a",
            "display_name": "DefaultMaliciousIpGroup",
            "description": "Default Malicious IP group",
            "path": "/infra/domains/default/groups/9be75a65-f7ae-441f-8e97-1ee94103b74a",
            "relative_path": "9be75a65-f7ae-441f-8e97-1ee94103b74a",
            "parent_path": "/infra/domains/default",
            "unique_id": "efc4b58e-bbda-4f16-93b0-83f0b8745921",
            "realization_id": "efc4b58e-bbda-4f16-93b0-83f0b8745921",
            "marked_for_delete": false,
            "overridden": false,
            "_create_time": 1661418528470,
            "_create_user": "system",
            "_last_modified_time": 1661418528470,
            "_last_modified_user": "system",
            "_system_owned": false,
            "_protection": "NOT_PROTECTED",
            "_revision": 0
        },
        {
            "expression": [
                {
                    "member_type": "VirtualMachine",
                    "key": "Tag",
                    "operator": "EQUALS",
                    "value": "Edge_NSGroup",
                    "resource_type": "Condition",
                    "id": "da122c92-8205-41fc-9f19-10ba6069333f",
                    "path": "/infra/domains/default/groups/a8b7ddce-a5d6-11e8-a7e5-43344e310957/condition-expressions/da122c92-8205-41fc-9f19-10ba6069333f",
                    "relative_path": "da122c92-8205-41fc-9f19-10ba6069333f",
                    "parent_path": "/infra/domains/default/groups/a8b7ddce-a5d6-11e8-a7e5-43344e310957",
                    "marked_for_delete": false,
                    "overridden": false,
                    "_protection": "NOT_PROTECTED"
                }
            ],
            "extended_expression": [],
            "reference": false,
            "resource_type": "Group",
            "id": "a8b7ddce-a5d6-11e8-a7e5-43344e310957",
            "display_name": "Edge_NSGroup",
            "description": "Edge VMs are added to DFW exclude list via Edge_NSGroup",
            "path": "/infra/domains/default/groups/a8b7ddce-a5d6-11e8-a7e5-43344e310957",
            "relative_path": "a8b7ddce-a5d6-11e8-a7e5-43344e310957",
            "parent_path": "/infra/domains/default",
            "unique_id": "dcda0fe0-0df9-40ca-aa5c-f4e7f7a706ae",
            "realization_id": "dcda0fe0-0df9-40ca-aa5c-f4e7f7a706ae",
            "marked_for_delete": false,
            "overridden": false,
            "_create_time": 1661418542929,
            "_create_user": "system",
            "_last_modified_time": 1661418542929,
            "_last_modified_user": "system",
            "_system_owned": true,
            "_protection": "NOT_PROTECTED",
            "_revision": 0
        },
        {
            "expression": [
                {
                    "member_type": "VirtualMachine",
                    "key": "Tag",
                    "operator": "EQUALS",
                    "scope_operator": "EQUALS",
                    "value": "appvm",
                    "resource_type": "Condition",
                    "id": "f8655ec2-3079-42b7-8cd6-eff635dd562b",
                    "path": "/infra/domains/default/groups/newgroup/condition-expressions/f8655ec2-3079-42b7-8cd6-eff635dd562b",
                    "relative_path": "f8655ec2-3079-42b7-8cd6-eff635dd562b",
                    "parent_path": "/infra/domains/default/groups/newgroup",
                    "marked_for_delete": false,
                    "overridden": false,
                    "_protection": "NOT_PROTECTED"
                }
            ],
            "extended_expression": [],
            "reference": false,
            "resource_type": "Group",
            "id": "newgroup",
            "display_name": "NSX Academy App VMs",
            "description": "NSX Academy App VMs",
            "path": "/infra/domains/default/groups/newgroup",
            "relative_path": "newgroup",
            "parent_path": "/infra/domains/default",
            "unique_id": "70acd0ad-22df-4b60-828c-55033b4fc620",
            "realization_id": "70acd0ad-22df-4b60-828c-55033b4fc620",
            "marked_for_delete": false,
            "overridden": false,
            "_create_time": 1661590163452,
            "_create_user": "admin",
            "_last_modified_time": 1661590330432,
            "_last_modified_user": "admin",
            "_system_owned": false,
            "_protection": "NOT_PROTECTED",
            "_revision": 1
        },
        {
            "expression": [],
            "extended_expression": [],
            "reference": false,
            "resource_type": "Group",
            "id": "03335585-9574-4d44-a001-818ca9a9c282",
            "display_name": "ServiceInsertion_NSGroup",
            "description": "SVMs deployed by ServiceInsertion are added to this NSGroup",
            "path": "/infra/domains/default/groups/03335585-9574-4d44-a001-818ca9a9c282",
            "relative_path": "03335585-9574-4d44-a001-818ca9a9c282",
            "parent_path": "/infra/domains/default",
            "unique_id": "658b5425-d2ba-48fa-9306-f86502fb433a",
            "realization_id": "658b5425-d2ba-48fa-9306-f86502fb433a",
            "marked_for_delete": false,
            "overridden": false,
            "_create_time": 1661418545074,
            "_create_user": "system",
            "_last_modified_time": 1661418545074,
            "_last_modified_user": "system",
            "_system_owned": true,
            "_protection": "NOT_PROTECTED",
            "_revision": 0
        }
    ],
    "result_count": 4,
    "sort_by": "display_name",
    "sort_ascending": true
}
Pay attention to the following output as this is related to my new/updated Group:
        {
            "expression": [
                {
                    "member_type": "VirtualMachine",
                    "key": "Tag",
                    "operator": "EQUALS",
                    "scope_operator": "EQUALS",
                    "value": "appvm",
                    "resource_type": "Condition",
                    "id": "f8655ec2-3079-42b7-8cd6-eff635dd562b",
                    "path": "/infra/domains/default/groups/newgroup/condition-expressions/f8655ec2-3079-42b7-8cd6-eff635dd562b",
                    "relative_path": "f8655ec2-3079-42b7-8cd6-eff635dd562b",
                    "parent_path": "/infra/domains/default/groups/newgroup",
                    "marked_for_delete": false,
                    "overridden": false,
                    "_protection": "NOT_PROTECTED"
                }
            ],
            "extended_expression": [],
            "reference": false,
            "resource_type": "Group",
            "id": "newgroup",
            "display_name": "NSX Academy App VMs",
            "description": "NSX Academy App VMs",
            "path": "/infra/domains/default/groups/newgroup",
            "relative_path": "newgroup",
            "parent_path": "/infra/domains/default",
            "unique_id": "70acd0ad-22df-4b60-828c-55033b4fc620",
            "realization_id": "70acd0ad-22df-4b60-828c-55033b4fc620",
            "marked_for_delete": false,
            "overridden": false,
            "_create_time": 1661590163452,
            "_create_user": "admin",
            "_last_modified_time": 1661590330432,
            "_last_modified_user": "admin",
            "_system_owned": false,
            "_protection": "NOT_PROTECTED",
            "_revision": 1
        },
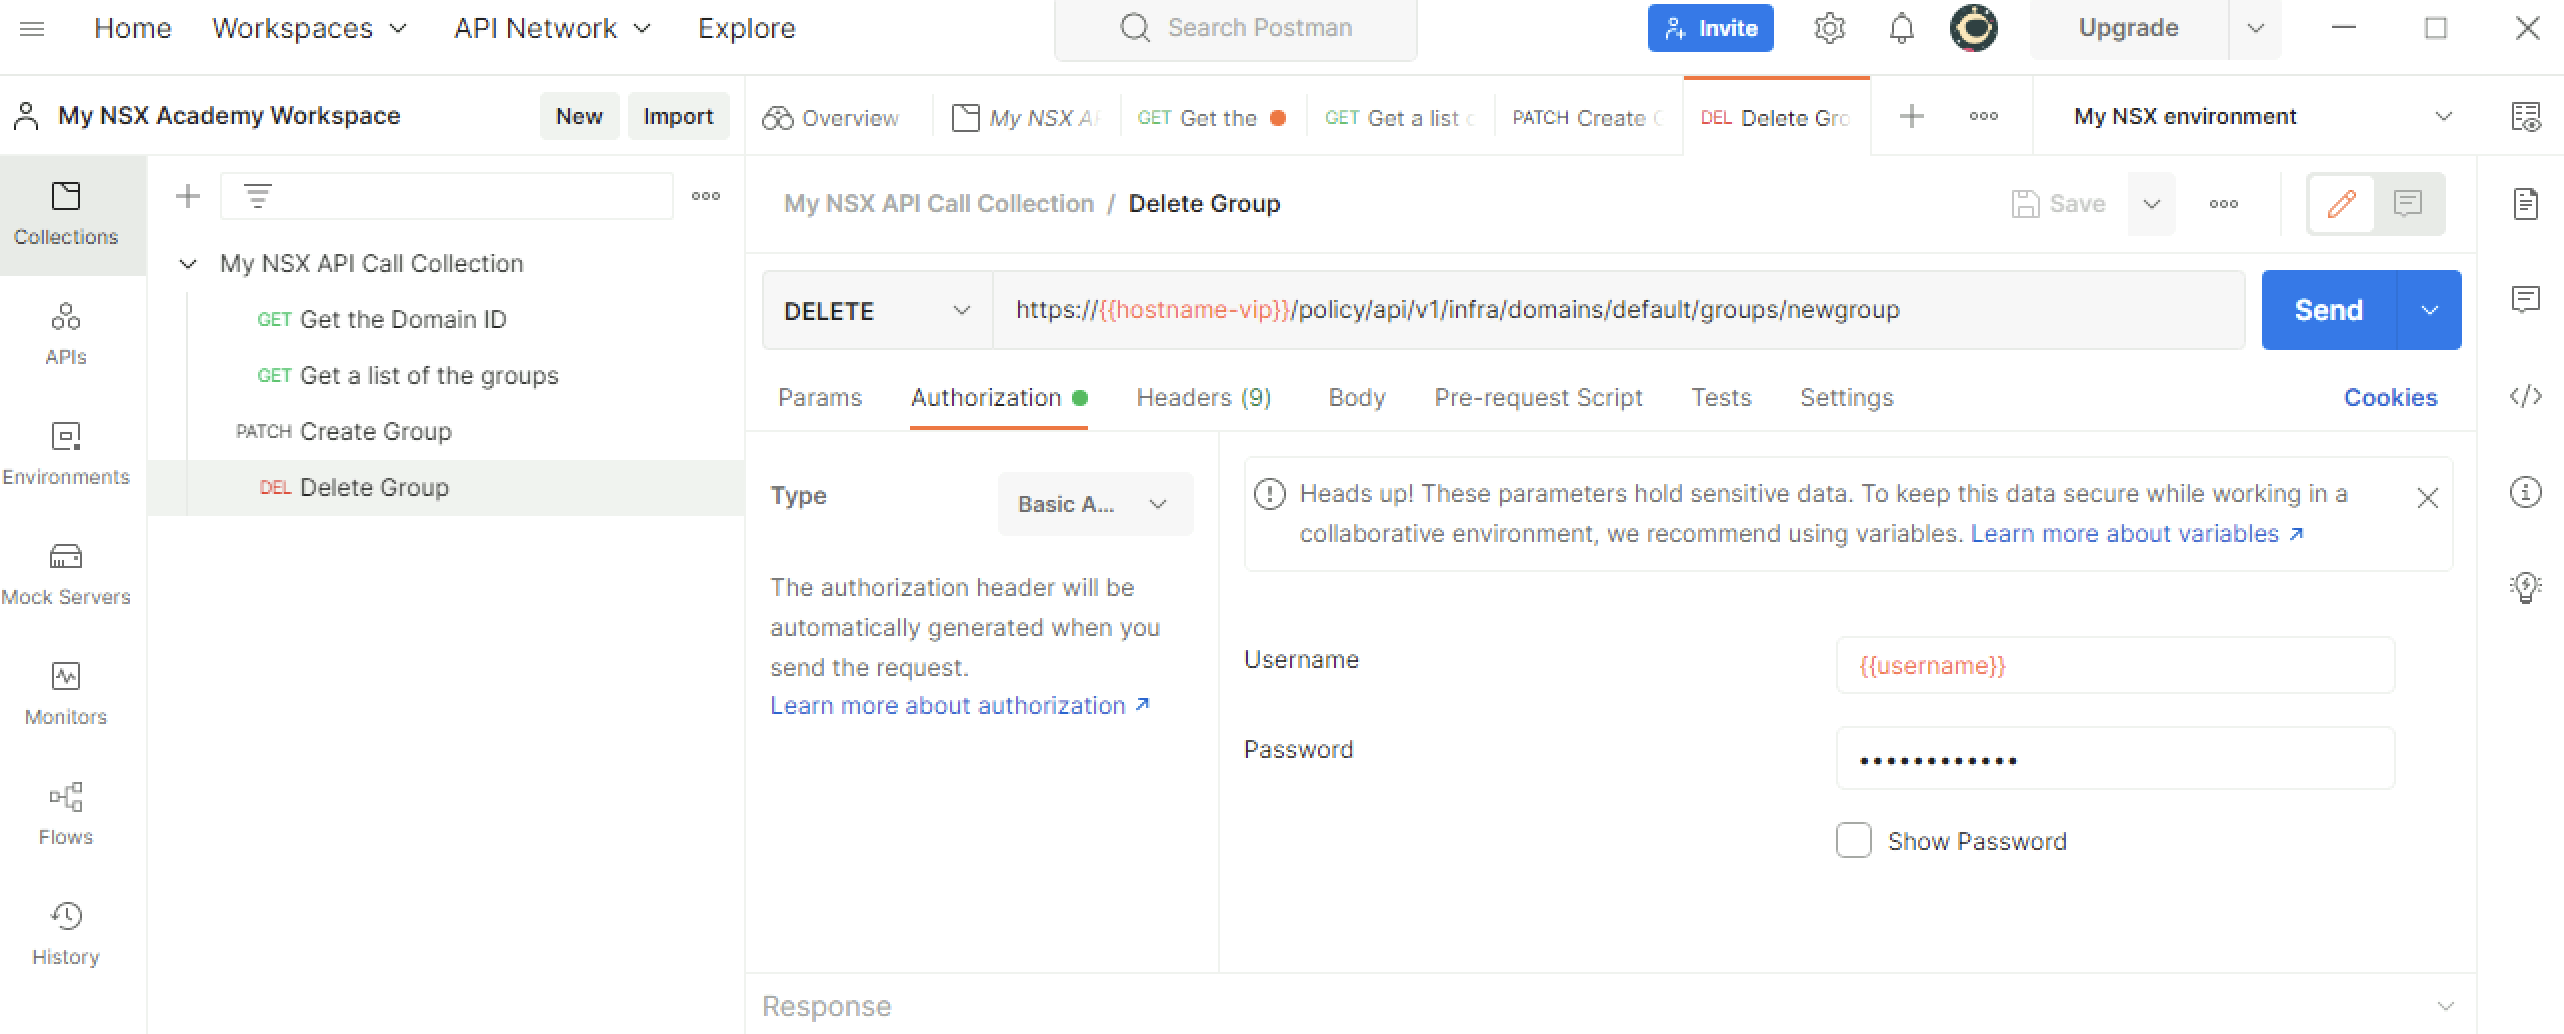
STEP 9: Perform my first DELETE API request on NSX (delete the group)
Now it is time to delete the group again.
Use the following URL to delete the group.
DELETE https://{{hostname-vip}}/policy/api/v1/infra/domains/default/groups/newgroup
Again create a new Request in the collection with the URL specification (note I am using DELETE instead of PATCH / GET) and specify the Authorization type + username and password settings. And click on Save again
When I clicked on “Send” and everything is working correctly look for “200 OK” message and look at output.
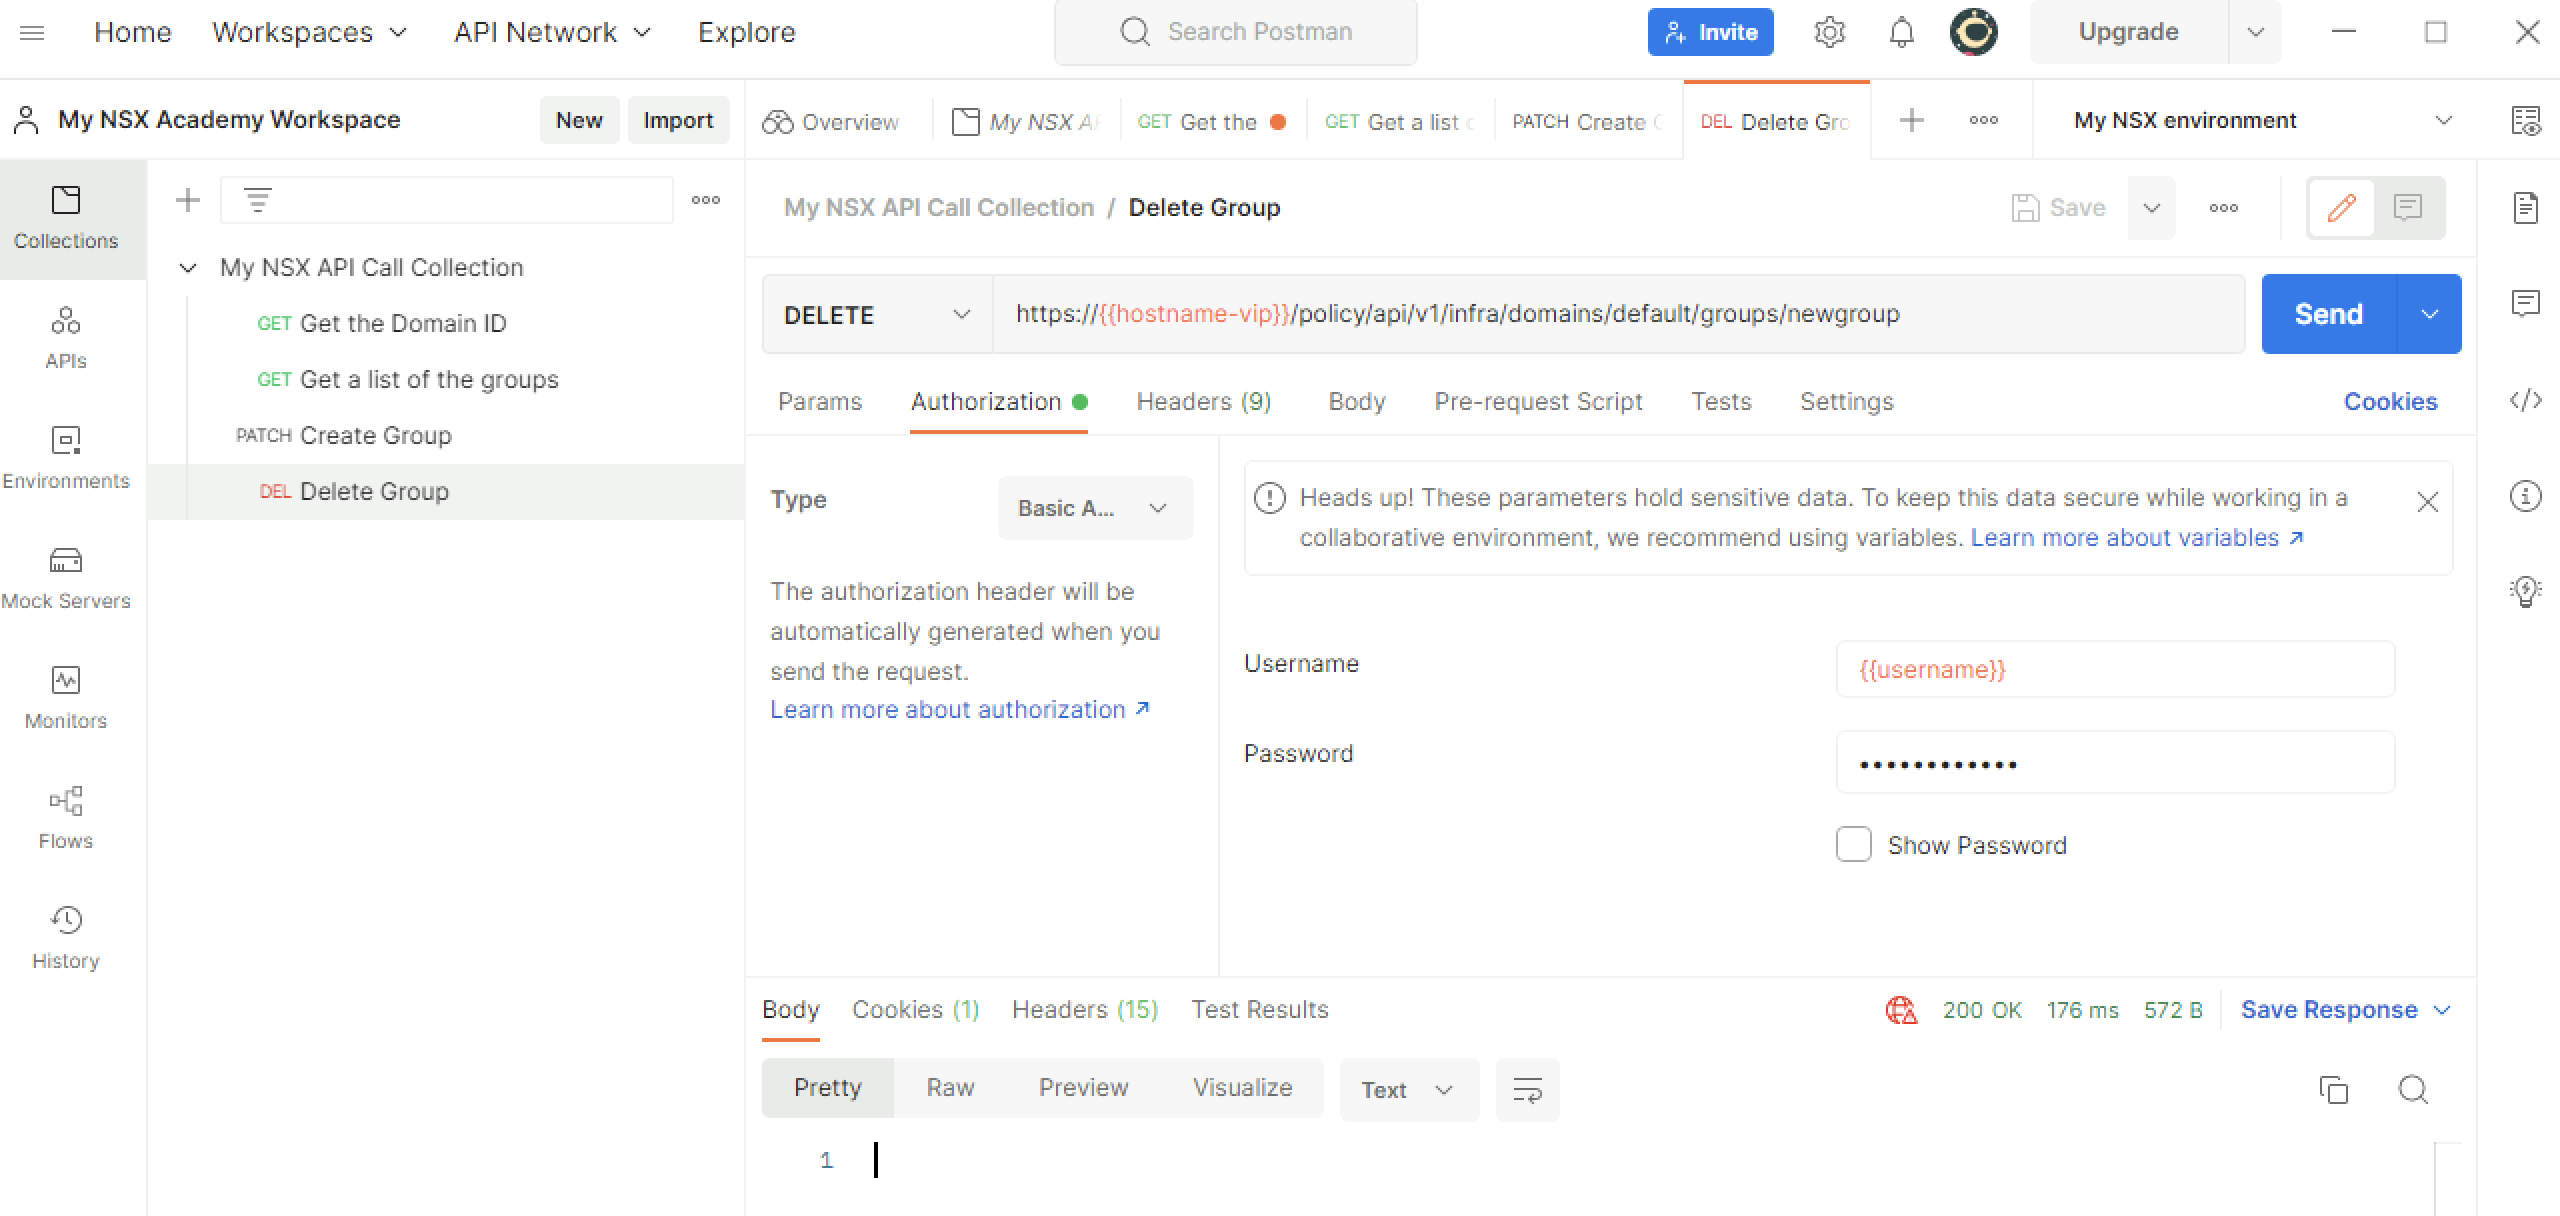
The group is now delete and is no longer visible in the NSX GUI when you go to Inventory → Groups. I might need to click on “Refresh” below.