VLAN tagged interface on the Raspberry: Difference between revisions
From Iwan
No edit summary |
m (Applying replacements) |
||
| Line 56: | Line 56: | ||
</console> | </console> | ||
=== RPi1 | === RPi1–XX instructions === | ||
'''THIS EXAMPLE USES VLAN4, BUT WHEN TESTING IN THE NETWORK THE VLAN# NEEDS To BE CHANGED WITH THE ONE TRUNKED''' | '''THIS EXAMPLE USES VLAN4, BUT WHEN TESTING IN THE NETWORK THE VLAN# NEEDS To BE CHANGED WITH THE ONE TRUNKED''' | ||
Latest revision as of 21:35, 15 March 2024
When you have only one cable available on your Raspberry Pi and you want to test something out with multiple networks this can be done with adding a tagged interface to your Raspberry on-board interface.
We can also call this a Raspberry on a stick configuration (this will only makes sense to people who knows what a router on a stick is)
My sources where this and this.
Lab Setup
Drawing
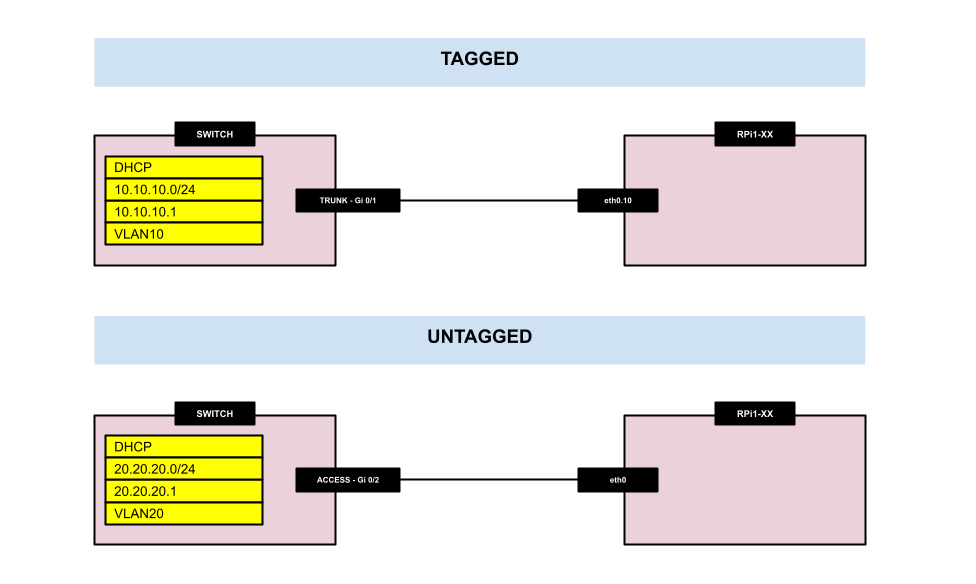
Switch config
!
vlan 4
 name RPI1-TAGGED
!
interface Vlan4
 ip address 10.10.10.1 255.255.255.0
 no shut
!
ip dhcp excluded-address 10.10.10.1 10.10.10.50
!
ip dhcp pool RPI1-TAGGED
 network 10.10.10.0 255.255.255.0
 default-router 10.10.10.1
!
vlan 20
 name RPI1-UNTAGGED
!
interface Vlan20
 ip address 20.20.20.1 255.255.255.0
 no shut
!
ip dhcp excluded-address 20.20.20.1 20.20.20.50
!
ip dhcp pool RPI1-UNTAGGED
 network 20.20.20.0 255.255.255.0
 default-router 20.20.20.1
!
interface GigabitEthernet0/1
 description CON-TO-RPI1-TAGGED
 switchport trunk encapsulation dot1q
 switchport mode trunk
 no shut
!
interface GigabitEthernet0/2
 description CON-TO-RPI1-UNTAGGED
 switchport access vlan 20
 switchport mode access
 no shut
!
RPi1–XX instructions
THIS EXAMPLE USES VLAN4, BUT WHEN TESTING IN THE NETWORK THE VLAN# NEEDS To BE CHANGED WITH THE ONE TRUNKED
Make sure you make ALL network interface related changes on the console
- Unordered List Item
- Turn on the RPi1-XX
- Make sure there a TV / Monitor, the power, a keyboard and the network is connected to the RPi1-XX
- verify the current network settings
[pidora@RPi1-XX ~]$ ip a
[pidora@RPi1-XX ~]$ more /etc/sysconfig/network-scripts/ifcfg-eth0
- move the current network settings
[pidora@RPi1-XX ~]$ sudo mkdir /home/pidora/backup
[pidora@RPi1-XX ~]$ sudo mv /etc/sysconfig/network-scripts/ifcfg-eth0 /home/pidora/backup/
- copy the current network settings to the VLAN tagged interface
[pidora@RPi1-XX ~]$ sudo cp /home/pidora/backup/ifcfg-eth0 /etc/sysconfig/network-scripts/ifcfg-eth0.4
- make sure the content of the "ifcfg-eth0.4" file looks like this with vi:
[pidora@RPi1-XX ~]$ sudo vi /etc/sysconfig/network-scripts/ifcfg-eth0.4
DEVICE=eth0.4
BOOTPROTO=dhcp
ONBOOT=yes
VLAN=yes
NM_CONTROLLED=no
- make sure the 8021q module is loaded
[pidora@RPi1-XX ~]$ sudo lsmod | grep 8021q
- if its not loaded then load it
[pidora@RPi1-XX ~]$ sudo modprobe 8021q
- when the RPI1-XX is rebooted the module is not loaded automatically.
- to make this happen we need to do the following
[pidora@RPi1-XX ~]$ sudo sh -c 'grep -q 8021q /etc/modules || echo 8021q >> /etc/modules'
- restart the network settings
[pidora@RPi1-XX ~]$ sudo systemctl restart network.service
- verify if an IP address in the correct range is given
[pidora@RPi1-XX ~]$ ip a
1: lo: <LOOPBACK,UP,LOWER_UP> mtu 65536 qdisc noqueue state UNKNOWN group default
    link/loopback 00:00:00:00:00:00 brd 00:00:00:00:00:00
    inet 127.0.0.1/8 scope host lo
       valid_lft forever preferred_lft forever
    inet6 ::1/128 scope host
       valid_lft forever preferred_lft forever
2: eth0: <BROADCAST,MULTICAST,UP,LOWER_UP> mtu 1500 qdisc pfifo_fast state UP group default qlen 1000
    link/ether b8:27:eb:fc:7a:fa brd ff:ff:ff:ff:ff:ff
    inet6 fe80::ba27:ebff:fefc:7afa/64 scope link
       valid_lft forever preferred_lft forever
3: eth0.4@eth0: <BROADCAST,MULTICAST,UP,LOWER_UP> mtu 1500 qdisc noqueue state UP group default
    link/ether b8:27:eb:fc:7a:fa brd ff:ff:ff:ff:ff:ff
    inet 10.10.10.51/24 brd 10.10.10.255 scope global dynamic eth0.10
       valid_lft 85236sec preferred_lft 85236sec
    inet6 fe80::ba27:ebff:fefc:7afa/64 scope link
       valid_lft forever preferred_lft forever