Lab: NSX Manager backup configuration: Difference between revisions
(Add) |
(Fix) |
||
| (5 intermediate revisions by the same user not shown) | |||
| Line 3: | Line 3: | ||
In this lab I am working with the following software and versions: | In this lab I am working with the following software and versions: | ||
{| | {| class="wikitable simple-table" | ||
|- | |- | ||
! | ! Software | ||
! | ! Version | ||
! | ! Filename | ||
|- | |- | ||
| Ubuntu Server | |||
| 20.04.3 | |||
| ubuntu-20.04.3-live-server-amd64.iso | |||
|- | |- | ||
| VMware NSX | |||
| 4.0.0.1 | |||
| nsx-unified-appliance-4.0.0.1.0.20159694.ova | |||
|} | |} | ||
| Line 34: | Line 34: | ||
<span id="76fcebf8-0bff-483c-a28e-2638078e0aaa"></span> | <span id="76fcebf8-0bff-483c-a28e-2638078e0aaa"></span> | ||
= The Steps = | = The Steps = | ||
</div> | </div> | ||
<span class="to-do-children-unchecked">STEP 1: Configure backup</span> | <span class="to-do-children-unchecked">STEP 1: Configure backup</span> | ||
<div class="indented"> | <div class="indented"> | ||
</div></li></ul> | </div></li></ul> | ||
<span id="6f565272-6d9c-470d-885e-1a0a56948a1f"></span> | <span id="6f565272-6d9c-470d-885e-1a0a56948a1f"></span> | ||
= STEP 1 | = STEP 1{{fqm}} Configure backup = | ||
The following configuration parameters will be used when backup is configured on NSX: | The following configuration parameters will be used when backup is configured on NSX: | ||
| Line 56: | Line 49: | ||
<span id="section"></span> | <span id="section"></span> | ||
== == | |||
{| class="wikitable collection-content" | {| class="wikitable collection-content" | ||
| Line 62: | Line 55: | ||
! Parameter Name | ! Parameter Name | ||
! Input | ! Input | ||
|- | |- | ||
| | | FQDN or IP Address | ||
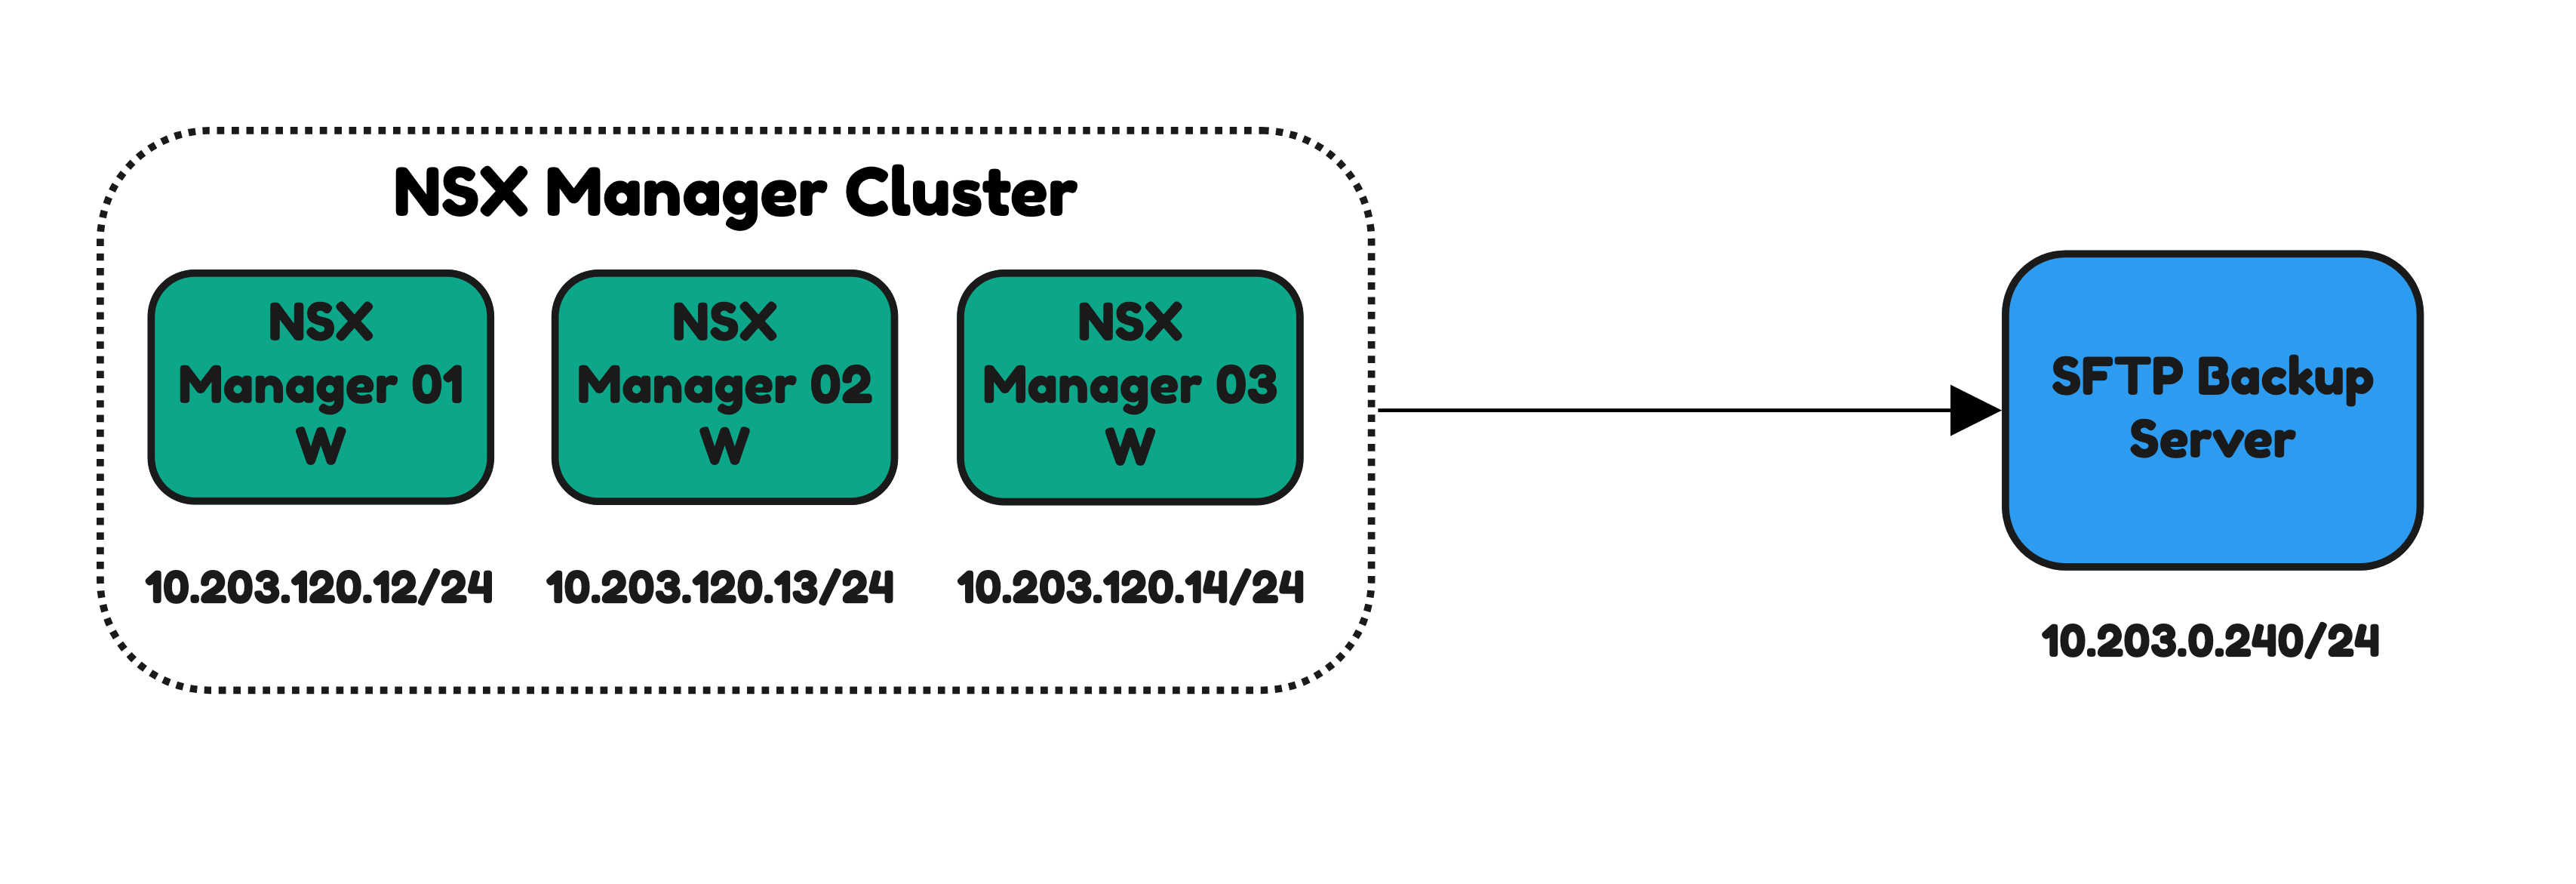
| 10.203.0.240 | |||
|- | |- | ||
| | | Port | ||
| 22 | |||
|- | |- | ||
| | | Directory Path | ||
| /home/administrator/nsxbackup/ | |||
|- | |- | ||
| | | Username | ||
| administrator | |||
|- | |- | ||
| | | Authentication Scheme | ||
| Password | |||
|- | |- | ||
| | | Password | ||
| VMware1! | |||
|- | |- | ||
| | | Passphrase | ||
| VMware1! | |||
|} | |} | ||
</div> | </div> | ||
| Line 210: | Line 199: | ||
</div> | </div> | ||
Continue with >> [[Lab: Replacing the self-signed SSL certificates with CA-signed certificates]] | |||
__TOC__ | |||
[[Category:NSX]] | |||
[[Category:Networking]] | |||
[[Category:VMware]] | |||
[[Category:NSX Academy]] | |||
Latest revision as of 06:55, 16 March 2024
In this lab I am working with the following software and versions:
| Software | Version | Filename |
|---|---|---|
| Ubuntu Server | 20.04.3 | ubuntu-20.04.3-live-server-amd64.iso |
| VMware NSX | 4.0.0.1 | nsx-unified-appliance-4.0.0.1.0.20159694.ova |
- Make sure NSX is backed up every Sunday and Wednesday.
- Make sure the backup occurs outside business hours.
- Also update the backup every two hours after a change has been made on NSX.
The Steps
STEP 1: Configure backup
STEP 1» Configure backup
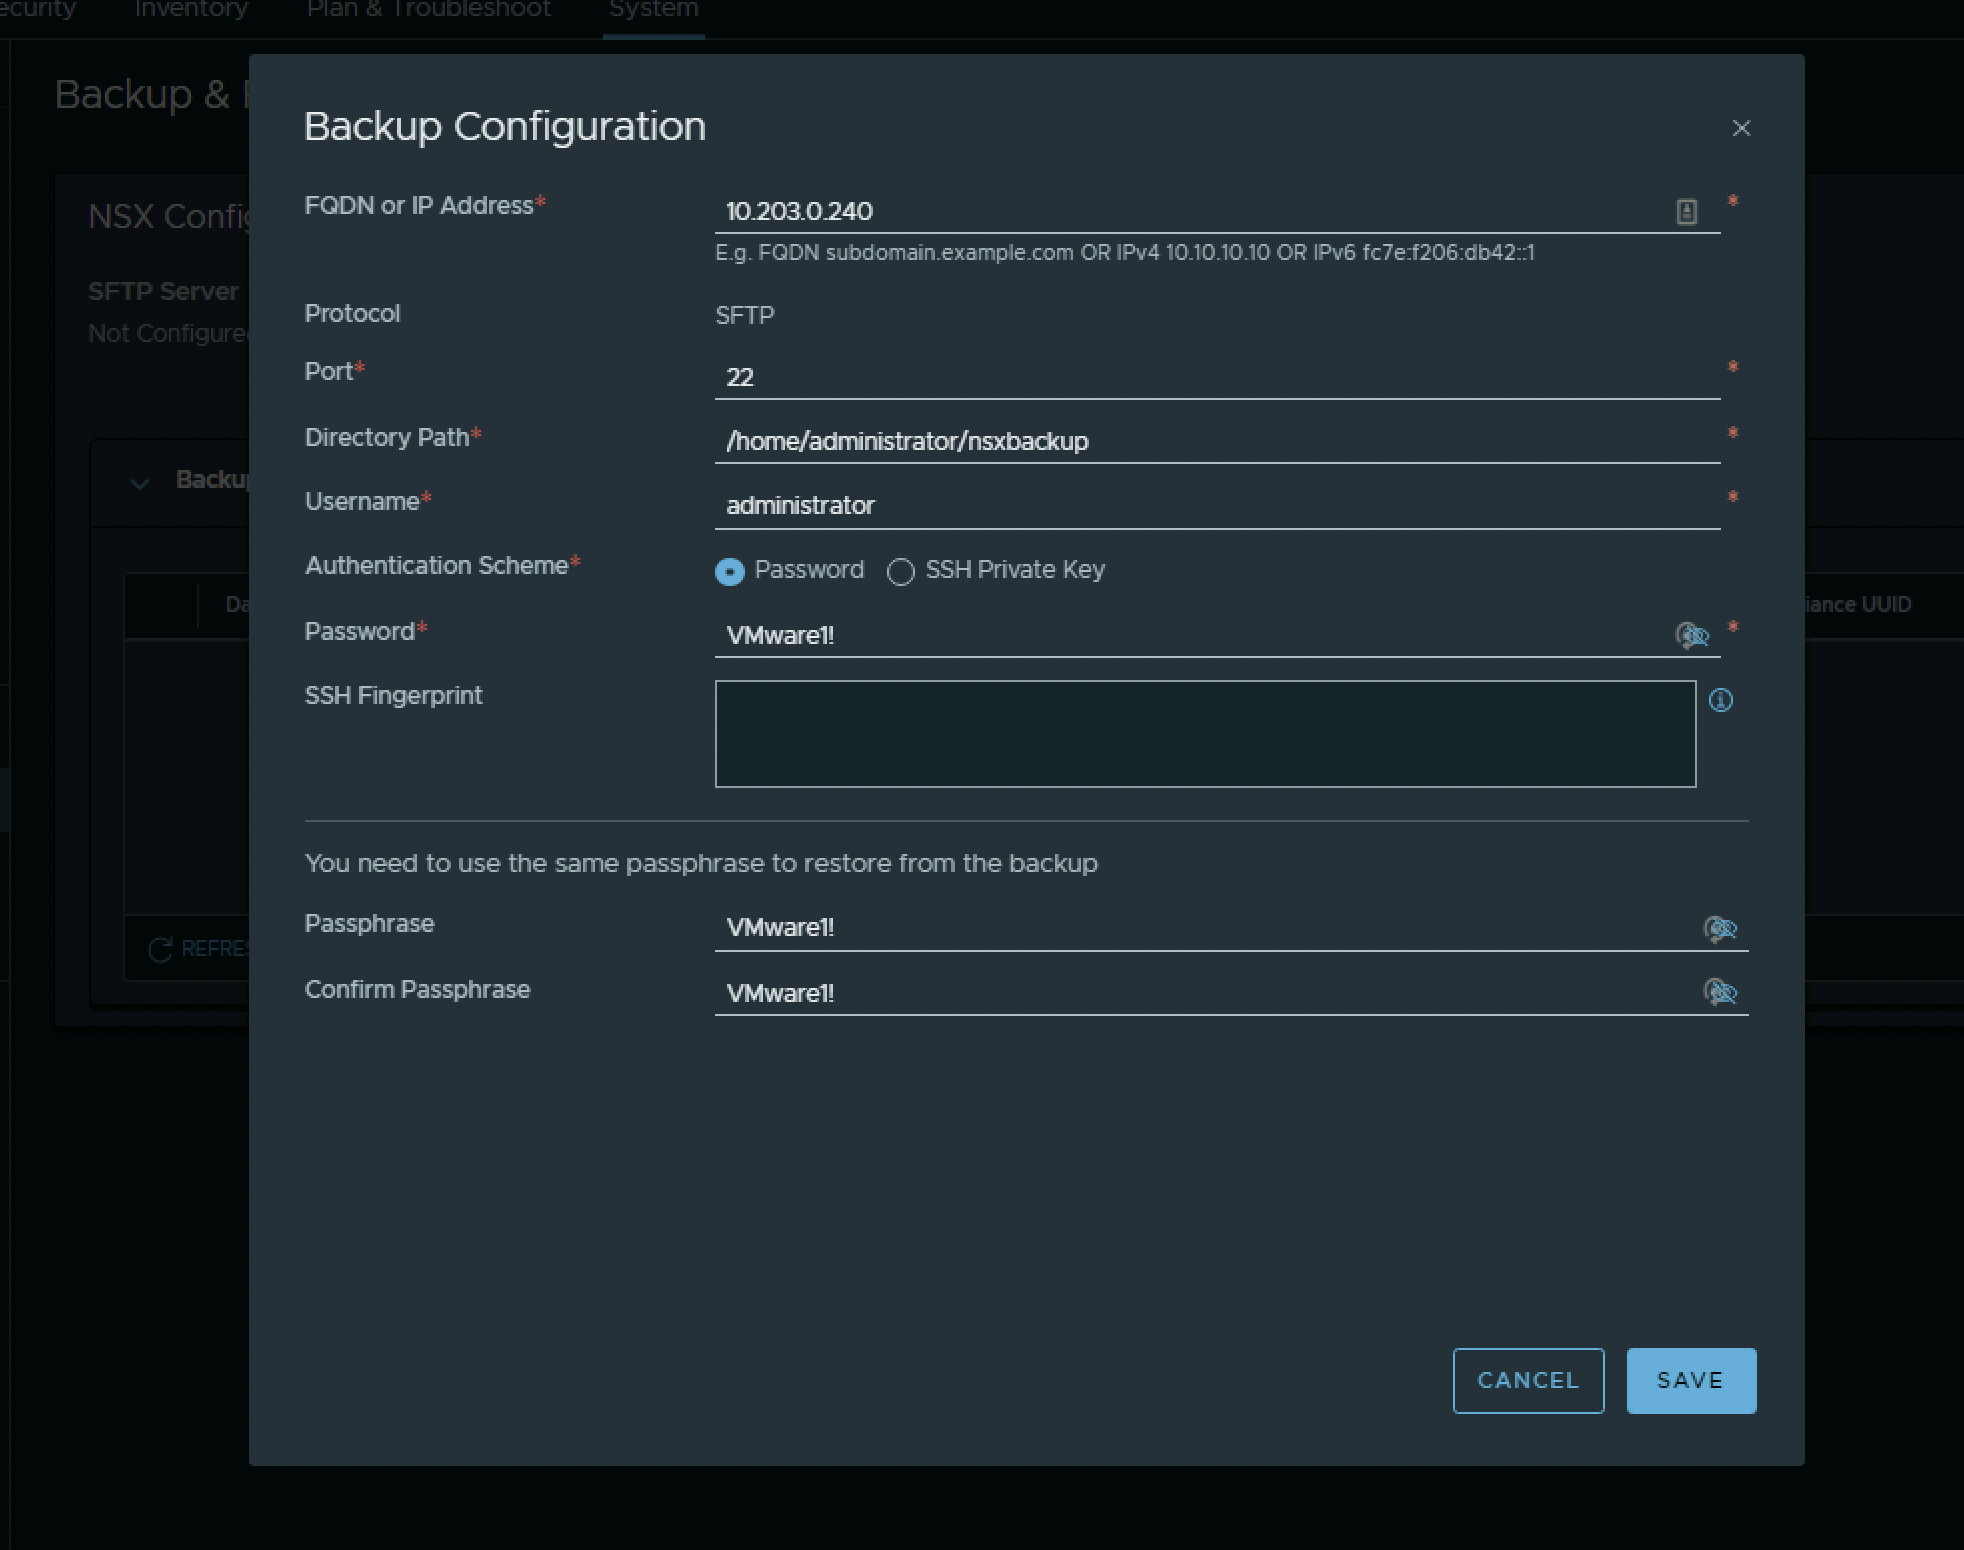
The following configuration parameters will be used when backup is configured on NSX:
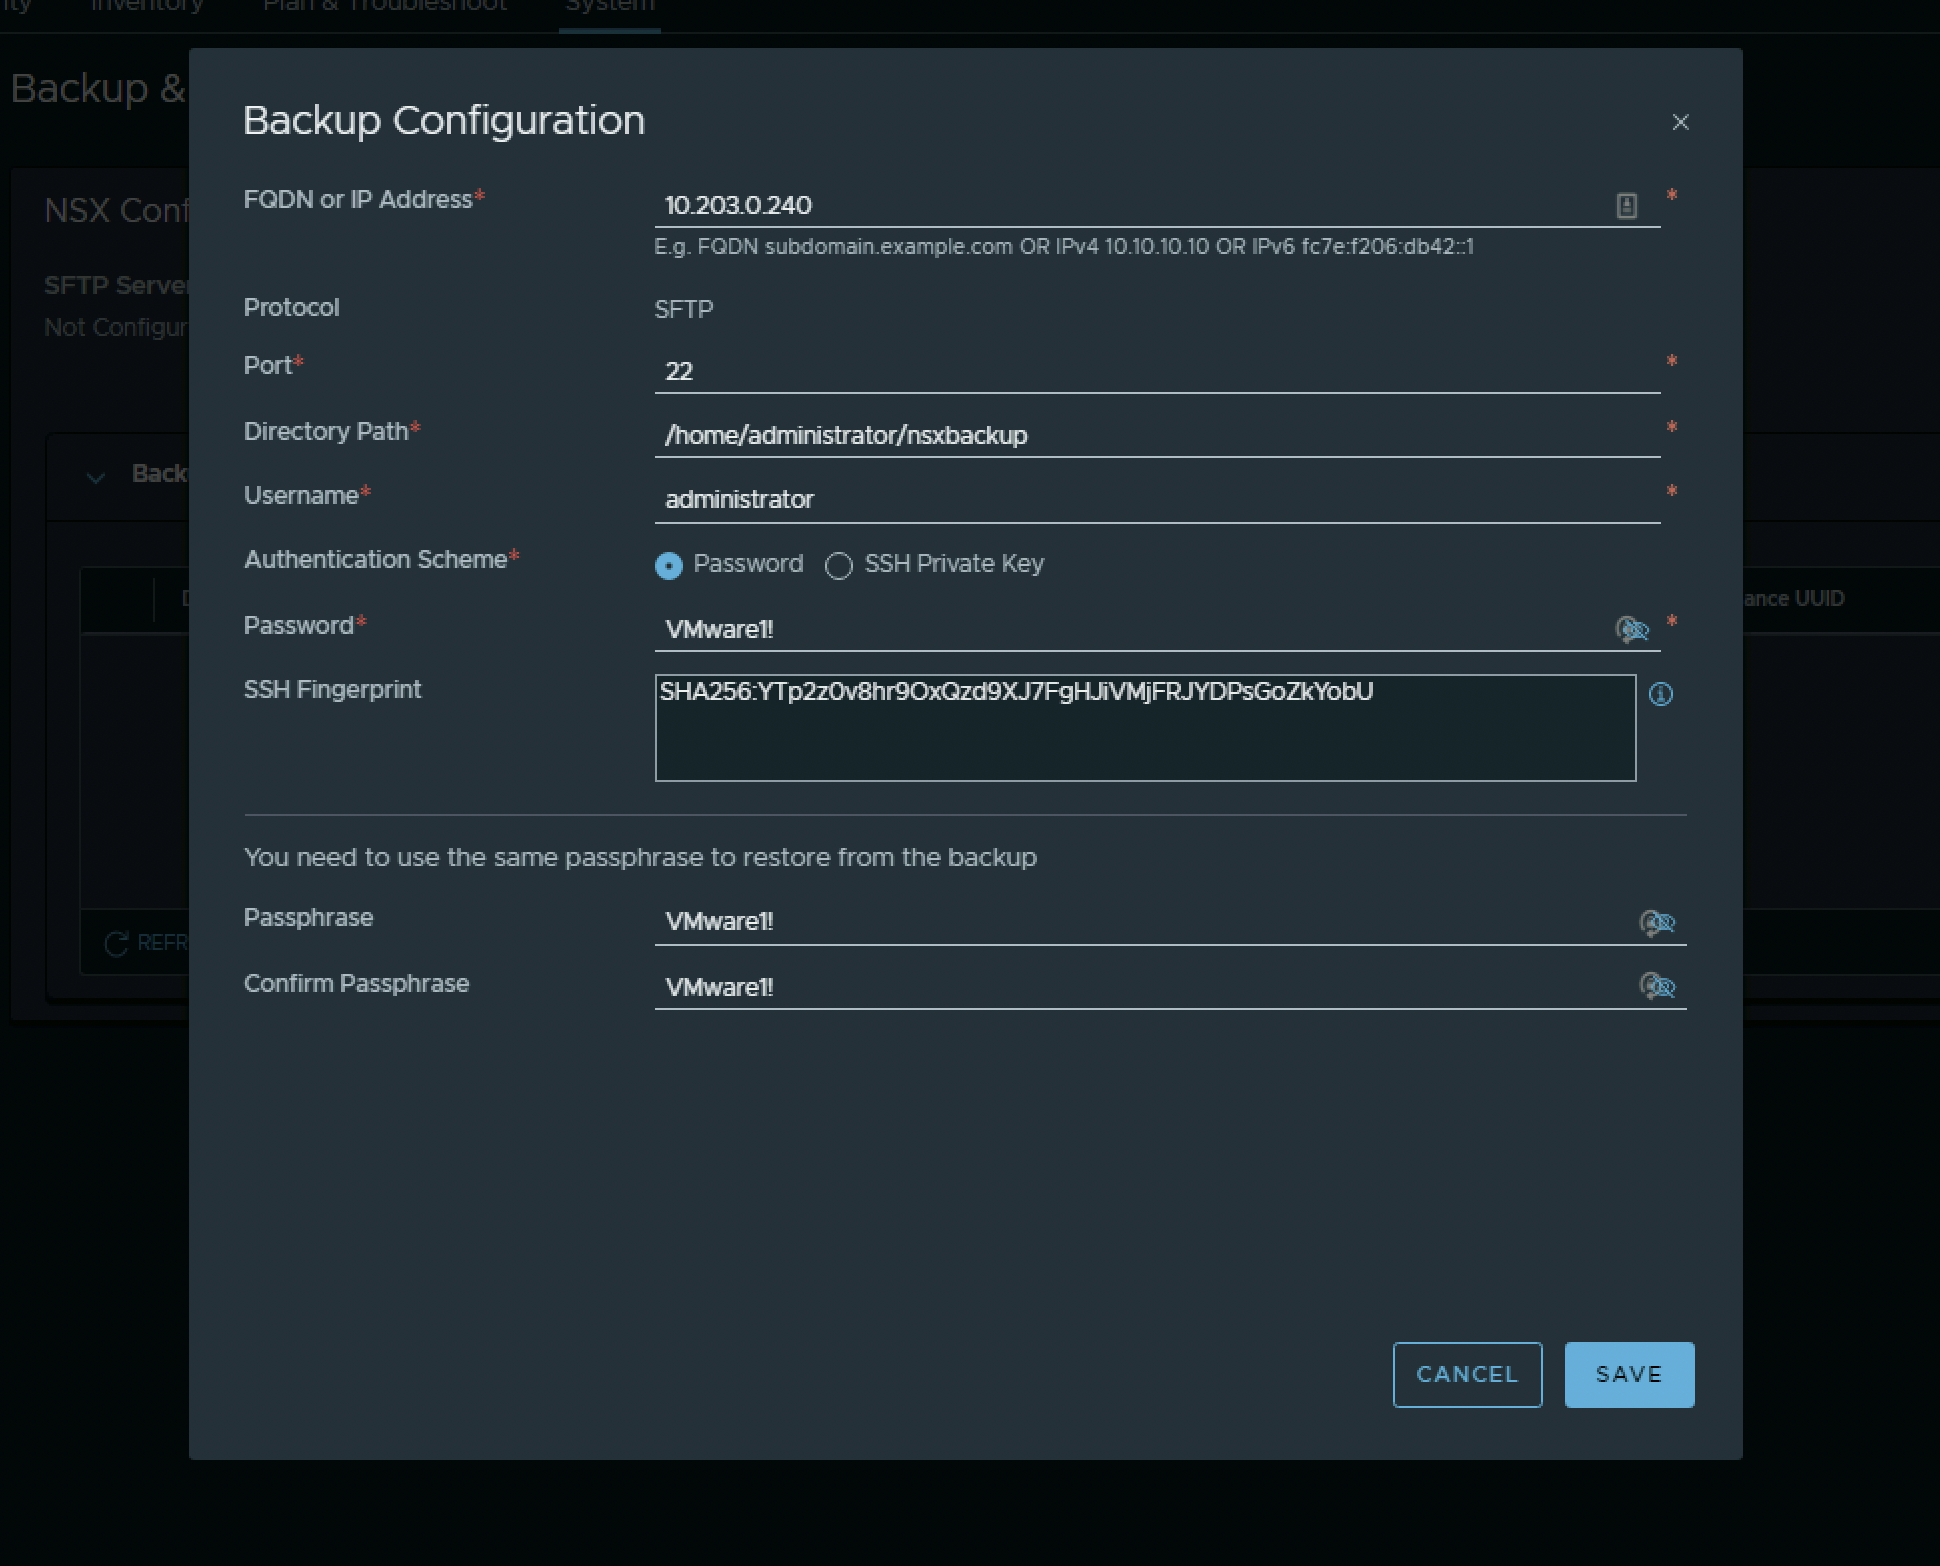
| Parameter Name | Input |
|---|---|
| FQDN or IP Address | 10.203.0.240 |
| Port | 22 |
| Directory Path | /home/administrator/nsxbackup/ |
| Username | administrator |
| Authentication Scheme | Password |
| Password | VMware1! |
| Passphrase | VMware1! |
Go to System → Lifecycle Management → Backup and Restore to configure backup on NSX.
Click on “Edit” to configure the SFTP Server.
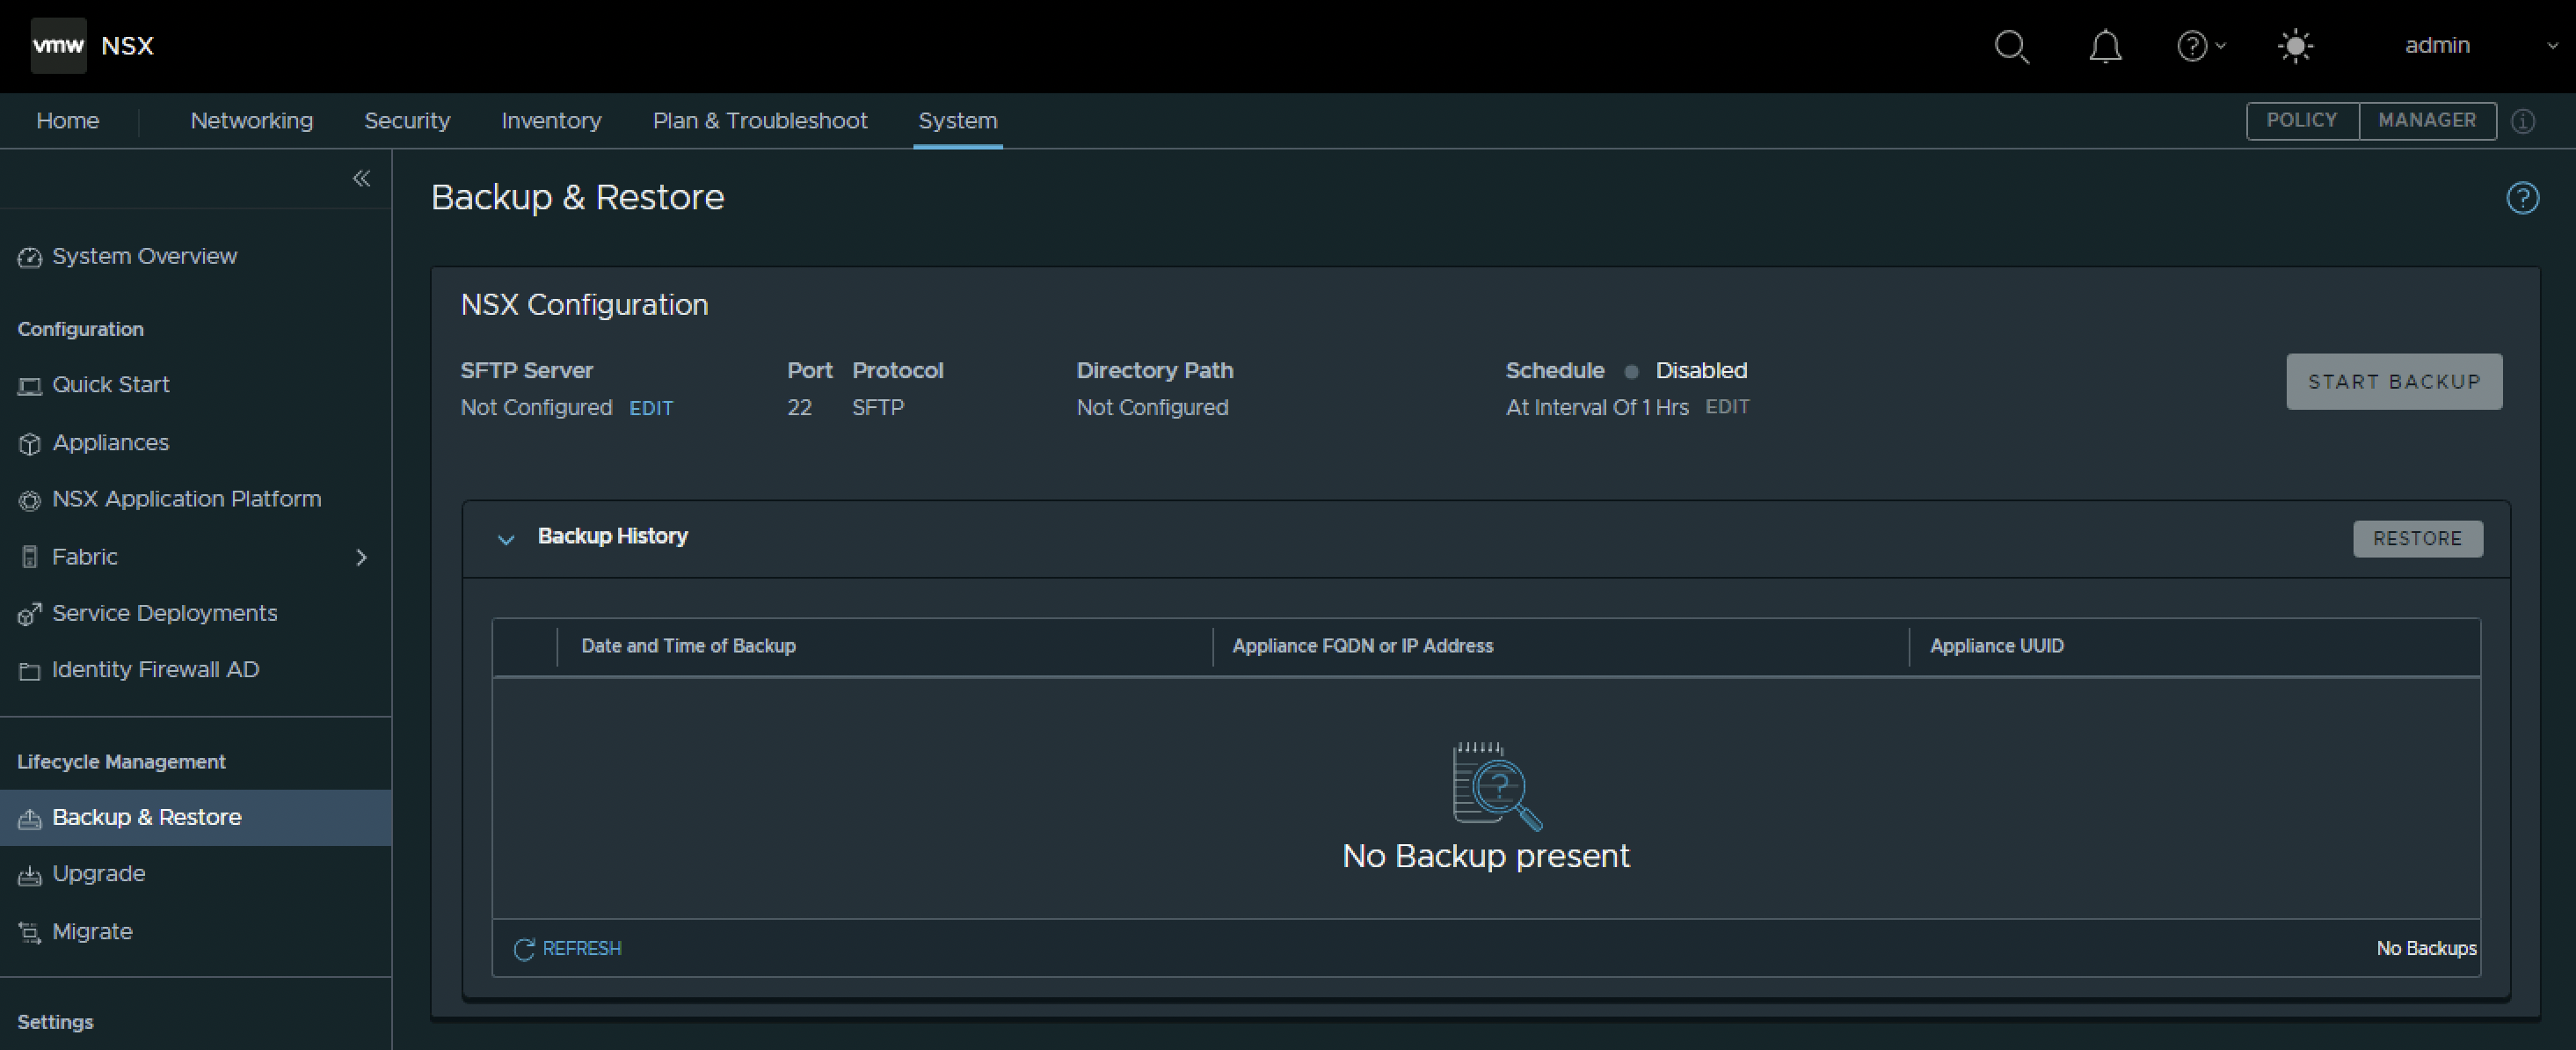
Use the configuration parameters provided above.
When I click “Save” I get a message to add the missing Fingerprint of the SFTP server. Click on “Add”.
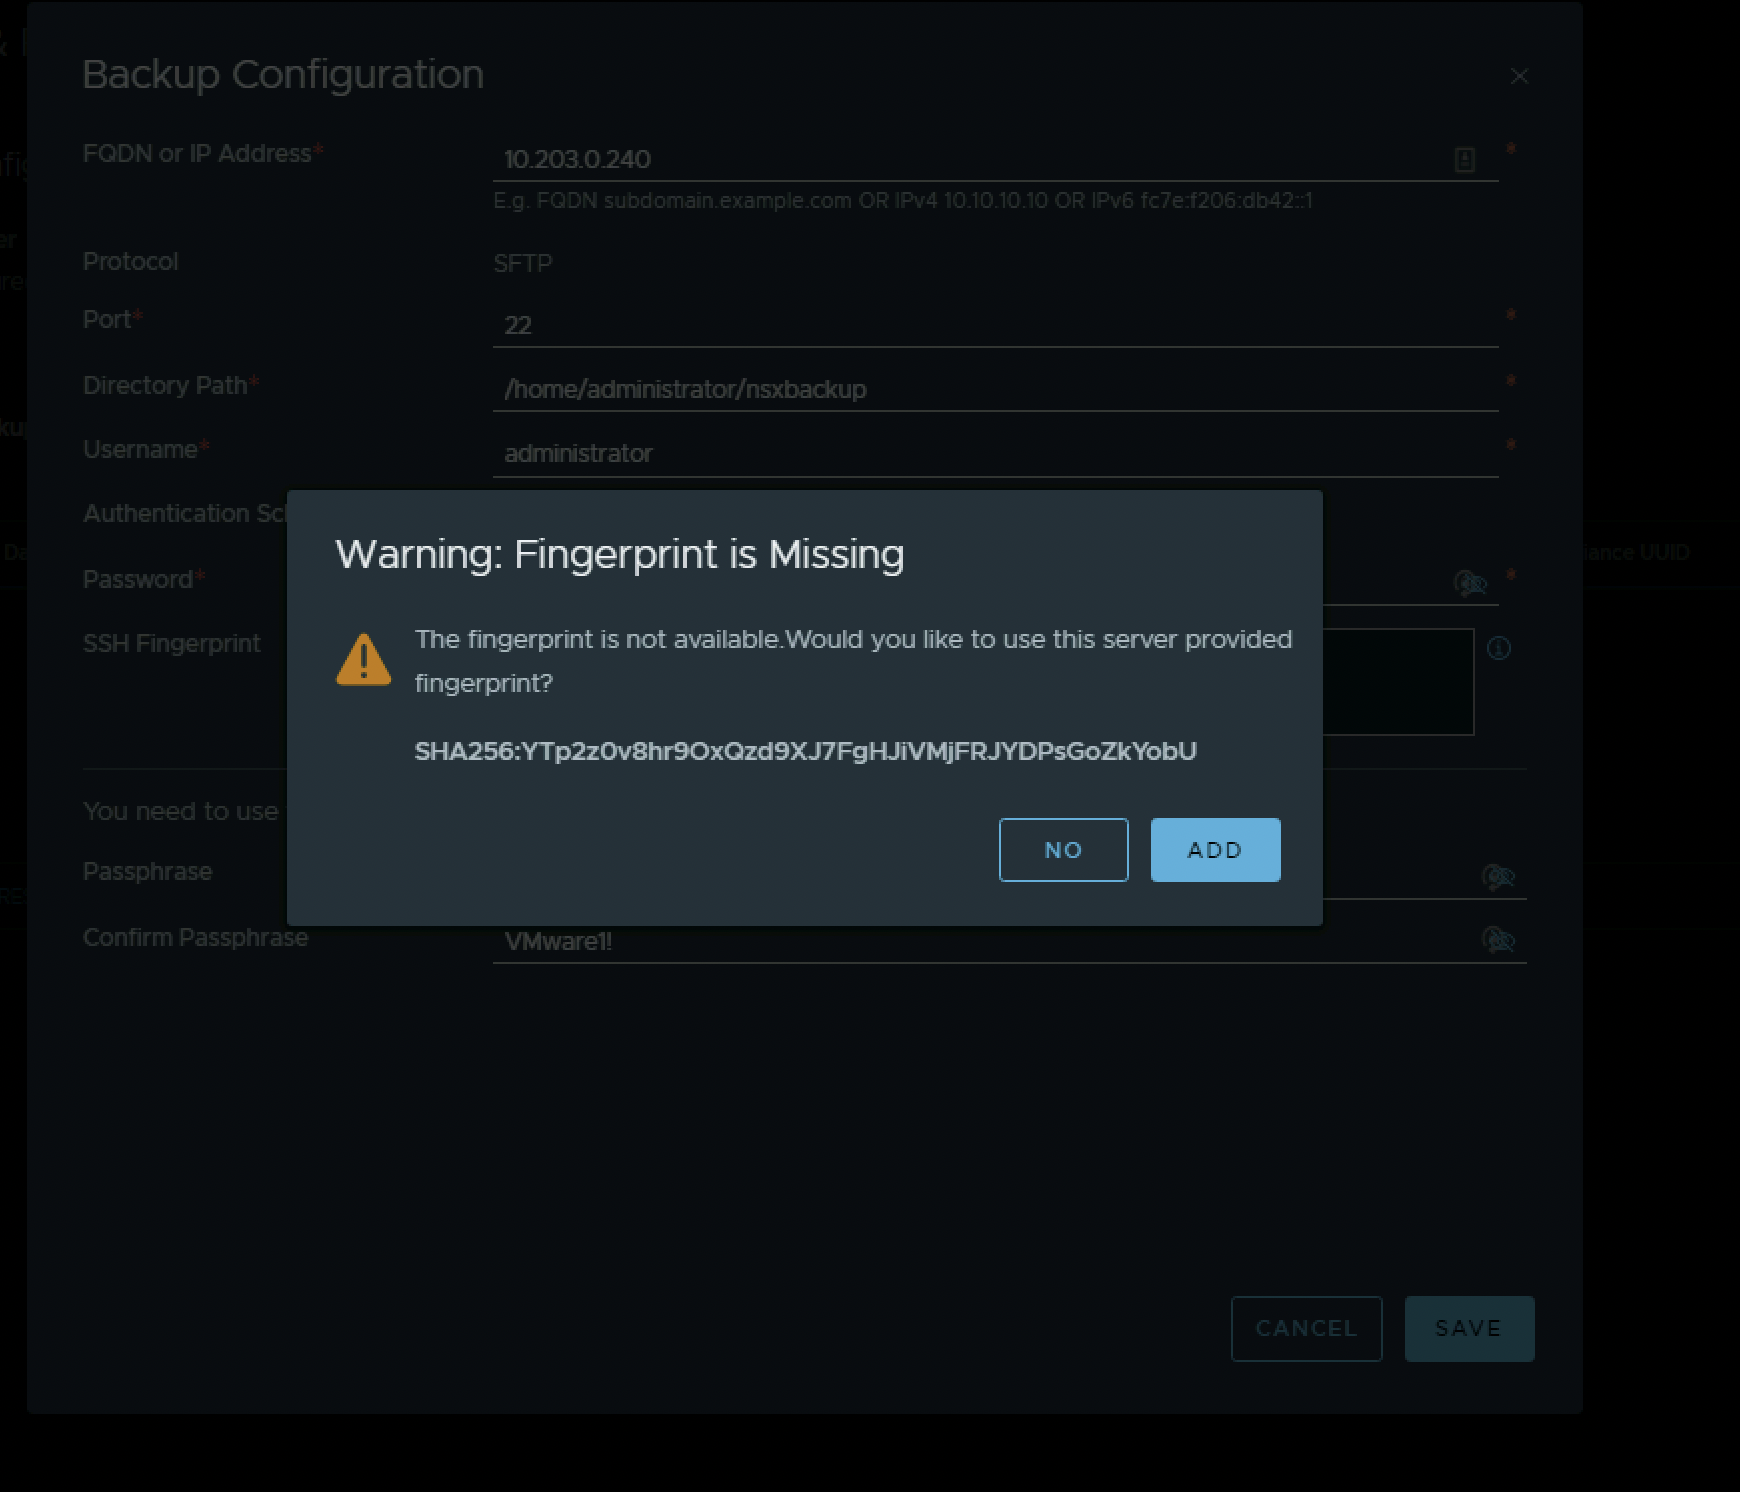
The SSH Fingerprint is added and click on “Save” again.
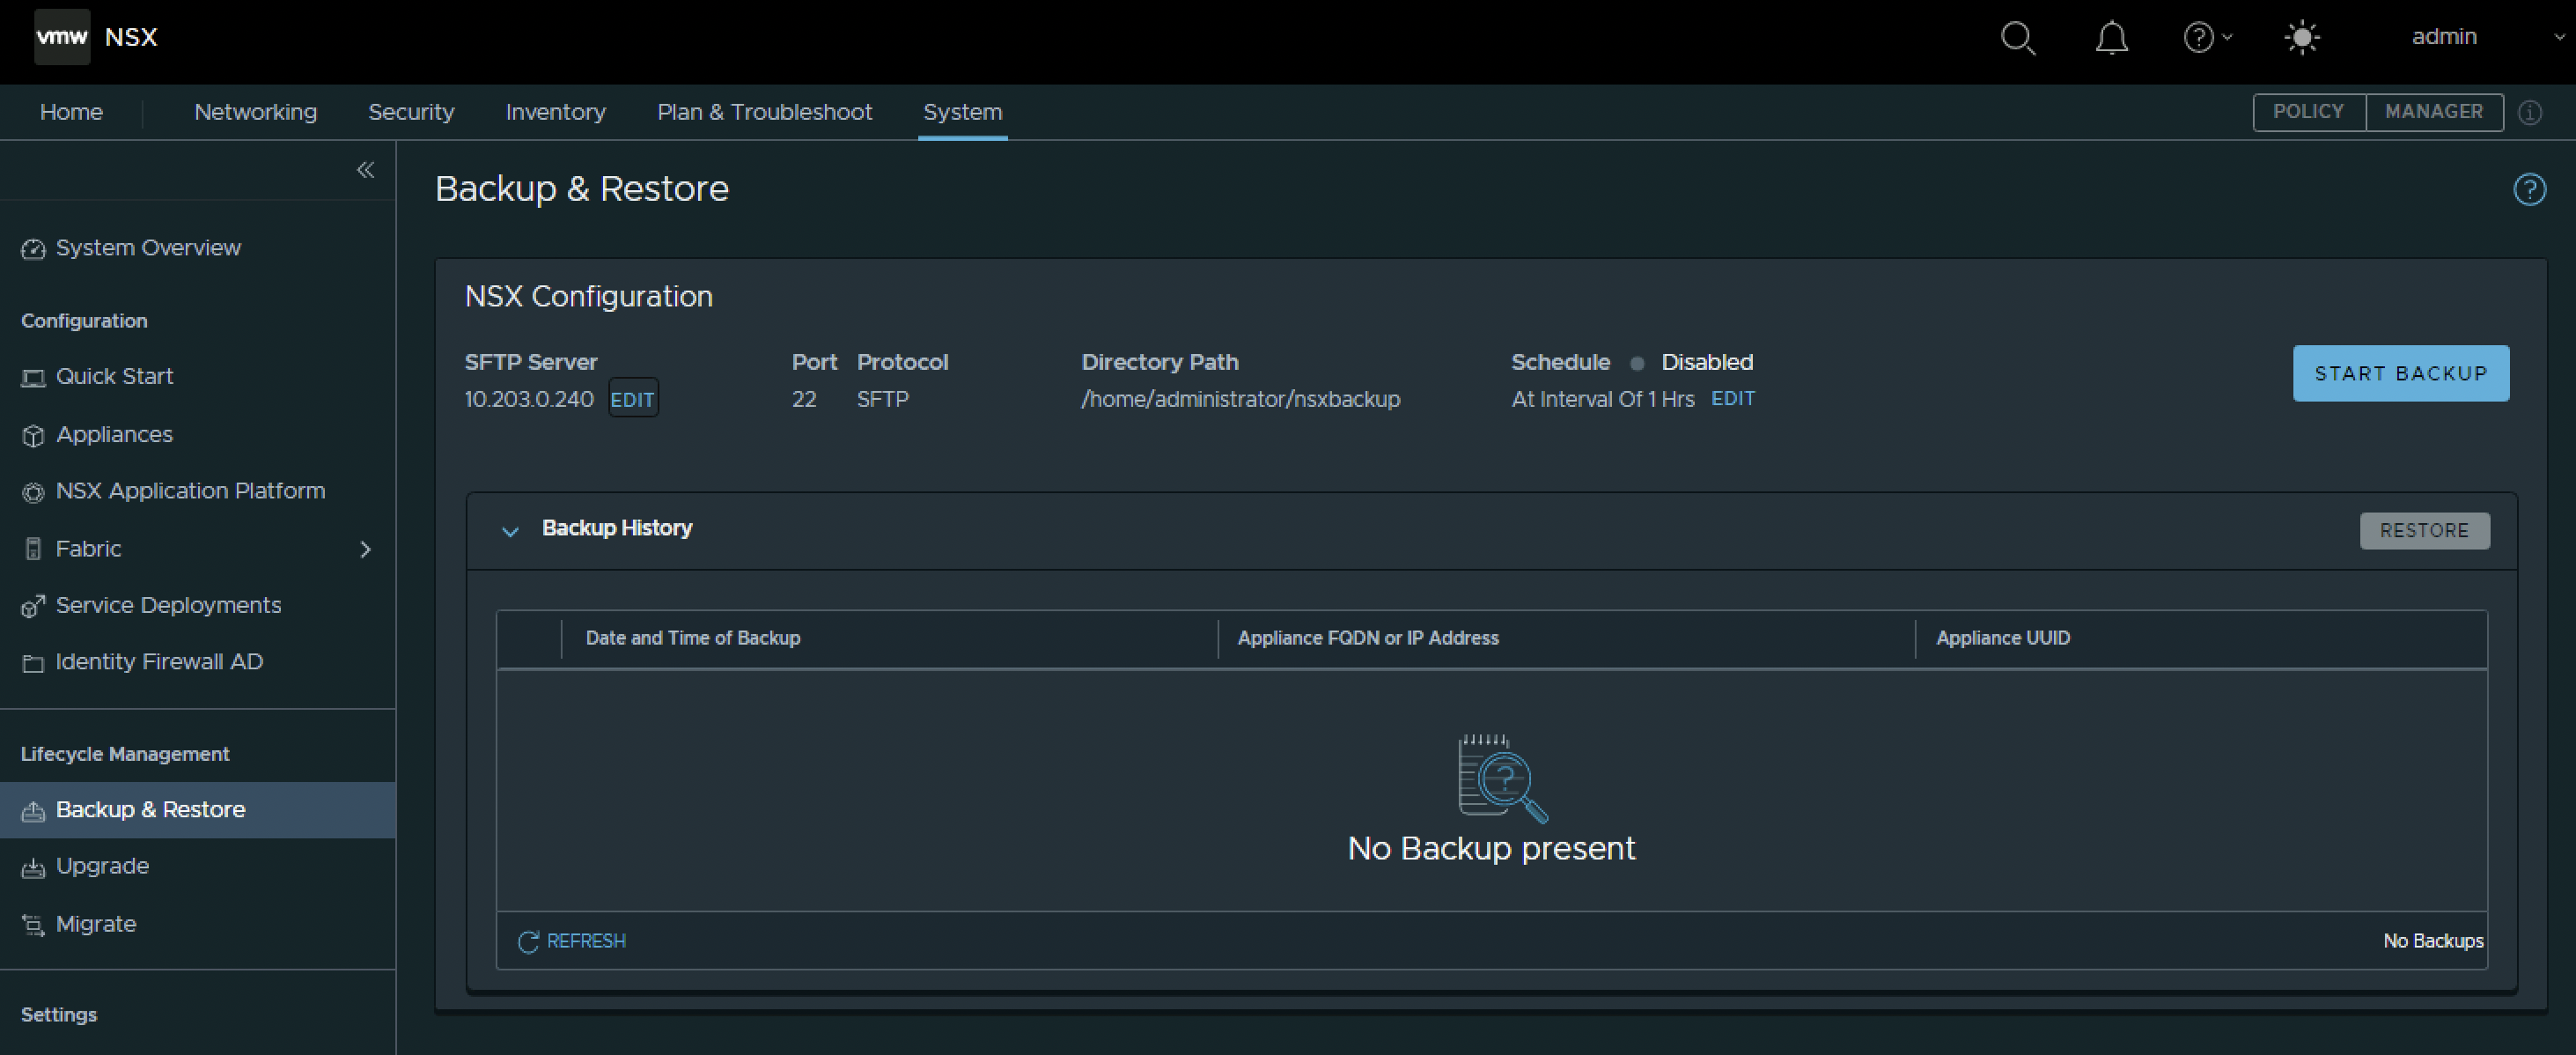
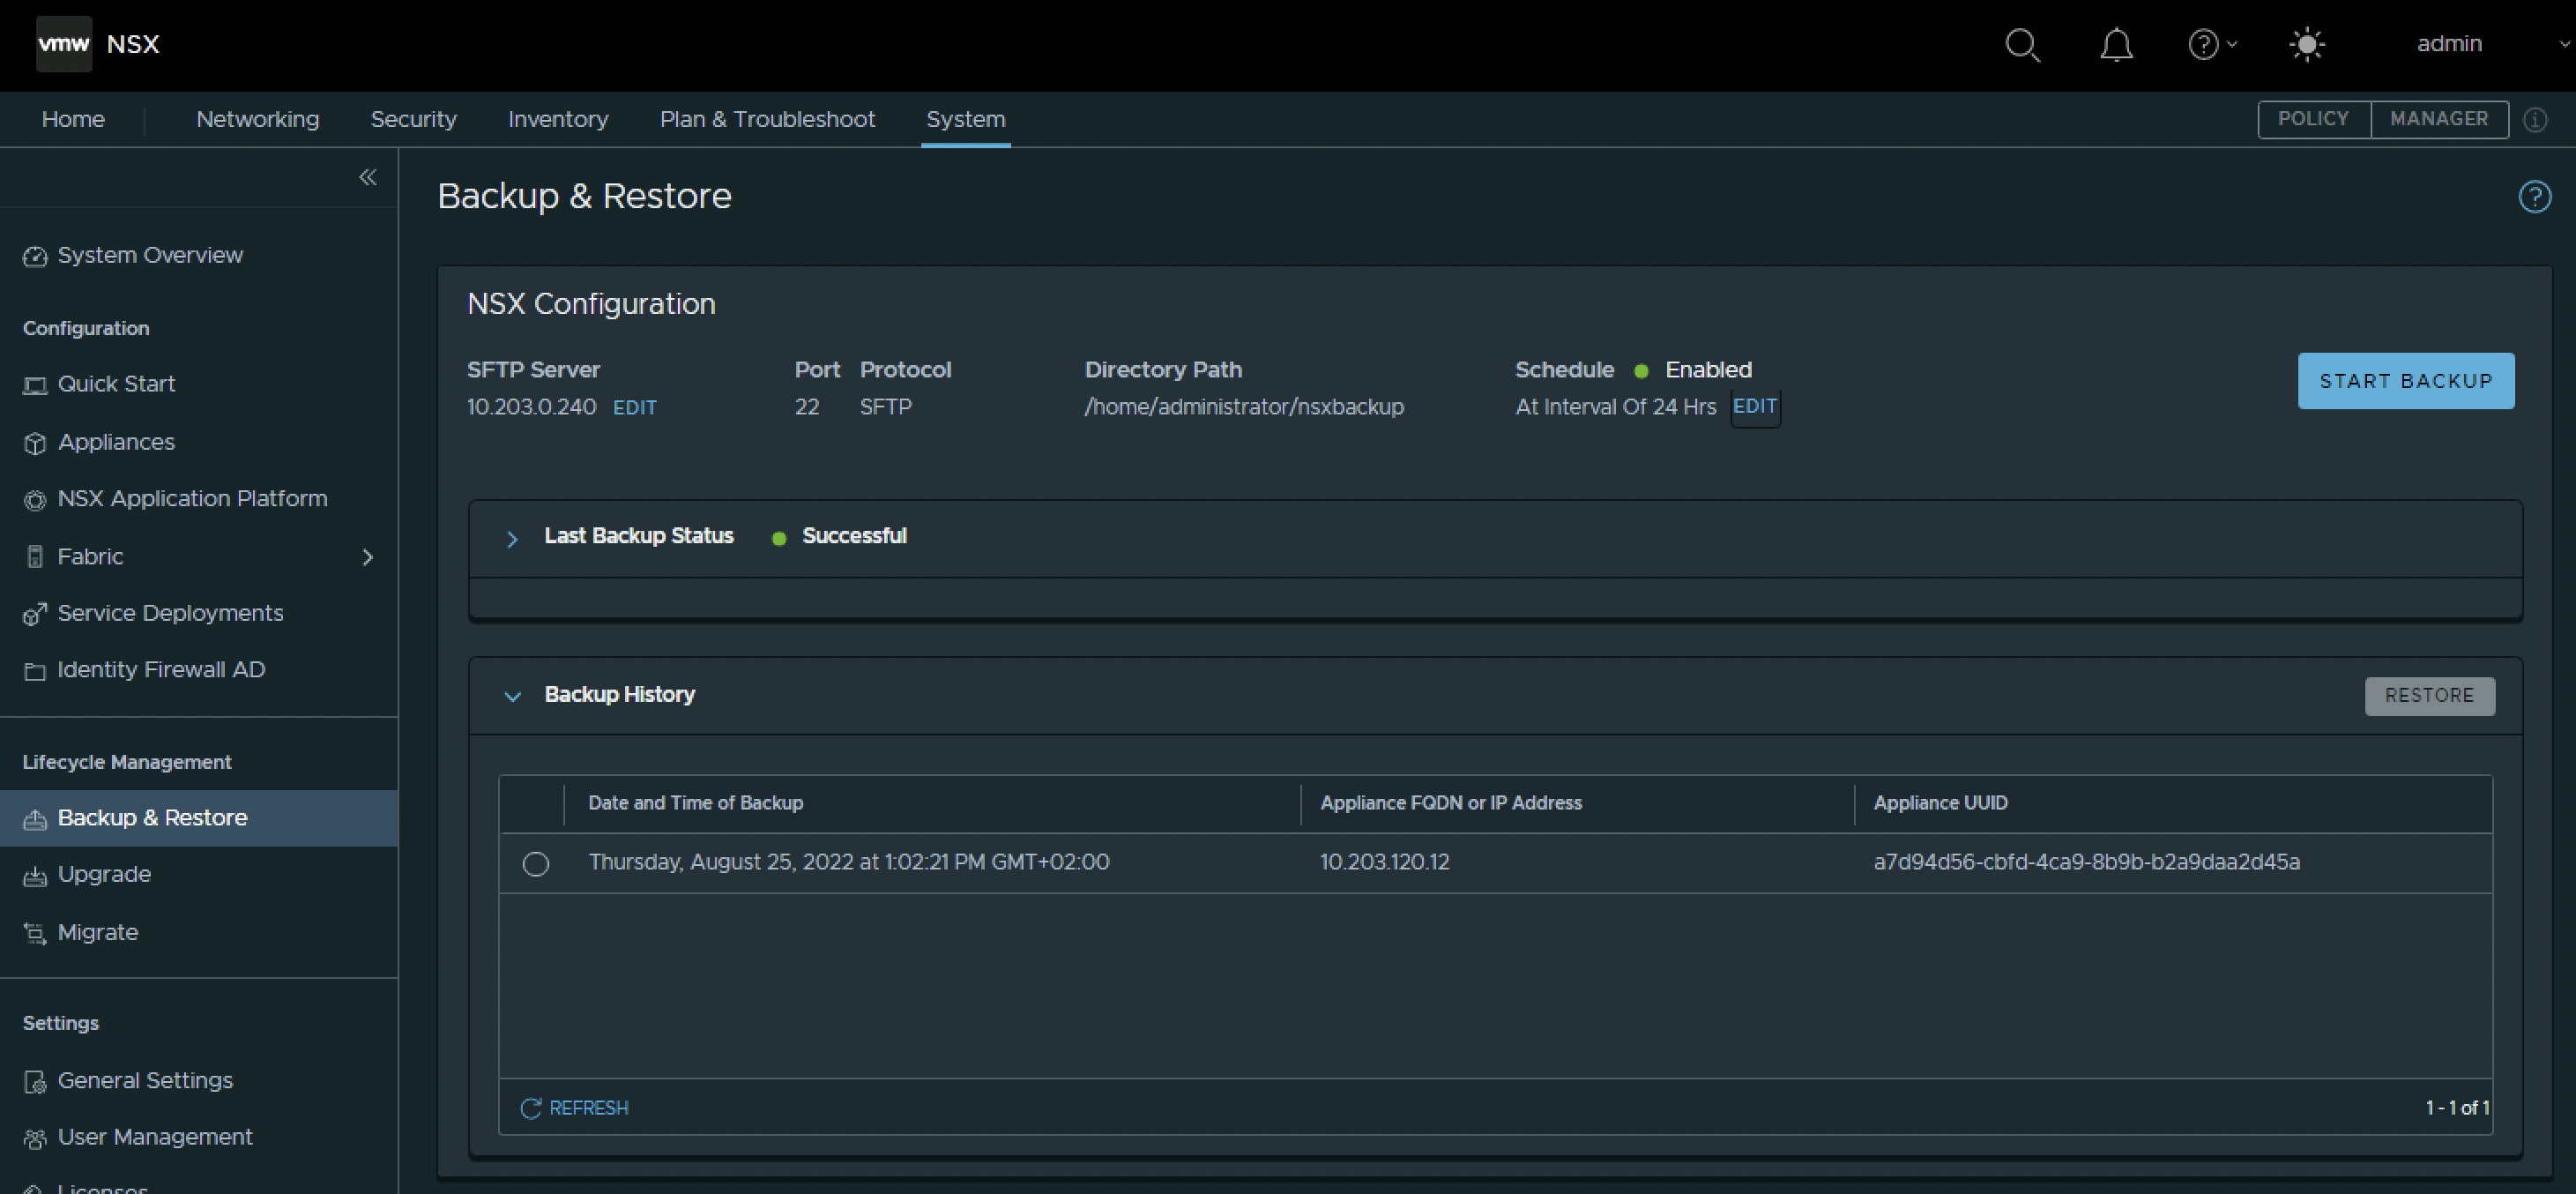
The SFTP server is now configured. Notice the IP address under the SFTP label. Click on “Start Backup” to start my first backup.
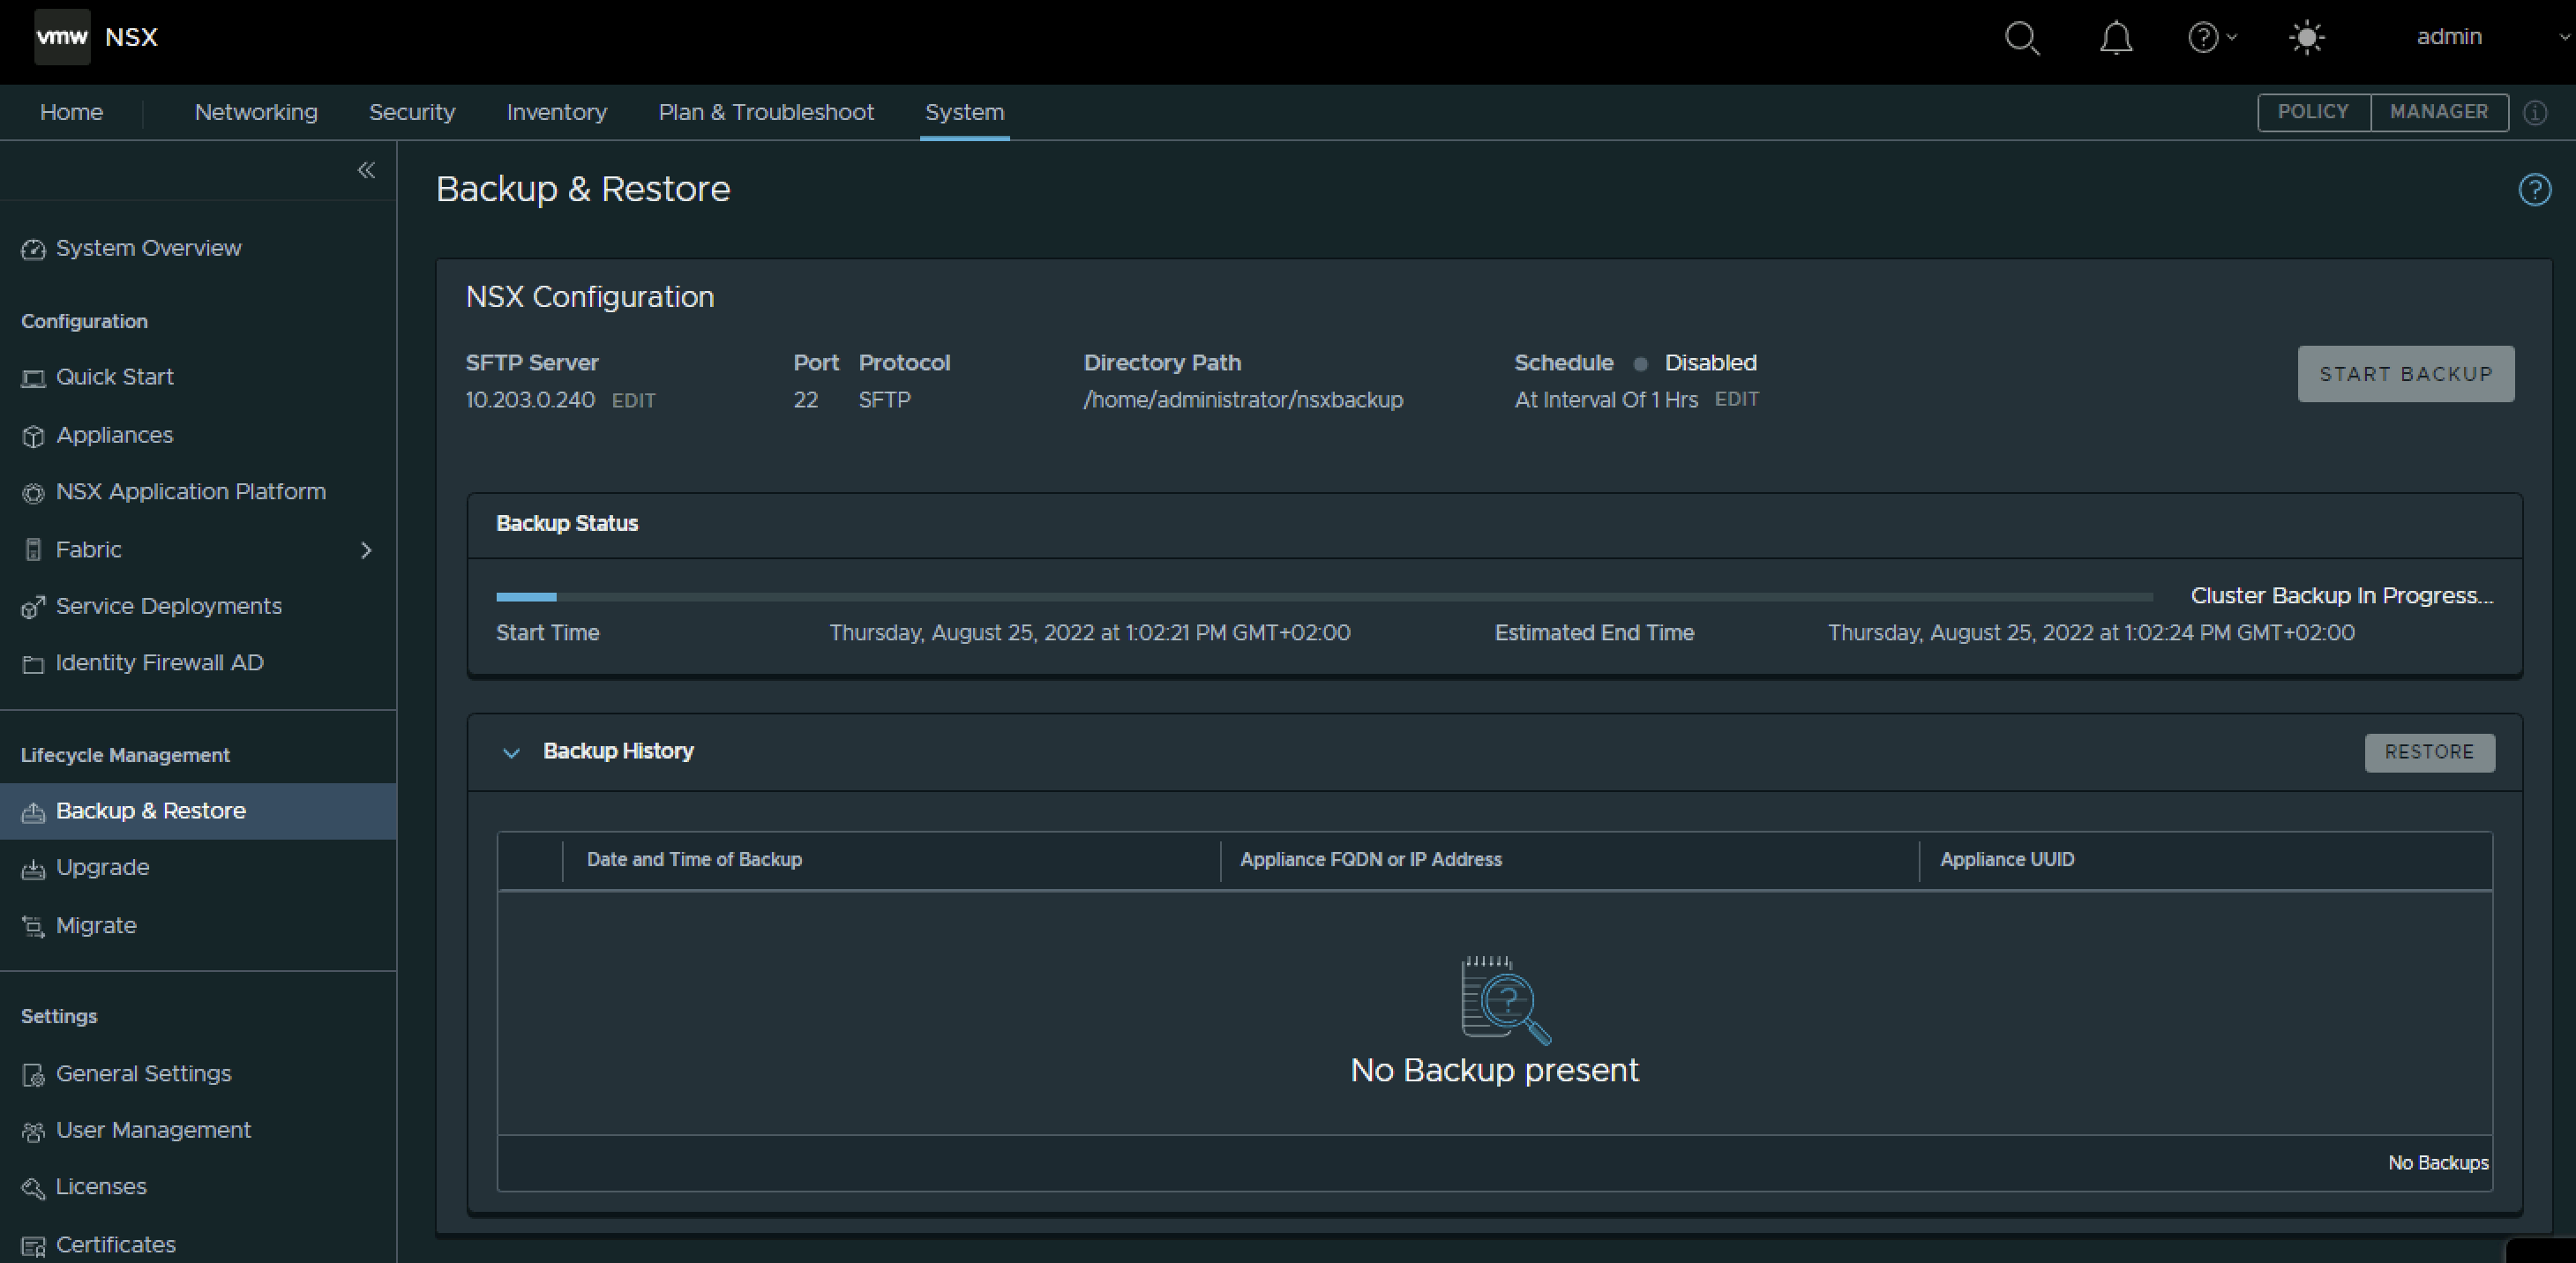
After the backup has started I can keep track by looking at the “Backup Status” bar.
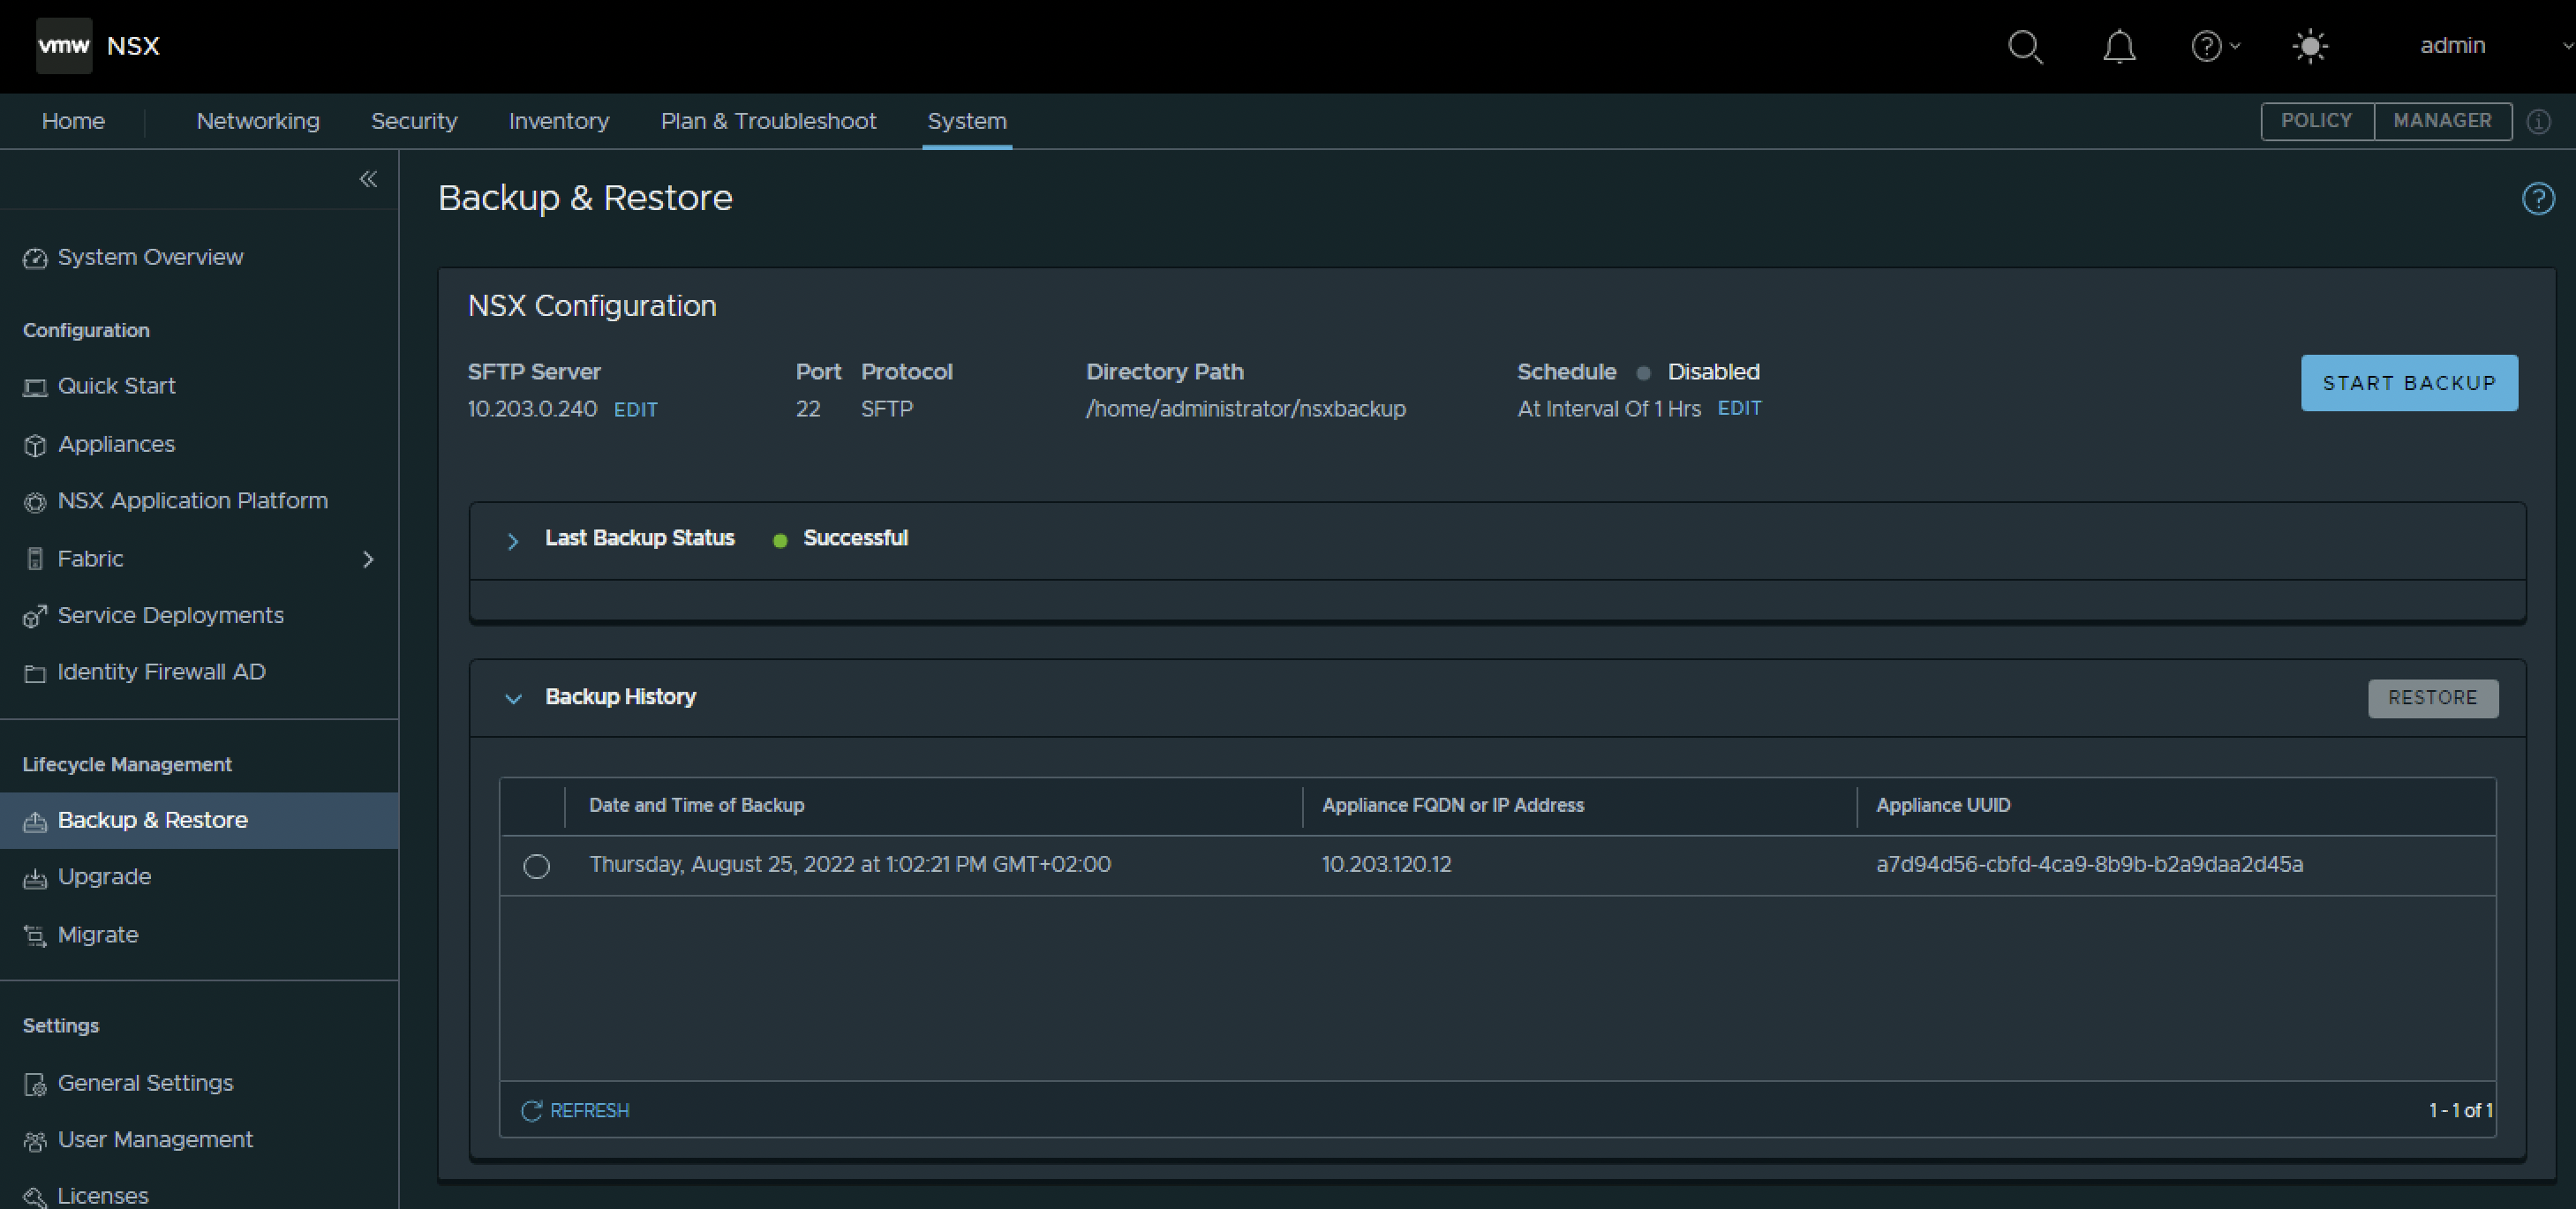
When the backup is finished I see the backup in the “Backup History” section.
I can also verify if the backup is done properly by logging into the SFTP server and verify if the folders and files are there.
administrator@step-lin:~/nsxbackup$ pwd
/home/administrator/nsxbackup

administrator@step-lin:~/nsxbackup$ ls -l
total 4
drwxrwxr-x 3 administrator administrator 4096 Aug 25 11:02 cluster-node-backups

administrator@step-lin:~/nsxbackup$ cd cluster-node-backups/

administrator@step-lin:~/nsxbackup/cluster-node-backups$ ls -l
total 4
drwxrwxr-x 3 administrator administrator 4096 Aug 25 11:02 4.0.0.1.0.20159694-a7d94d56-cbfd-4ca9-8b9b-b2a9daa2d45a-10.203.120.12

administrator@step-lin:~/nsxbackup/cluster-node-backups$ cd 4.0.0.1.0.20159694-a7d94d56-cbfd-4ca9-8b9b-b2a9daa2d45a-10.203.120.12/

administrator@step-lin:~/nsxbackup/cluster-node-backups/4.0.0.1.0.20159694-a7d94d56-cbfd-4ca9-8b9b-b2a9daa2d45a-10.203.120.12$ ls -l
total 4
drwxrwxr-x 2 administrator administrator 4096 Aug 25 11:03 backup-2022-08-25T11_02_21UTC

administrator@step-lin:~/nsxbackup/cluster-node-backups/4.0.0.1.0.20159694-a7d94d56-cbfd-4ca9-8b9b-b2a9daa2d45a-10.203.120.12$ cd backup-2022-08-25T11_02_21UTC/

administrator@step-lin:~/nsxbackup/cluster-node-backups/4.0.0.1.0.20159694-a7d94d56-cbfd-4ca9-8b9b-b2a9daa2d45a-10.203.120.12/backup-2022-08-25T11_02_21UTC$ ls -l
total 21584
-r-------- 1 administrator administrator 21207040 Aug 25 11:02 cluster_backup-a7d94d56-cbfd-4ca9-8b9b-b2a9daa2d45a-10.203.120.12-nsx-ufo-backup-restore.tar
-r-------- 1 administrator administrator   890880 Aug 25 11:03 node_backup-a7d94d56-cbfd-4ca9-8b9b-b2a9daa2d45a-10.203.120.12.tar
administrator@step-lin:~/nsxbackup/cluster-node-backups/4.0.0.1.0.20159694-a7d94d56-cbfd-4ca9-8b9b-b2a9daa2d45a-10.203.120.12/backup-2022-08-25T11_02_21UTC$
⚠️ The folder and filename contains the following UUID: a7d94d56-cbfd-4ca9-8b9b-b2a9daa2d45a. This UUID is the identifier of the NSX Manager that is the “Leader” in the cluster, and the backup will be done using this leader. To determine how I can find out what the leader is click here.
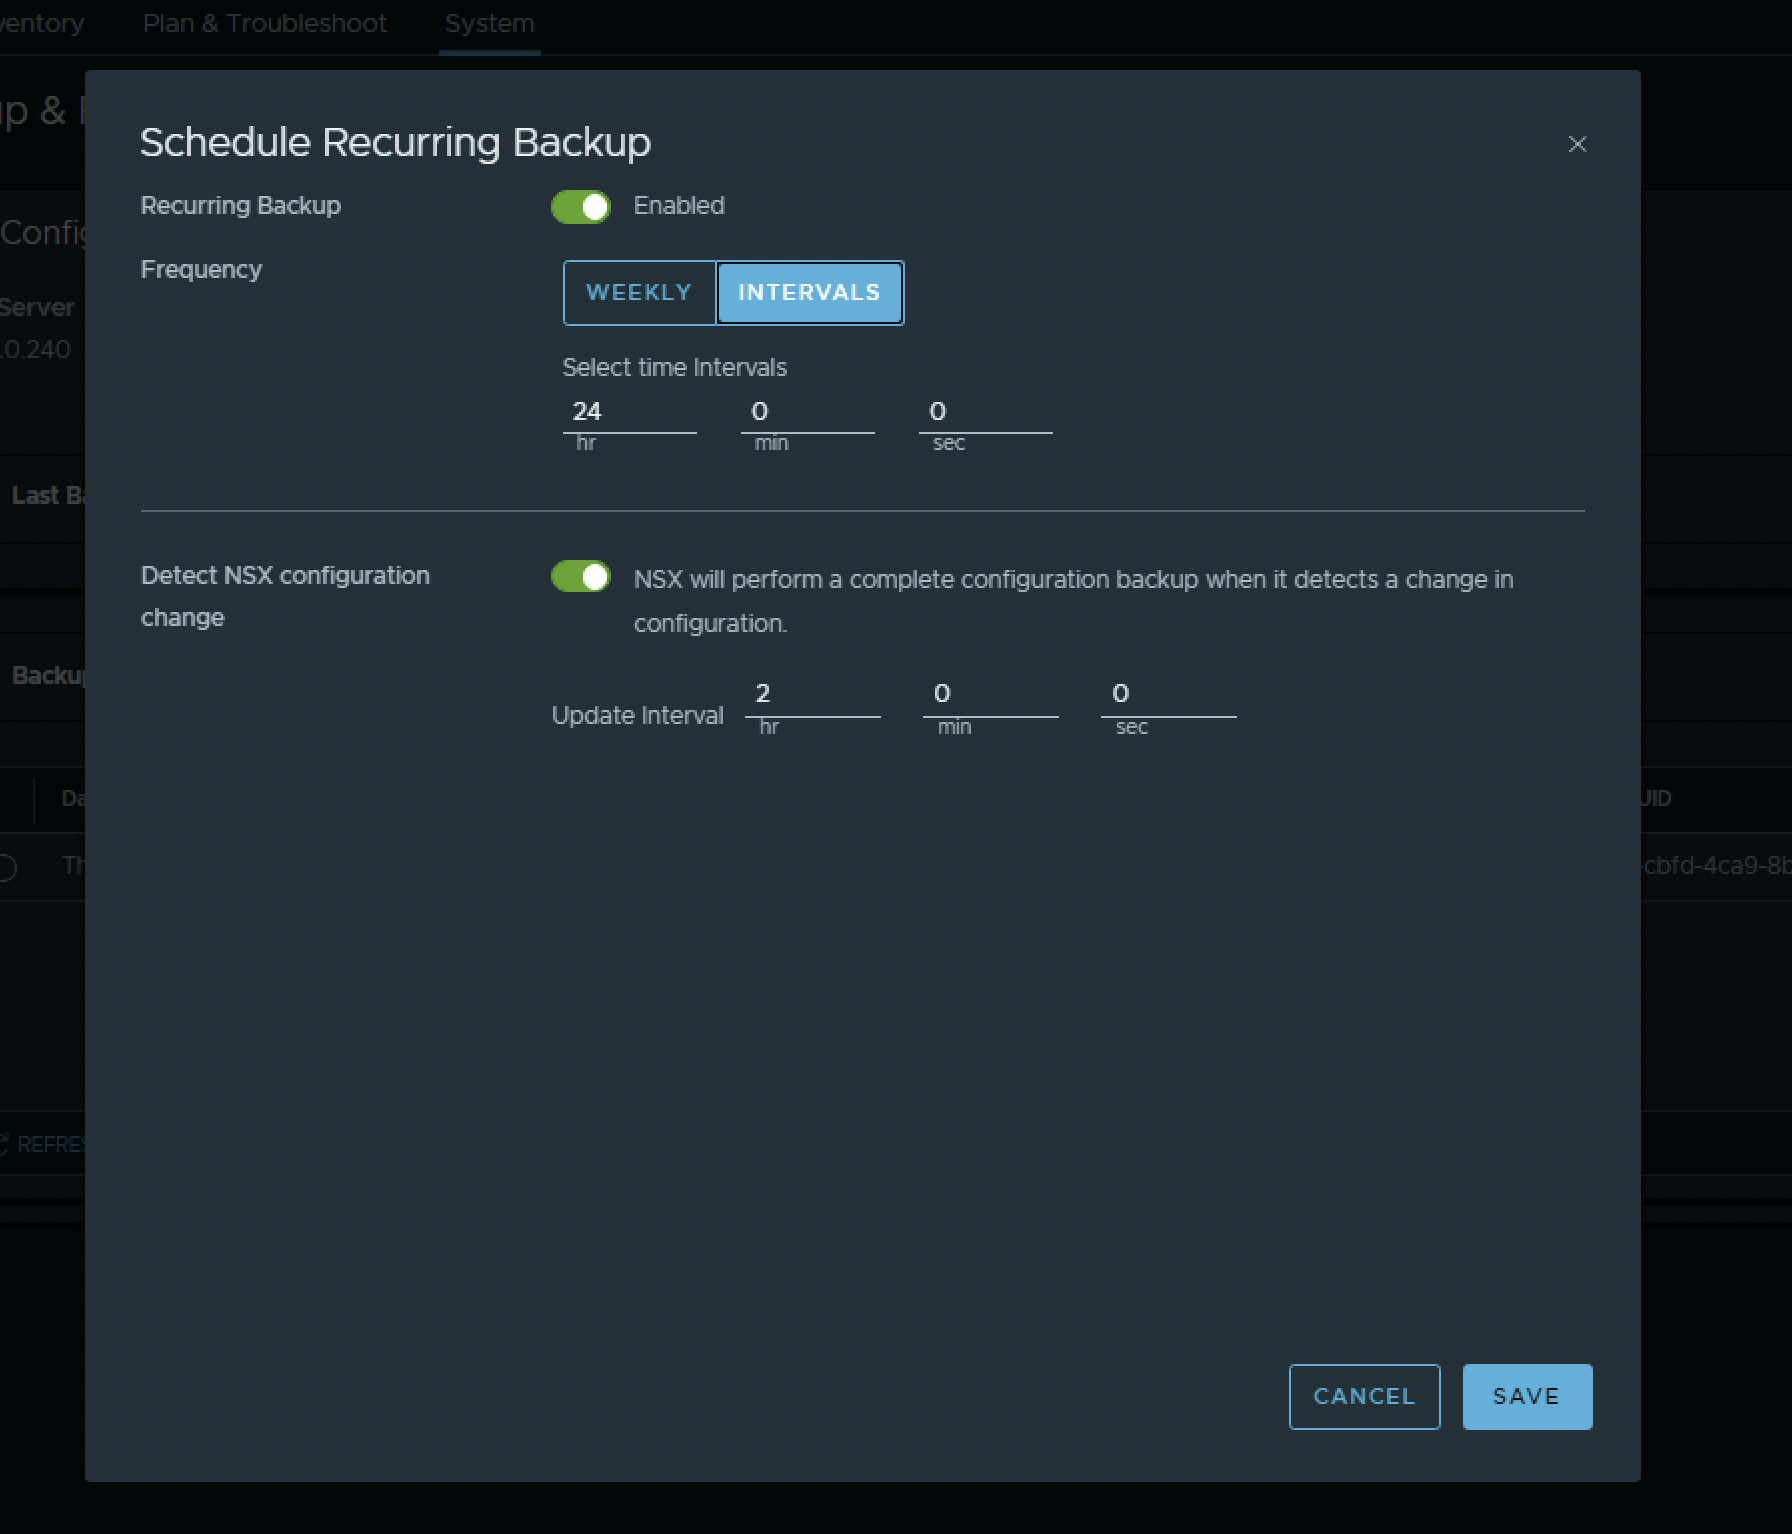
To schedule a backup to periodically automatically make backups click on “Edit” below the Schedule label.
I can schedule backups with a daily interval…
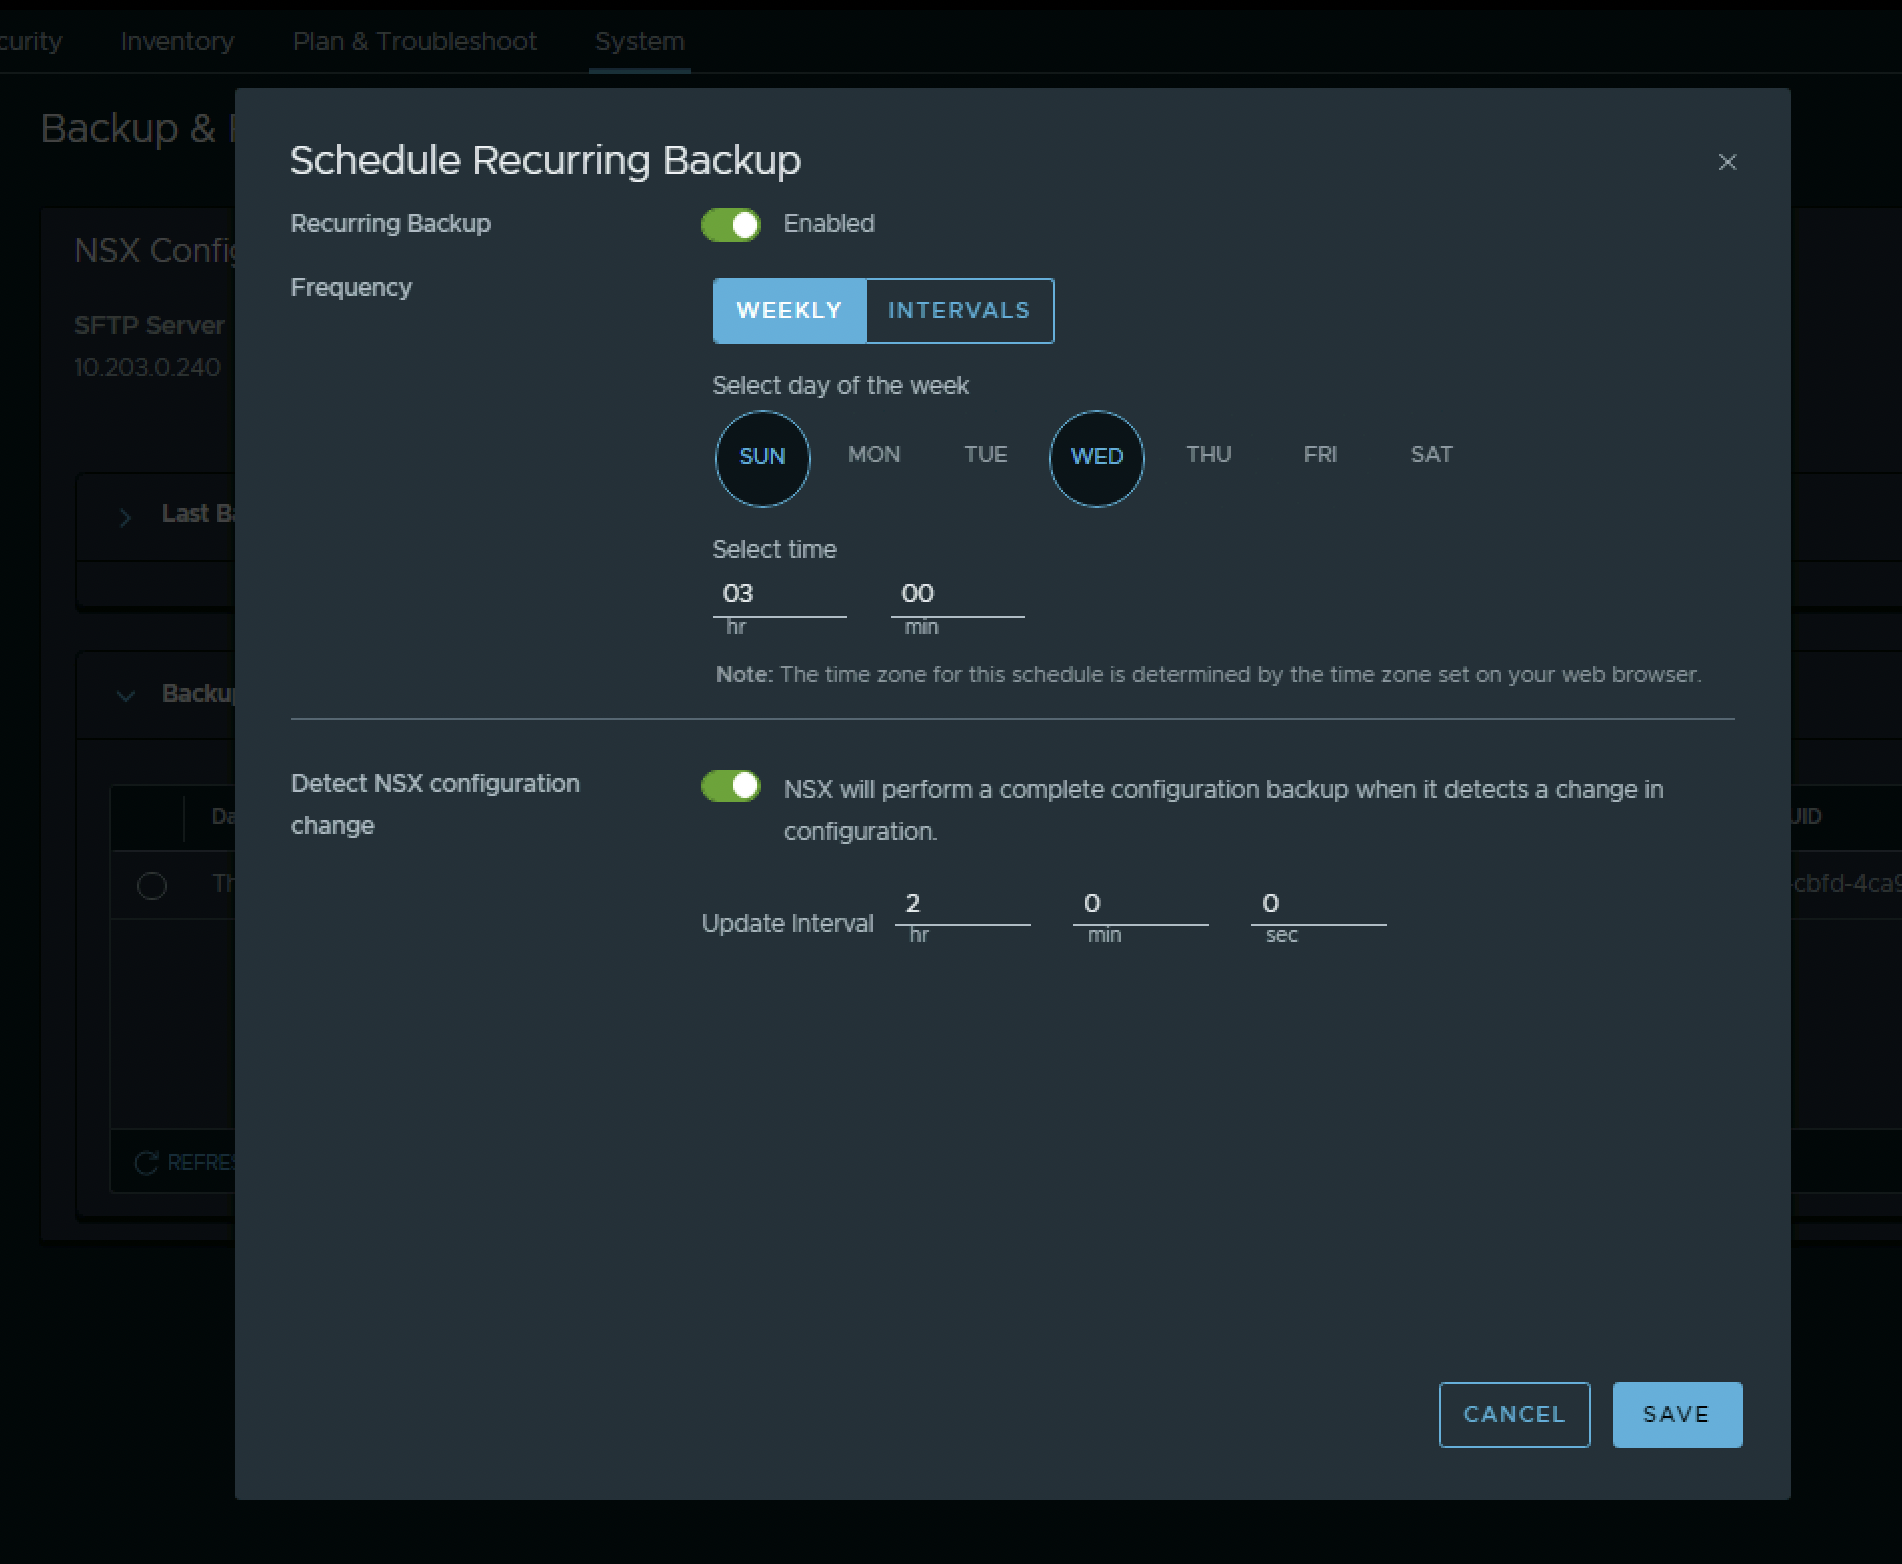
And with a weekly interval on specific days.
I want to make backups on Sundays and Wednesdays at 03:00 in the night.
I also want to automatically make a backup when a change is made. To prevent that a Backup is made every-time a change is made I want to do this with intervals of 2 hours. This means that when a change occurs one backup copy will be made every 2 hours. Click “Save”.
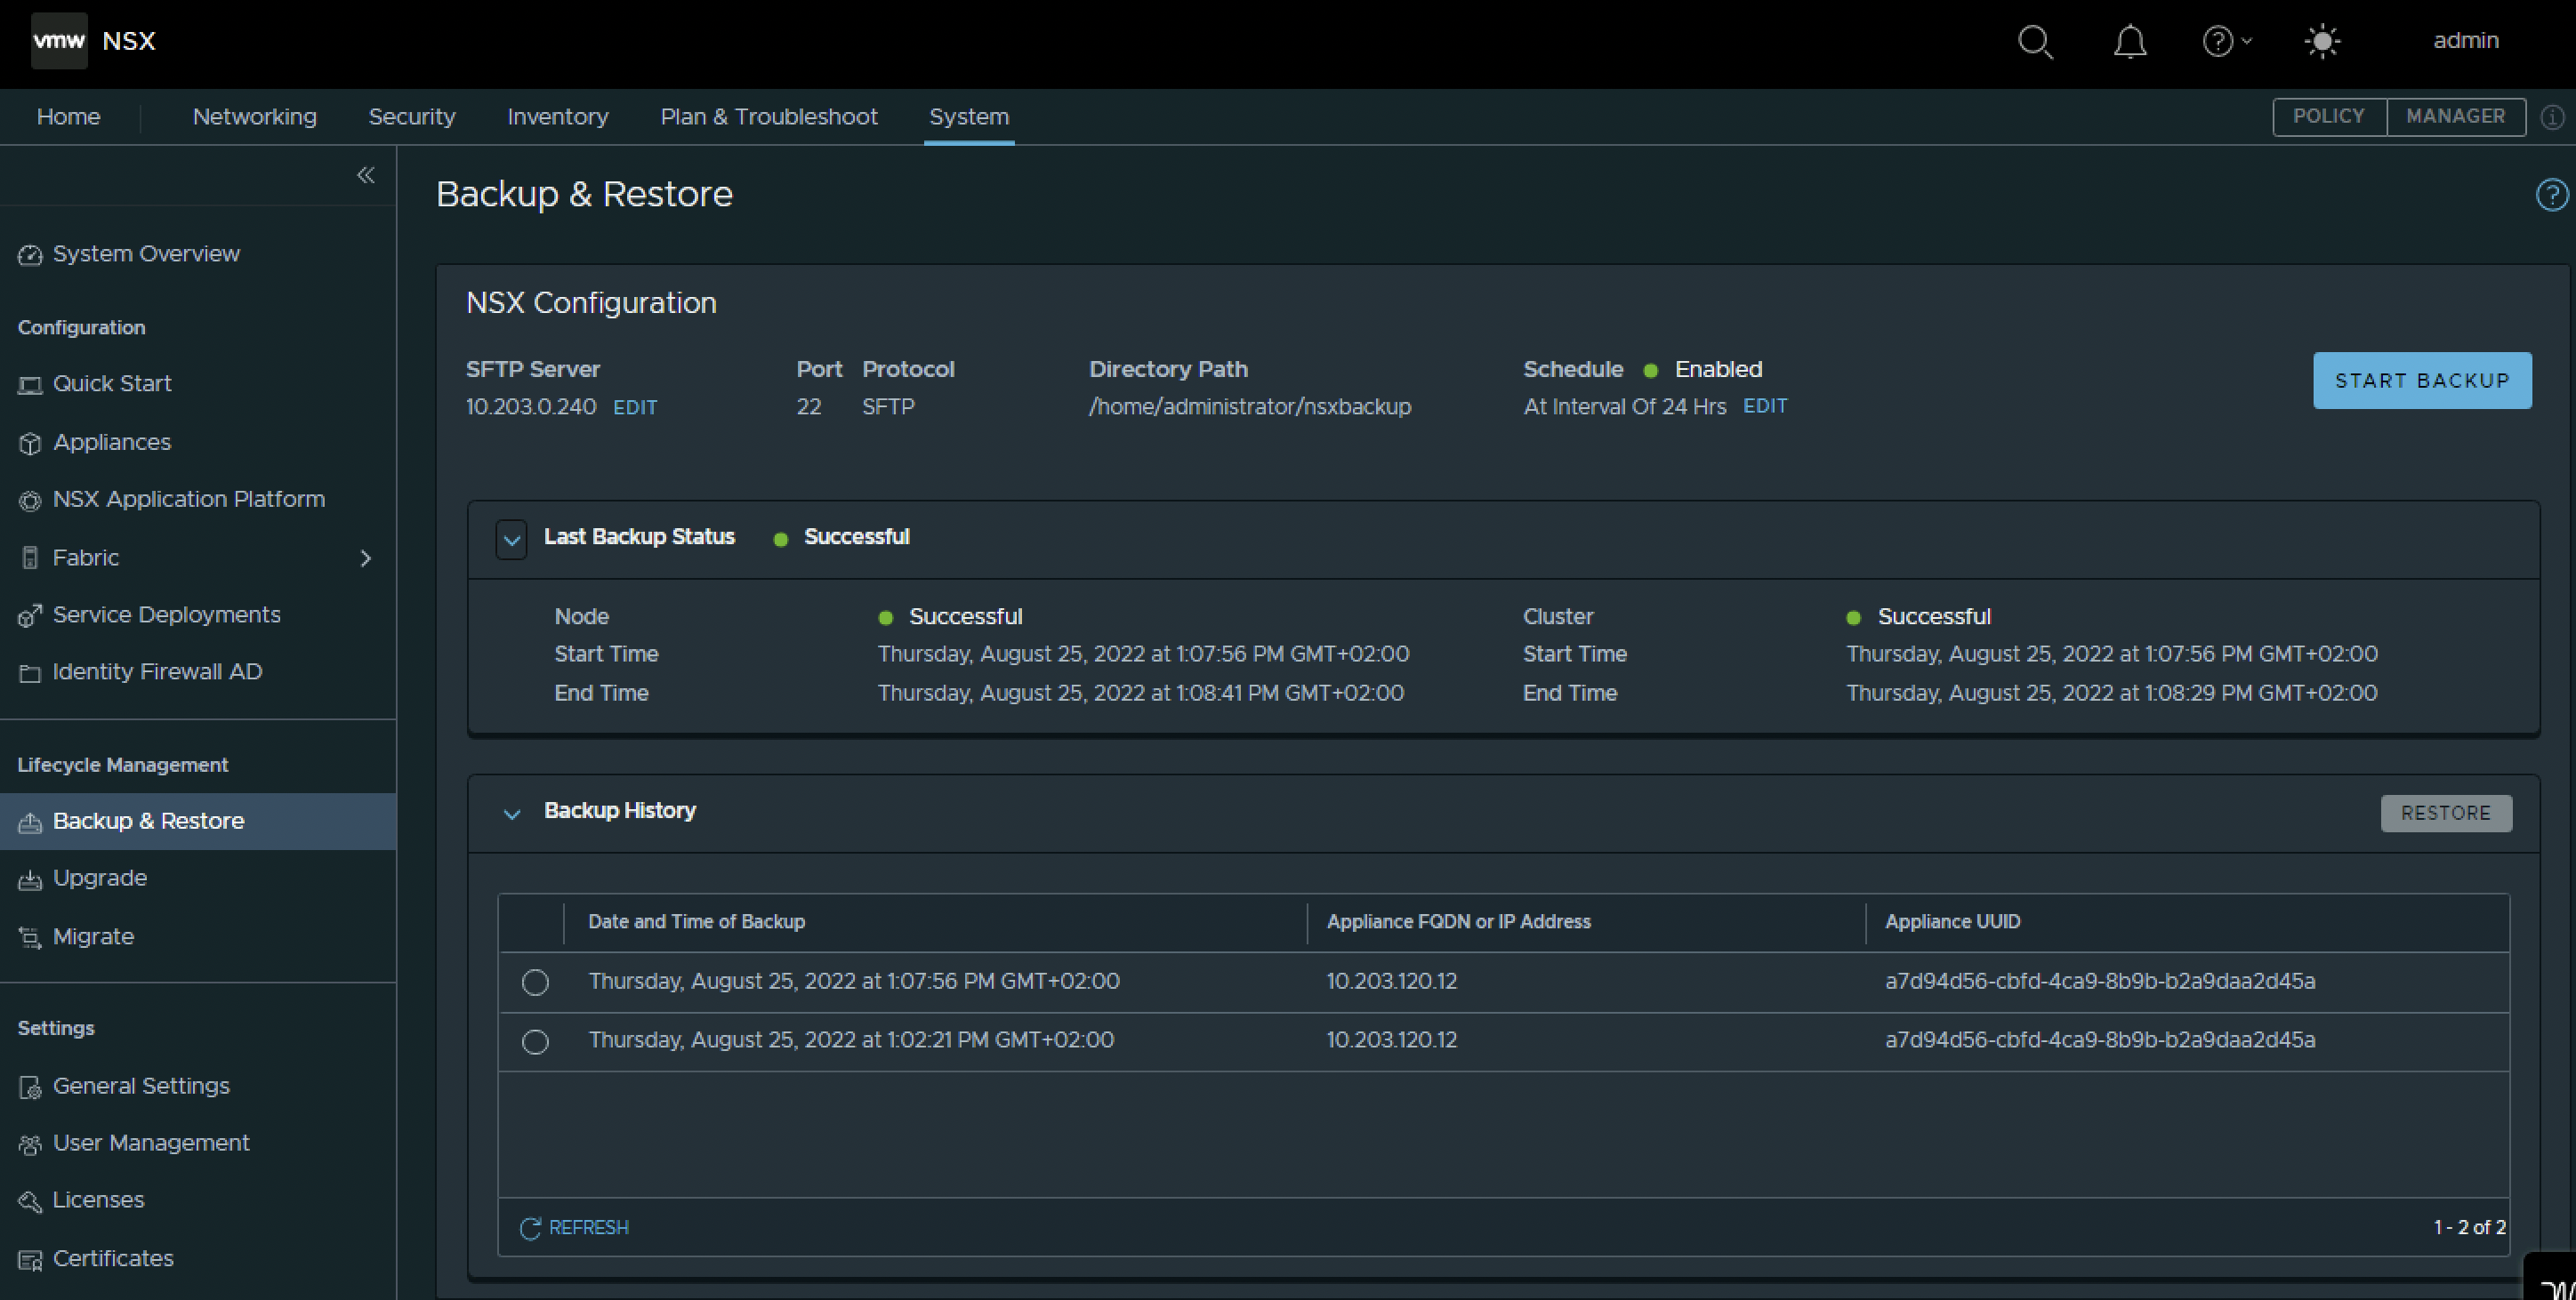
The Schedule is now configured. Notice the word “Enabled” next to the Schedule label.
The moment I clicked save a new backup was made, as a change was made. The change being scheduling the actual backup.
Continue with >> Lab: Replacing the self-signed SSL certificates with CA-signed certificates